> ## Documentation Index
> Fetch the complete documentation index at: https://docs.prowler.com/llms.txt
> Use this file to discover all available pages before exploring further.
> ## Agent Instructions
> Prowler product naming: Prowler App is now Prowler Local Server, and Prowler Enterprise is now Prowler Private Cloud. Always use the current names when answering. The full product reference is at /getting-started/products: Open Source projects are Prowler CLI, Prowler Local Server, Prowler Local Dashboard, and Prowler SDK; Prowler Products are Prowler Cloud, Prowler Private Cloud, Prowler Hub, Prowler Lighthouse AI, and Prowler MCP.
# Connect Codex / ChatGPT Desktop to Prowler MCP Server
Connect [OpenAI Codex](https://learn.chatgpt.com/docs/extend/mcp) to the Prowler Cloud MCP Server at `https://mcp.prowler.com/mcp` so Codex can query findings, inspect checks, and manage your Prowler providers.
## Which Codex Surfaces Work
Codex keeps MCP servers in one file, `~/.codex/config.toml`. You can set it up from either the **Codex / ChatGPT desktop app** or the **Codex CLI** — both write to that same file, so pick whichever you already use.
| Surface | Set it up here | Notes |
| -------------------------------------------------------------------------------------- | -------------- | ----------------------------------------------------- |
| **[Codex / ChatGPT desktop app](https://learn.chatgpt.com/docs/app)** (macOS, Windows) | ✅ Yes | **Settings → MCP servers** |
| **Codex CLI** (terminal) | ✅ Yes | `codex mcp` commands |
| **Codex IDE extension** (VS Code) | Inherits | Works automatically once the app or CLI is configured |
| **ChatGPT on the web** | ❌ No | Does not read local Codex configuration |
**Codex and ChatGPT share one desktop app.** Since July 2026 the standalone Codex app and the ChatGPT desktop app are the same application: Codex is a dedicated coding surface inside it, alongside Chat and Work. If you already had the Codex app, updating turns it into the new ChatGPT desktop app and it still opens in Codex. Either way, this guide applies.
Not to be confused with **ChatGPT Classic**, the name given to the previous-generation ChatGPT desktop app.
**Configure once, use everywhere.** The Codex documentation states that the ChatGPT desktop app, Codex CLI, and IDE extension "share this configuration. Once you configure your MCP servers, you can switch among those clients without redoing setup." Set the server up in the app or the CLI and the IDE extension picks it up with no extra work.
## Prerequisites
* **The Codex / ChatGPT desktop app, or Codex CLI 0.46.0 or later.** Remote MCP servers over streamable HTTP were added to the CLI in 0.46.0 — check with `codex --version` and upgrade if needed.
* **A Prowler Cloud account.** The free tier is enough to start. Sign up at [cloud.prowler.com](https://cloud.prowler.com).
## Step 1: Get Your Prowler API Key
Create an API key in Prowler Cloud and copy it. The key begins with `pk_` and is shown only once. Check the [API Keys](/user-guide/tutorials/prowler-app-api-keys#creating-api-keys) guide for details.
## Step 2: Add the Prowler MCP Server
The Prowler MCP Server needs two request headers: `Authorization` to authenticate you, and `User-Agent` because Codex does not send one by default.
Each tab below is a complete setup — follow the one that matches the surface you use.
1. Open **Settings** and select **Plugins → MCPs**
2. Click **Add server**
3. Enter `prowler` as the name and choose type **Streamable HTTP**
4. Enter the URL `https://mcp.prowler.com/mcp`
5. Add two headers:
| Header | Value |
| --------------- | ----------------------------- |
| `Authorization` | `Bearer pk_your_api_key_here` |
| `User-Agent` | `codex` |
6. Save the server
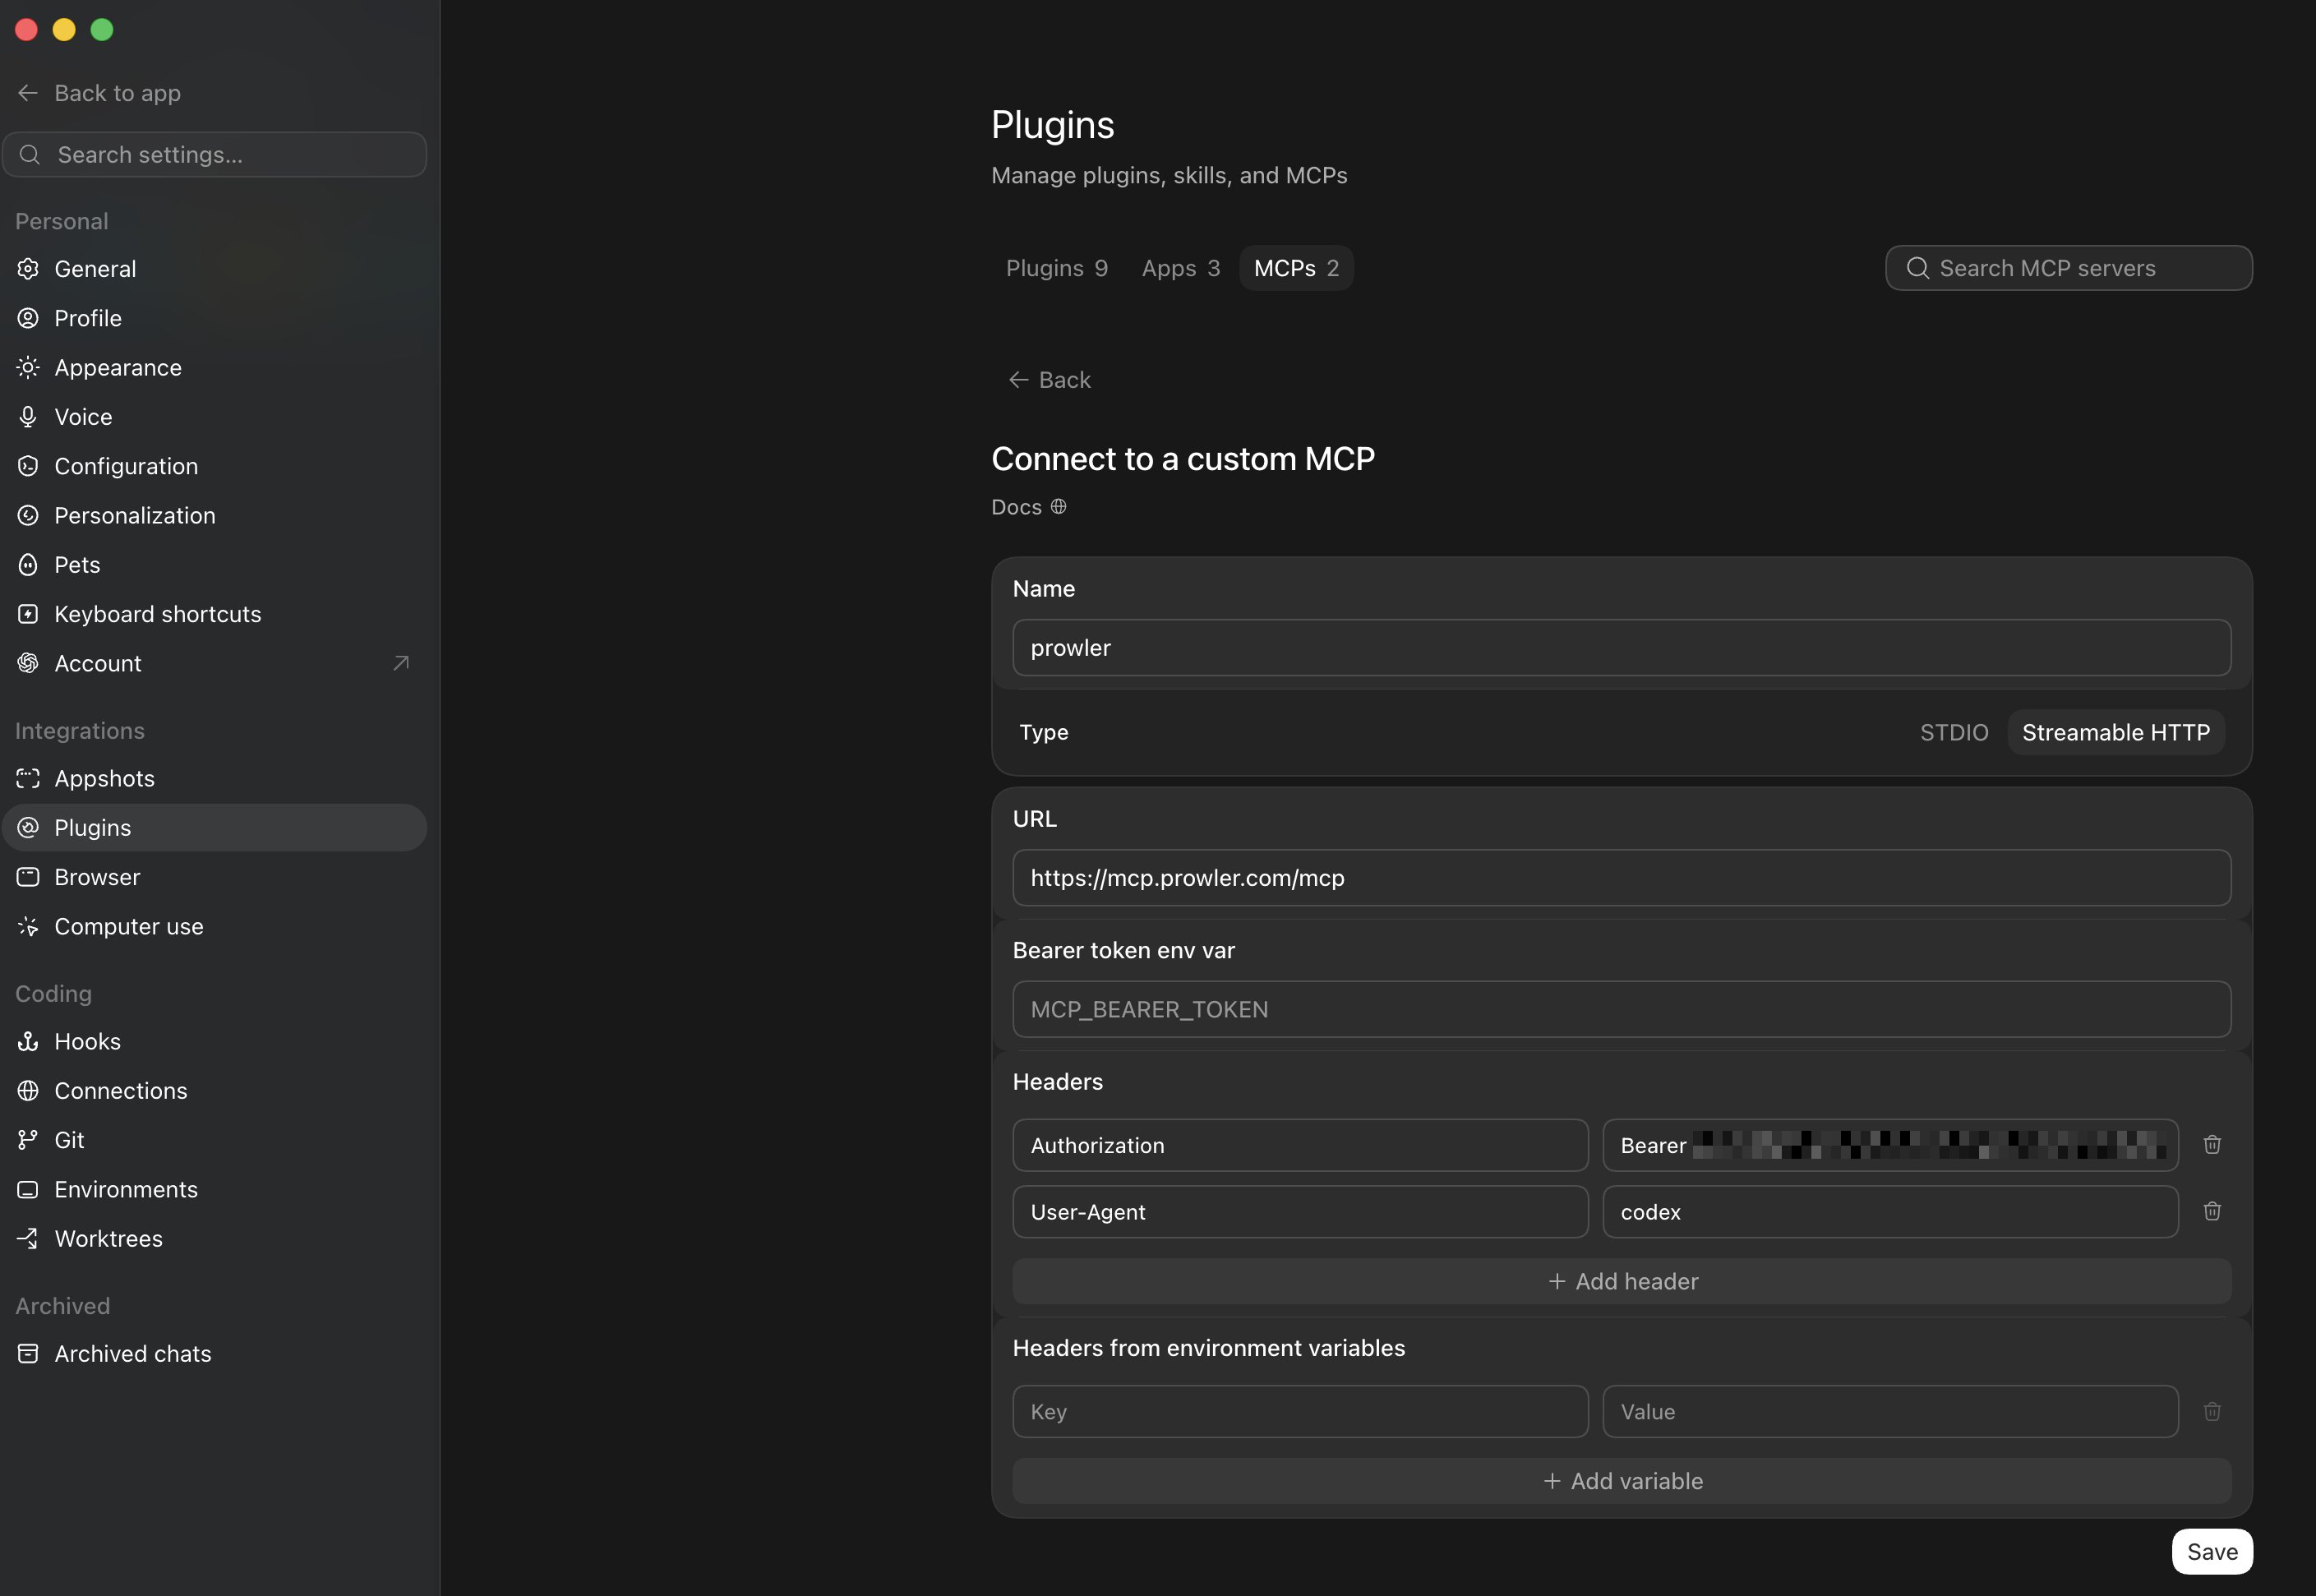 **Enter the key directly here rather than using an environment variable.** Codex can read credentials from an environment variable, but desktop applications do not reliably inherit variables exported in a shell profile — on macOS an app launched from Finder or the Dock typically sees none of them. Pasting the key into the dialog is the approach that works consistently in the app.
**This stores your API key in plain text** in `~/.codex/config.toml`. Treat that file accordingly: exclude it from dotfile repositories and config sync, and create the key from an account with the minimum permissions you need so its exposure is limited. Revoke and re-issue the key in Prowler Cloud if the file is ever shared.
Register the server:
```bash theme={null}
codex mcp add prowler --url https://mcp.prowler.com/mcp
```
Codex confirms with `Added global MCP server 'prowler'.`
Then add both headers by hand, since `codex mcp add` has no flag for headers. Open `~/.codex/config.toml` and complete the entry:
```toml theme={null}
[mcp_servers.prowler]
url = "https://mcp.prowler.com/mcp"
http_headers = { Authorization = "Bearer pk_your_api_key_here", "User-Agent" = "codex" }
```
**Write the key literally rather than using an environment variable.** This is the form that works across every Codex surface. All of them read this same file, but only the CLI reliably sees variables exported in your shell profile — see the warning below.
**This stores your API key in plain text** in `~/.codex/config.toml`. Treat that file accordingly: exclude it from dotfile repositories and config sync, and create the key from an account with the minimum permissions you need so its exposure is limited. Revoke and re-issue the key in Prowler Cloud if the file is ever shared.
Restart Codex once you are done.
**Local server:** Replace the URL with your own HTTP endpoint. Everything else stays the same.
## Step 3: Verify the Connection
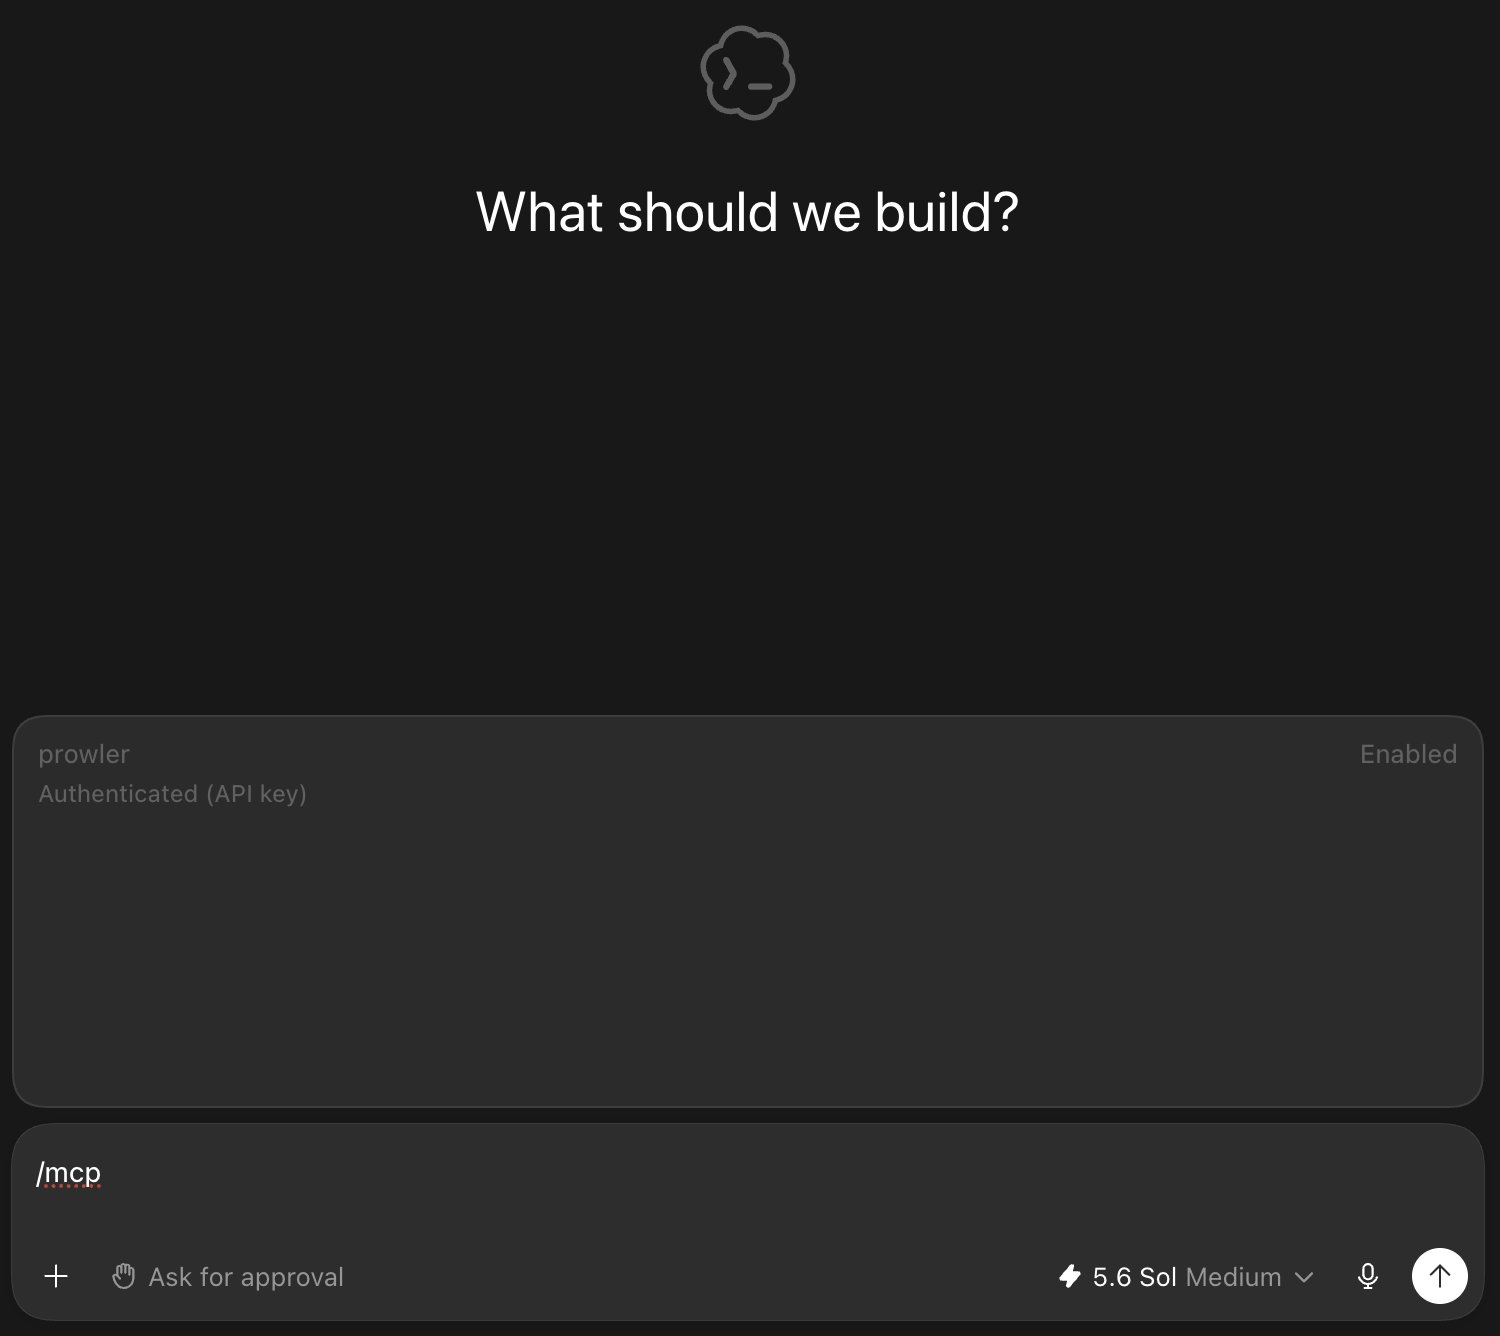
Run `/mcp` in the app or in a CLI session to list connected servers and their tools.
**Enter the key directly here rather than using an environment variable.** Codex can read credentials from an environment variable, but desktop applications do not reliably inherit variables exported in a shell profile — on macOS an app launched from Finder or the Dock typically sees none of them. Pasting the key into the dialog is the approach that works consistently in the app.
**This stores your API key in plain text** in `~/.codex/config.toml`. Treat that file accordingly: exclude it from dotfile repositories and config sync, and create the key from an account with the minimum permissions you need so its exposure is limited. Revoke and re-issue the key in Prowler Cloud if the file is ever shared.
Register the server:
```bash theme={null}
codex mcp add prowler --url https://mcp.prowler.com/mcp
```
Codex confirms with `Added global MCP server 'prowler'.`
Then add both headers by hand, since `codex mcp add` has no flag for headers. Open `~/.codex/config.toml` and complete the entry:
```toml theme={null}
[mcp_servers.prowler]
url = "https://mcp.prowler.com/mcp"
http_headers = { Authorization = "Bearer pk_your_api_key_here", "User-Agent" = "codex" }
```
**Write the key literally rather than using an environment variable.** This is the form that works across every Codex surface. All of them read this same file, but only the CLI reliably sees variables exported in your shell profile — see the warning below.
**This stores your API key in plain text** in `~/.codex/config.toml`. Treat that file accordingly: exclude it from dotfile repositories and config sync, and create the key from an account with the minimum permissions you need so its exposure is limited. Revoke and re-issue the key in Prowler Cloud if the file is ever shared.
Restart Codex once you are done.
**Local server:** Replace the URL with your own HTTP endpoint. Everything else stays the same.
## Step 3: Verify the Connection
Run `/mcp` in the app or in a CLI session to list connected servers and their tools.
 From the CLI you can also inspect the stored entry directly:
```bash theme={null}
codex mcp list # one row per server, with status and auth
codex mcp get prowler # full entry, header values masked
```
**Verify rather than assume.** Codex silently ignores unrecognized keys in `config.toml` — a misspelled key name produces no error at all, and the server simply never receives your credentials. Always confirm with `codex mcp get prowler` after editing the file by hand.
## Step 4: Start Using Prowler MCP
Ask Codex questions that use the Prowler tools:
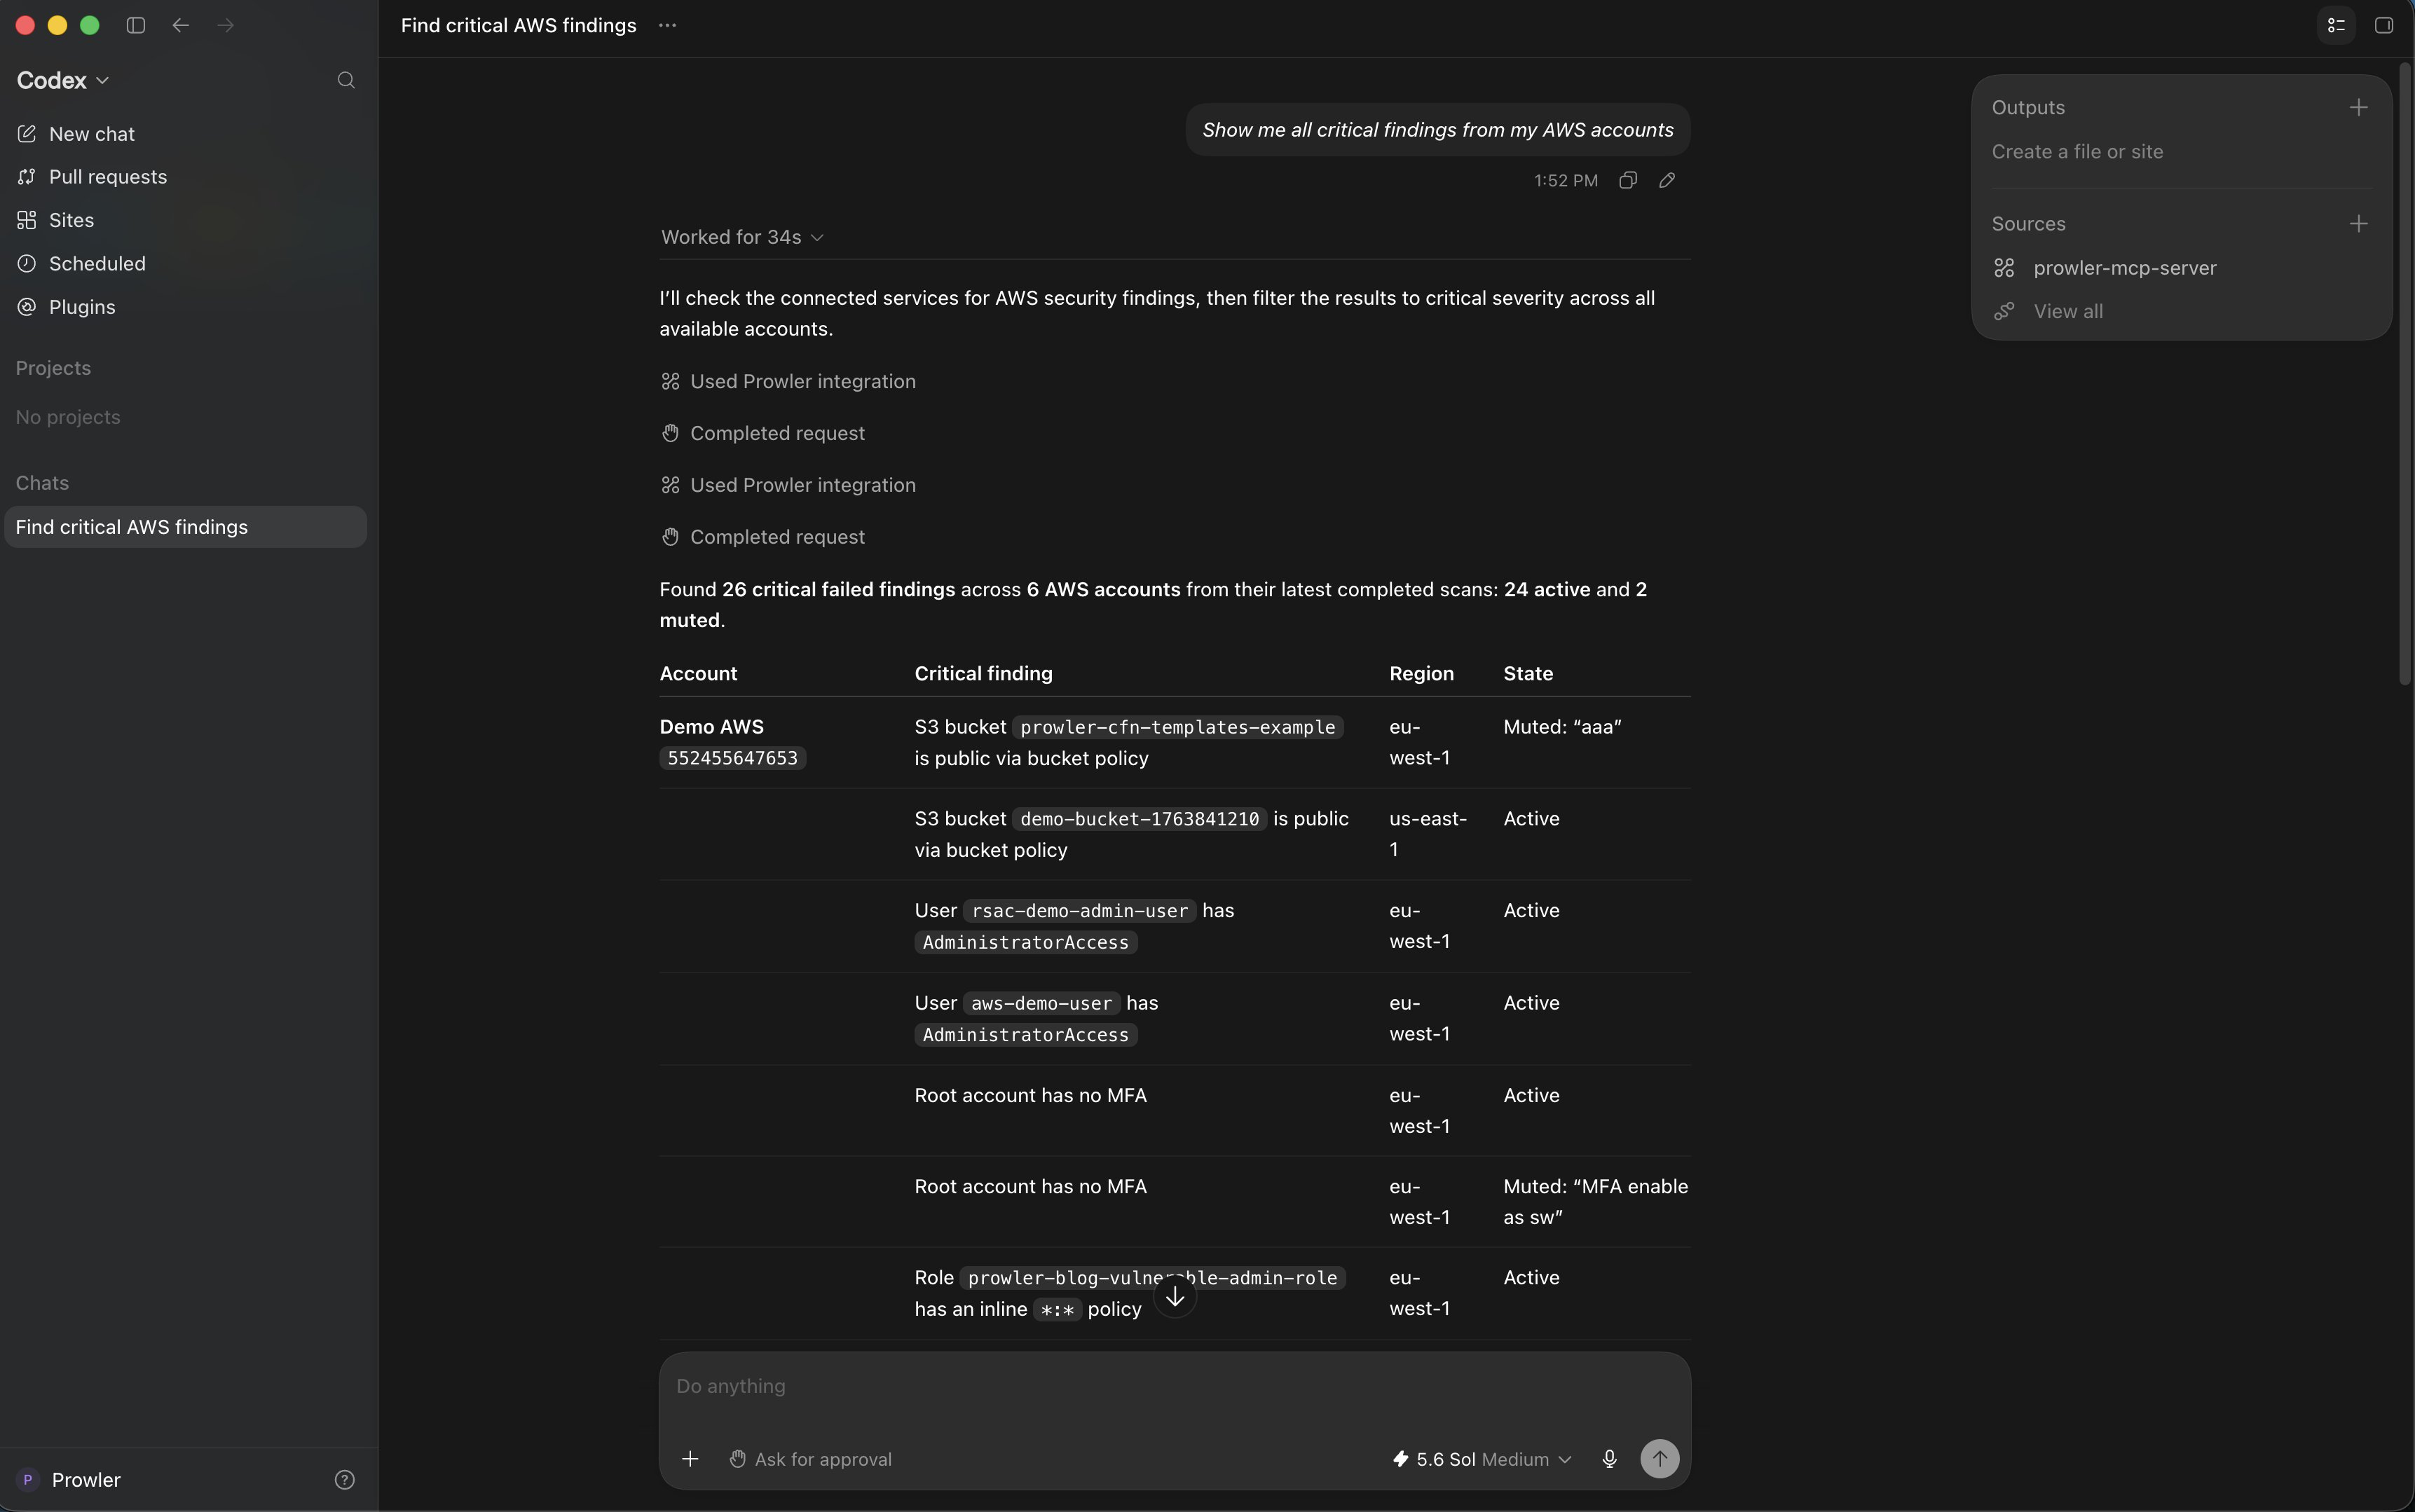
* *"Show me all critical findings from my AWS accounts"*
* *"What does the S3 bucket public access check do?"*
* *"List my connected Prowler providers and their last scan date"*
From the CLI you can also inspect the stored entry directly:
```bash theme={null}
codex mcp list # one row per server, with status and auth
codex mcp get prowler # full entry, header values masked
```
**Verify rather than assume.** Codex silently ignores unrecognized keys in `config.toml` — a misspelled key name produces no error at all, and the server simply never receives your credentials. Always confirm with `codex mcp get prowler` after editing the file by hand.
## Step 4: Start Using Prowler MCP
Ask Codex questions that use the Prowler tools:
* *"Show me all critical findings from my AWS accounts"*
* *"What does the S3 bucket public access check do?"*
* *"List my connected Prowler providers and their last scan date"*
 ## Troubleshooting
### Startup Fails With HTTP 403 Forbidden
Codex reports a handshake failure on startup, with an HTML error page rather than a JSON response:
```
⚠ MCP client for `prowler` failed to start: MCP startup failed: handshaking with MCP server
failed: ... unexpected server response: HTTP 403:
403 Forbidden
```
The `User-Agent` header is missing. Codex's HTTP client does not send one, and requests without it are rejected before reaching the MCP server. Note this is a **403**, not a 401 — so it is not an API key problem. Add the header as shown in [Step 2](#step-2-add-the-prowler-mcp-server); the value itself does not matter, only that the header is present.
### Authentication Fails With 401
* Run `codex mcp get prowler` and confirm the entry has the headers you expect. Values are masked, but a missing header shows as `-`.
* If you used a literal header, confirm the value starts with `Bearer ` and contains the full key.
* **If it works in the CLI but fails in the desktop app or the VS Code extension, you are almost certainly using an environment variable.** Those surfaces do not inherit your shell profile. Switch that entry to a literal `Authorization` header as shown in [Step 2](#step-2-add-the-prowler-mcp-server).
* If you use an environment variable, verify it is set in the environment Codex was launched from: `echo $PROWLER_API_KEY`.
* With `env_http_headers` the variable must include the `Bearer ` prefix. With `bearer_token_env_var` it must **not** — Codex adds the prefix itself.
* Confirm the key has not been revoked in Prowler Cloud.
### Server Not Listed
* Confirm your Codex CLI version is 0.46.0 or later with `codex --version`.
* Run `codex mcp get prowler`. If it reports the server is not found, the entry was not written or the TOML table name is misspelled.
* Check for a typo in the key names. Codex ignores unknown keys without warning.
### Project-Scoped Config Is Ignored
A `.codex/config.toml` inside a project is loaded **only when the project is trusted**. If your entry lives there and does nothing, trust the project or move the entry to `~/.codex/config.toml`.
### Tools Do Not Appear After Editing the Config
Restart Codex. Configuration is read at startup. In the app, quit completely and reopen it, sometimes just clous the window is not enough.
## Next Steps
Explore all available tools and capabilities
Configuration reference for every supported client
## Getting Help
* Search for existing [GitHub issues](https://github.com/prowler-cloud/prowler/issues)
* Ask for help in our [Slack community](https://goto.prowler.com/slack)
* Report a new issue on [GitHub](https://github.com/prowler-cloud/prowler/issues/new)
## Troubleshooting
### Startup Fails With HTTP 403 Forbidden
Codex reports a handshake failure on startup, with an HTML error page rather than a JSON response:
```
⚠ MCP client for `prowler` failed to start: MCP startup failed: handshaking with MCP server
failed: ... unexpected server response: HTTP 403:
403 Forbidden
```
The `User-Agent` header is missing. Codex's HTTP client does not send one, and requests without it are rejected before reaching the MCP server. Note this is a **403**, not a 401 — so it is not an API key problem. Add the header as shown in [Step 2](#step-2-add-the-prowler-mcp-server); the value itself does not matter, only that the header is present.
### Authentication Fails With 401
* Run `codex mcp get prowler` and confirm the entry has the headers you expect. Values are masked, but a missing header shows as `-`.
* If you used a literal header, confirm the value starts with `Bearer ` and contains the full key.
* **If it works in the CLI but fails in the desktop app or the VS Code extension, you are almost certainly using an environment variable.** Those surfaces do not inherit your shell profile. Switch that entry to a literal `Authorization` header as shown in [Step 2](#step-2-add-the-prowler-mcp-server).
* If you use an environment variable, verify it is set in the environment Codex was launched from: `echo $PROWLER_API_KEY`.
* With `env_http_headers` the variable must include the `Bearer ` prefix. With `bearer_token_env_var` it must **not** — Codex adds the prefix itself.
* Confirm the key has not been revoked in Prowler Cloud.
### Server Not Listed
* Confirm your Codex CLI version is 0.46.0 or later with `codex --version`.
* Run `codex mcp get prowler`. If it reports the server is not found, the entry was not written or the TOML table name is misspelled.
* Check for a typo in the key names. Codex ignores unknown keys without warning.
### Project-Scoped Config Is Ignored
A `.codex/config.toml` inside a project is loaded **only when the project is trusted**. If your entry lives there and does nothing, trust the project or move the entry to `~/.codex/config.toml`.
### Tools Do Not Appear After Editing the Config
Restart Codex. Configuration is read at startup. In the app, quit completely and reopen it, sometimes just clous the window is not enough.
## Next Steps
Explore all available tools and capabilities
Configuration reference for every supported client
## Getting Help
* Search for existing [GitHub issues](https://github.com/prowler-cloud/prowler/issues)
* Ask for help in our [Slack community](https://goto.prowler.com/slack)
* Report a new issue on [GitHub](https://github.com/prowler-cloud/prowler/issues/new)