> ## Documentation Index
> Fetch the complete documentation index at: https://docs.prowler.com/llms.txt
> Use this file to discover all available pages before exploring further.
# AWS Authentication in Prowler
Prowler requires AWS credentials to function properly. Authentication is available through the following methods:
* Static Credentials
* Assumed Role
When using **Assumed Role**, the Prowler UI exposes two credential sources for calling `sts:AssumeRole`. The labels differ between Prowler Cloud and self-hosted Prowler App, but both map to the same underlying credential types:
* **AWS SDK Default** (shown as *"Prowler Cloud will assume your IAM role"* in Prowler Cloud and *"AWS SDK Default"* in self-hosted Prowler App): Prowler uses the credentials already available to the API and worker containers through the [AWS SDK default credential chain](https://boto3.amazonaws.com/v1/documentation/api/latest/guide/credentials.html). This is the default in Prowler Cloud and requires extra configuration in self-hosted Prowler App (see [Configuring AWS SDK Default for Self-Hosted Prowler App](#configuring-aws-sdk-default-for-self-hosted-prowler-app)).
* **Access & Secret Key**: You paste an IAM user's `AWS_ACCESS_KEY_ID`, `AWS_SECRET_ACCESS_KEY`, and optionally `AWS_SESSION_TOKEN` into the form. Prowler uses those keys to call `sts:AssumeRole`.
## Required Permissions
To ensure full functionality, attach the following AWS managed policies to the designated user or role:
* `arn:aws:iam::aws:policy/SecurityAudit`
* `arn:aws:iam::aws:policy/job-function/ViewOnlyAccess`
### Additional Permissions
For certain checks, additional read-only permissions are required. Attach the following custom policy to your role: [prowler-additions-policy.json](https://github.com/prowler-cloud/prowler/blob/master/permissions/prowler-additions-policy.json)
## Assume Role (Recommended)
This method grants permanent access and is the recommended setup for production environments.
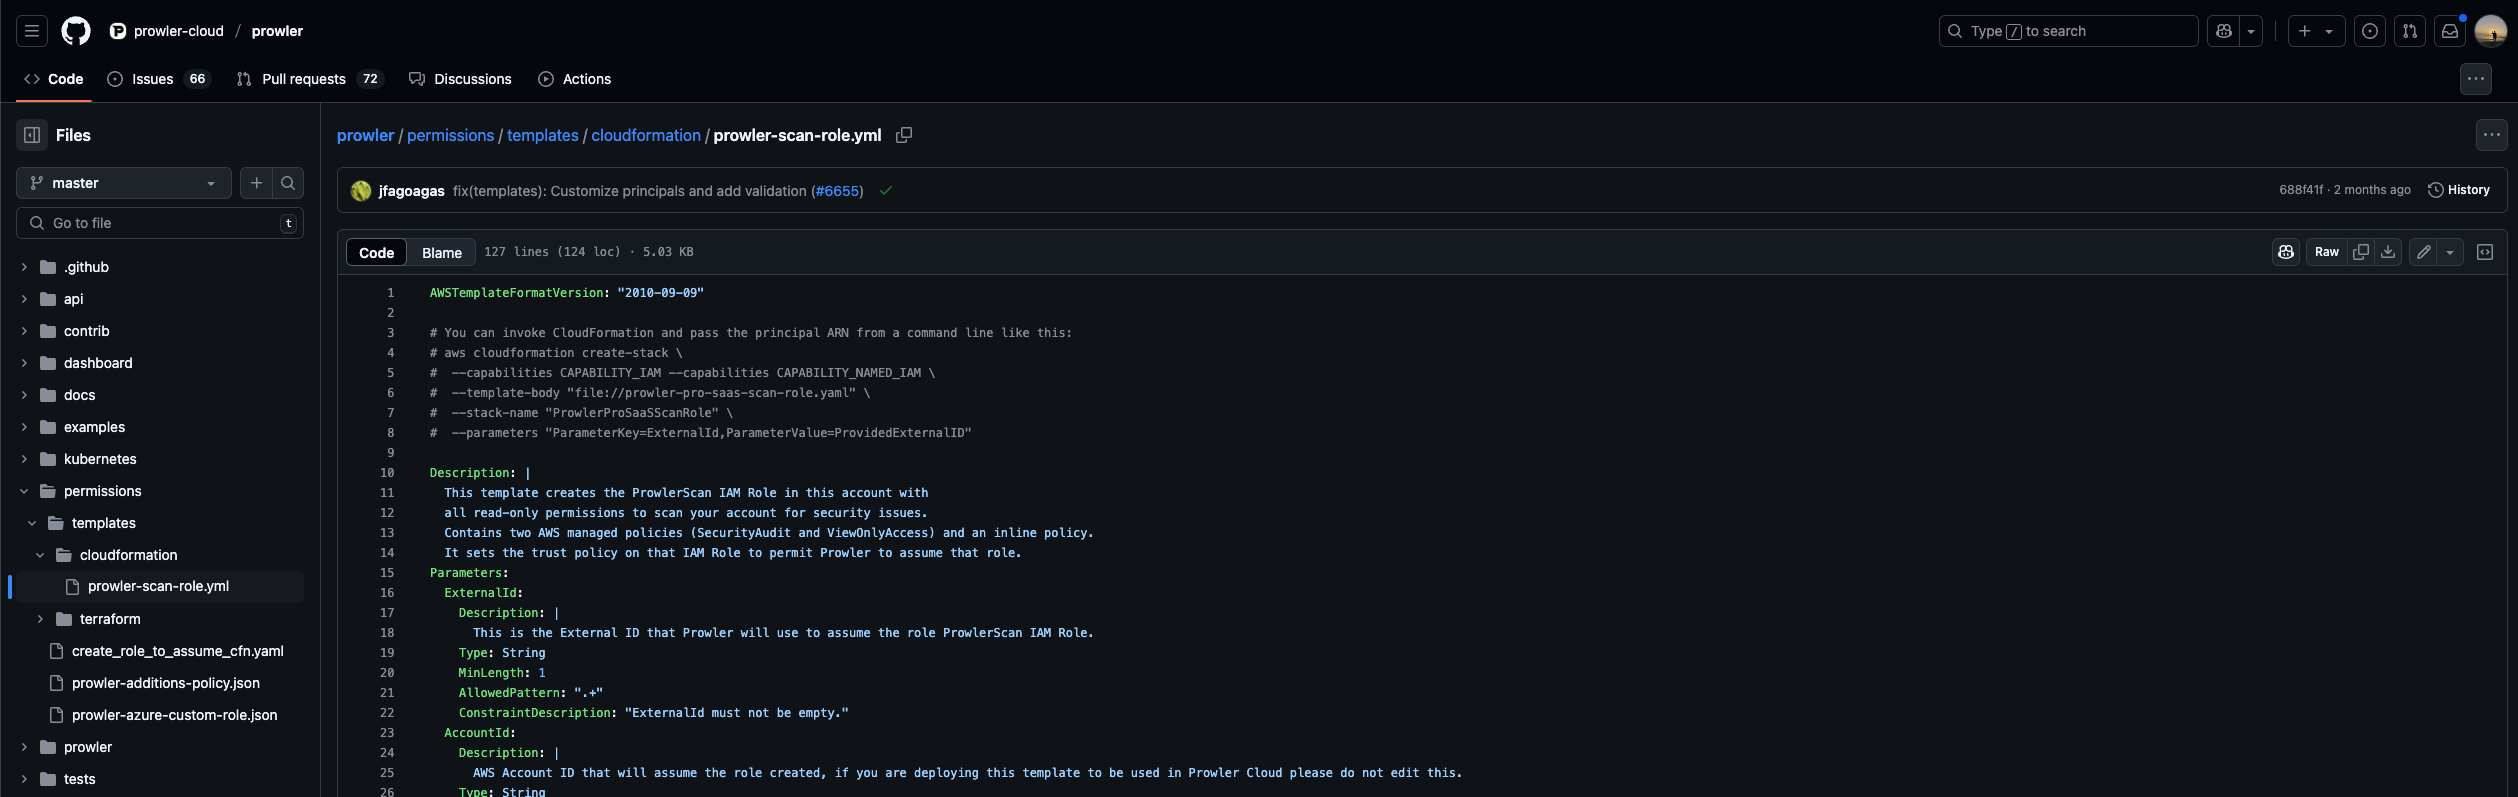
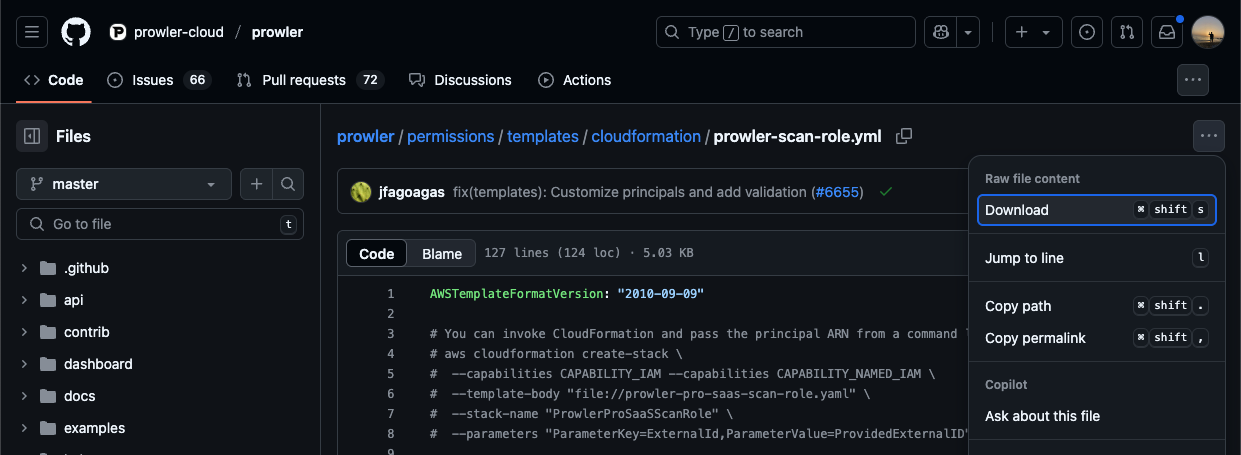
1. Download the [Prowler Scan Role Template](https://raw.githubusercontent.com/prowler-cloud/prowler/refs/heads/master/permissions/templates/cloudformation/prowler-scan-role.yml)
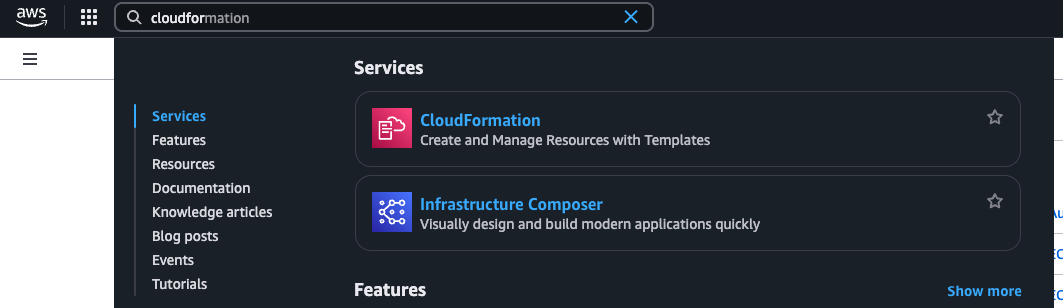
 2. Open the [AWS Console](https://console.aws.amazon.com), search for **CloudFormation**
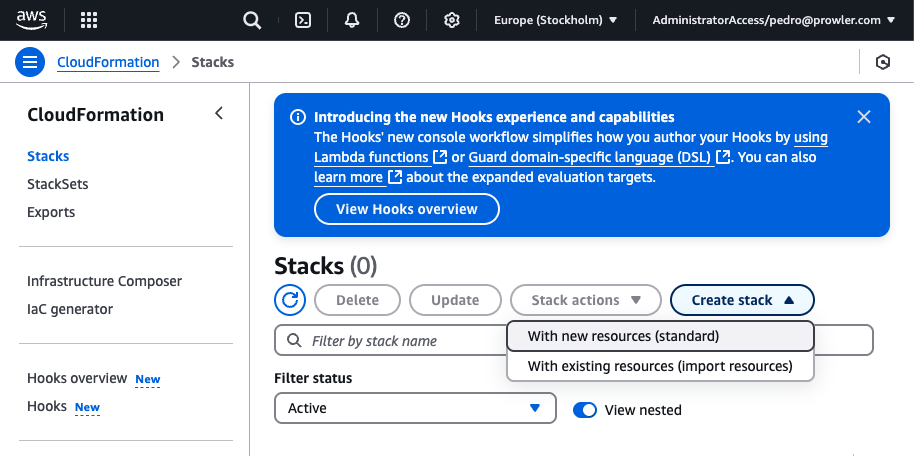
 3. Go to **Stacks** and click "Create stack" > "With new resources (standard)"
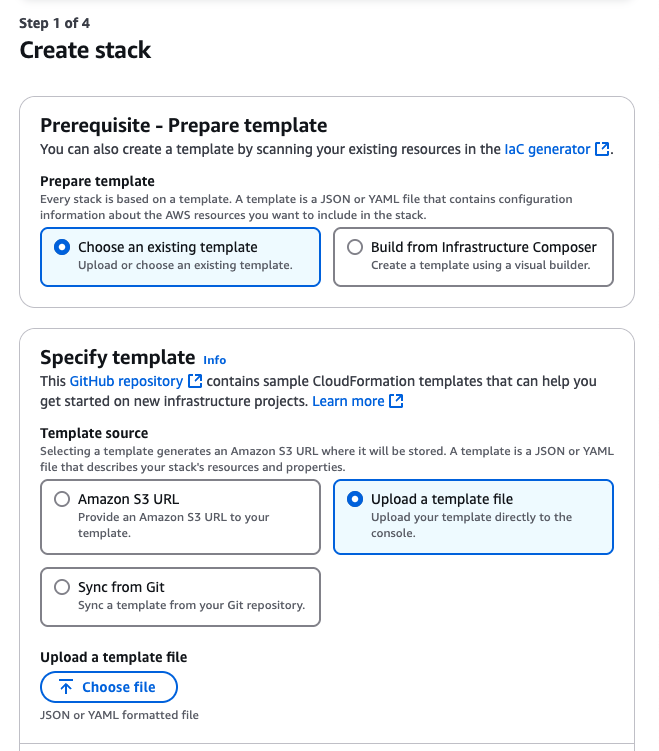
 4. In **Specify Template**, choose "Upload a template file" and select the downloaded file
 5. Click "Next", provide a stack name and the **External ID** shown in the Prowler Cloud setup screen
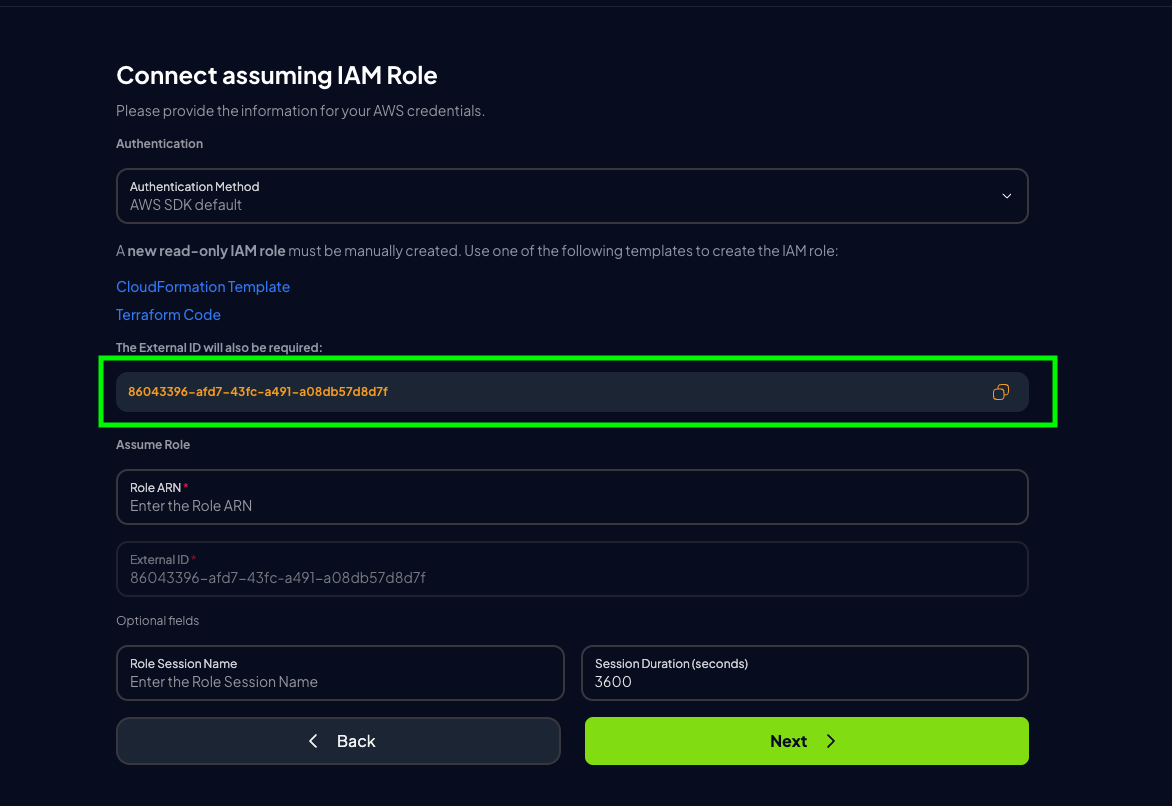
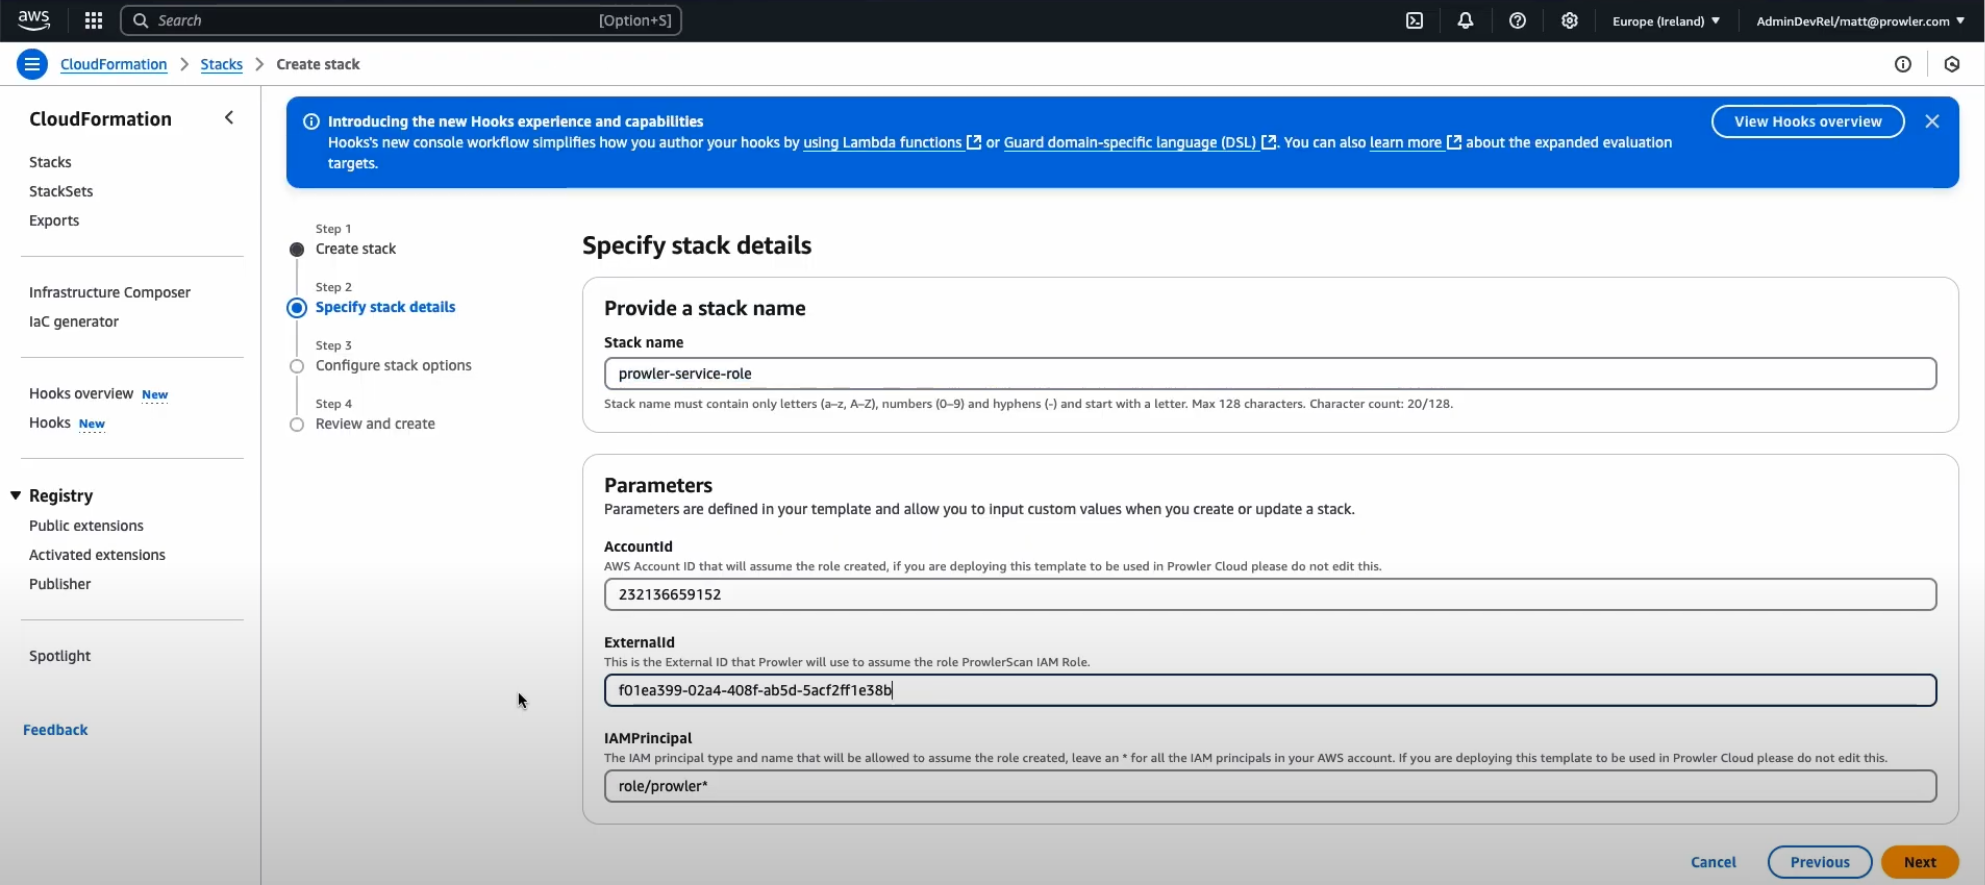 An **External ID** is required when assuming the *ProwlerScan* role to prevent the [confused deputy problem](https://docs.aws.amazon.com/IAM/latest/UserGuide/confused-deputy.html).
6. Acknowledge the IAM resource creation warning and proceed
An **External ID** is required when assuming the *ProwlerScan* role to prevent the [confused deputy problem](https://docs.aws.amazon.com/IAM/latest/UserGuide/confused-deputy.html).
6. Acknowledge the IAM resource creation warning and proceed
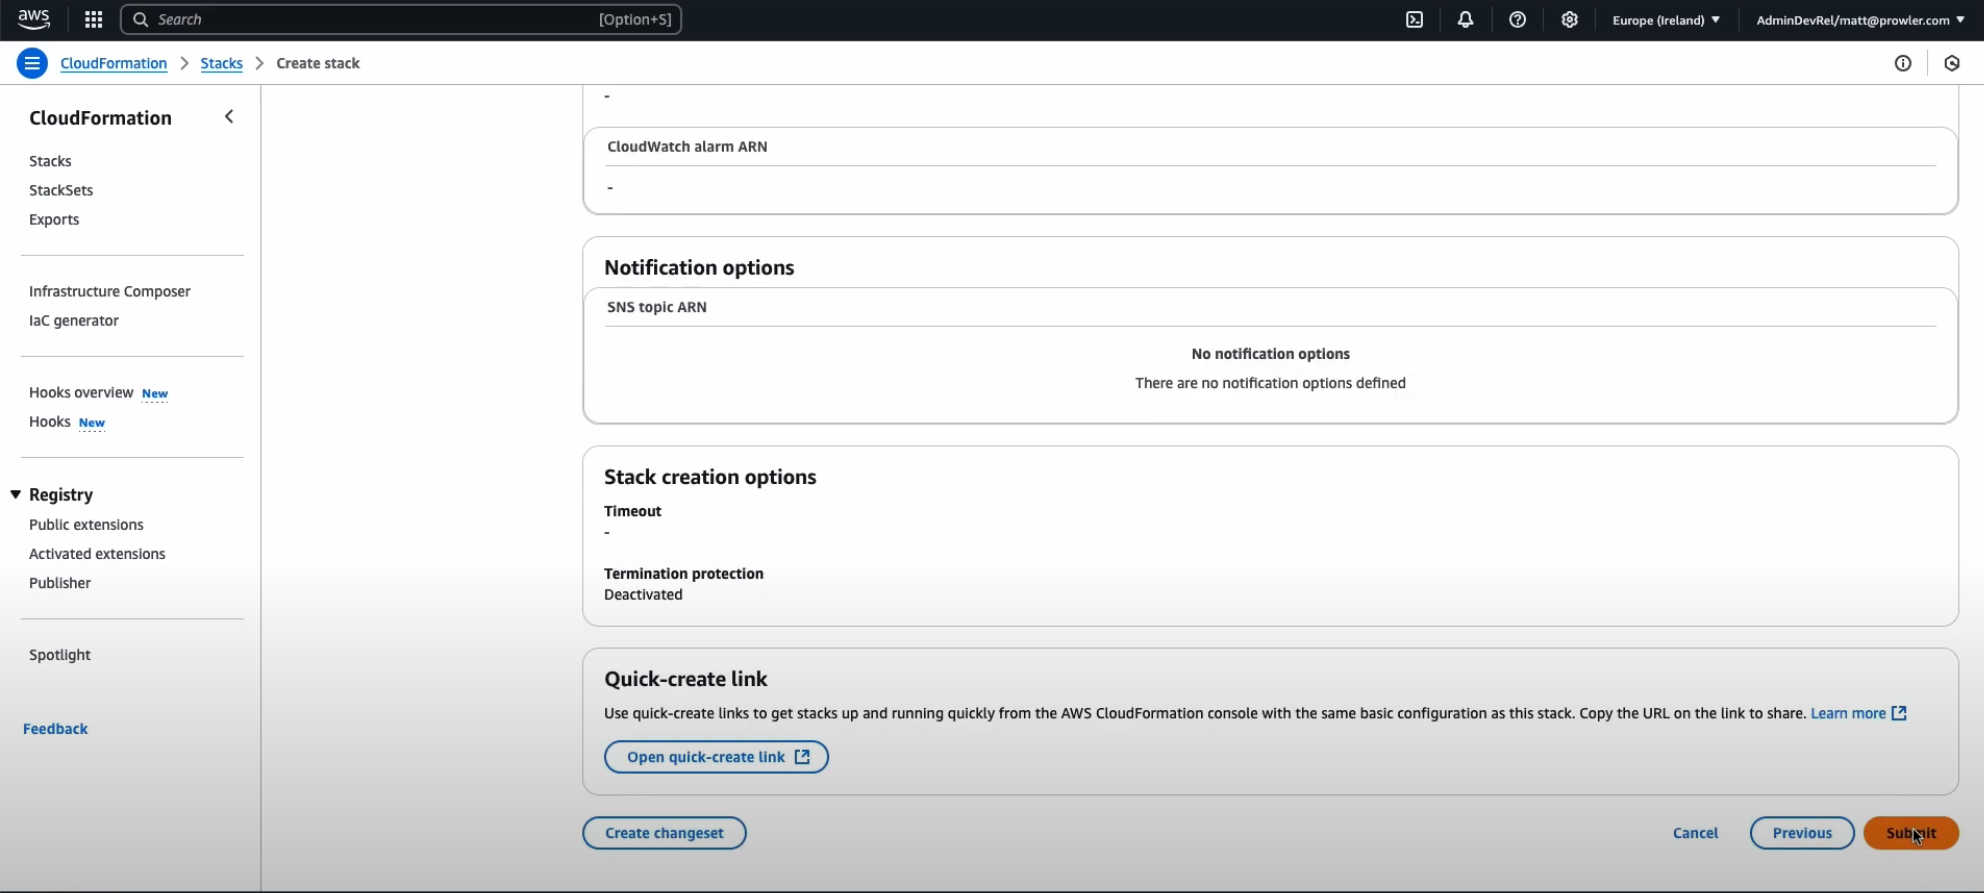
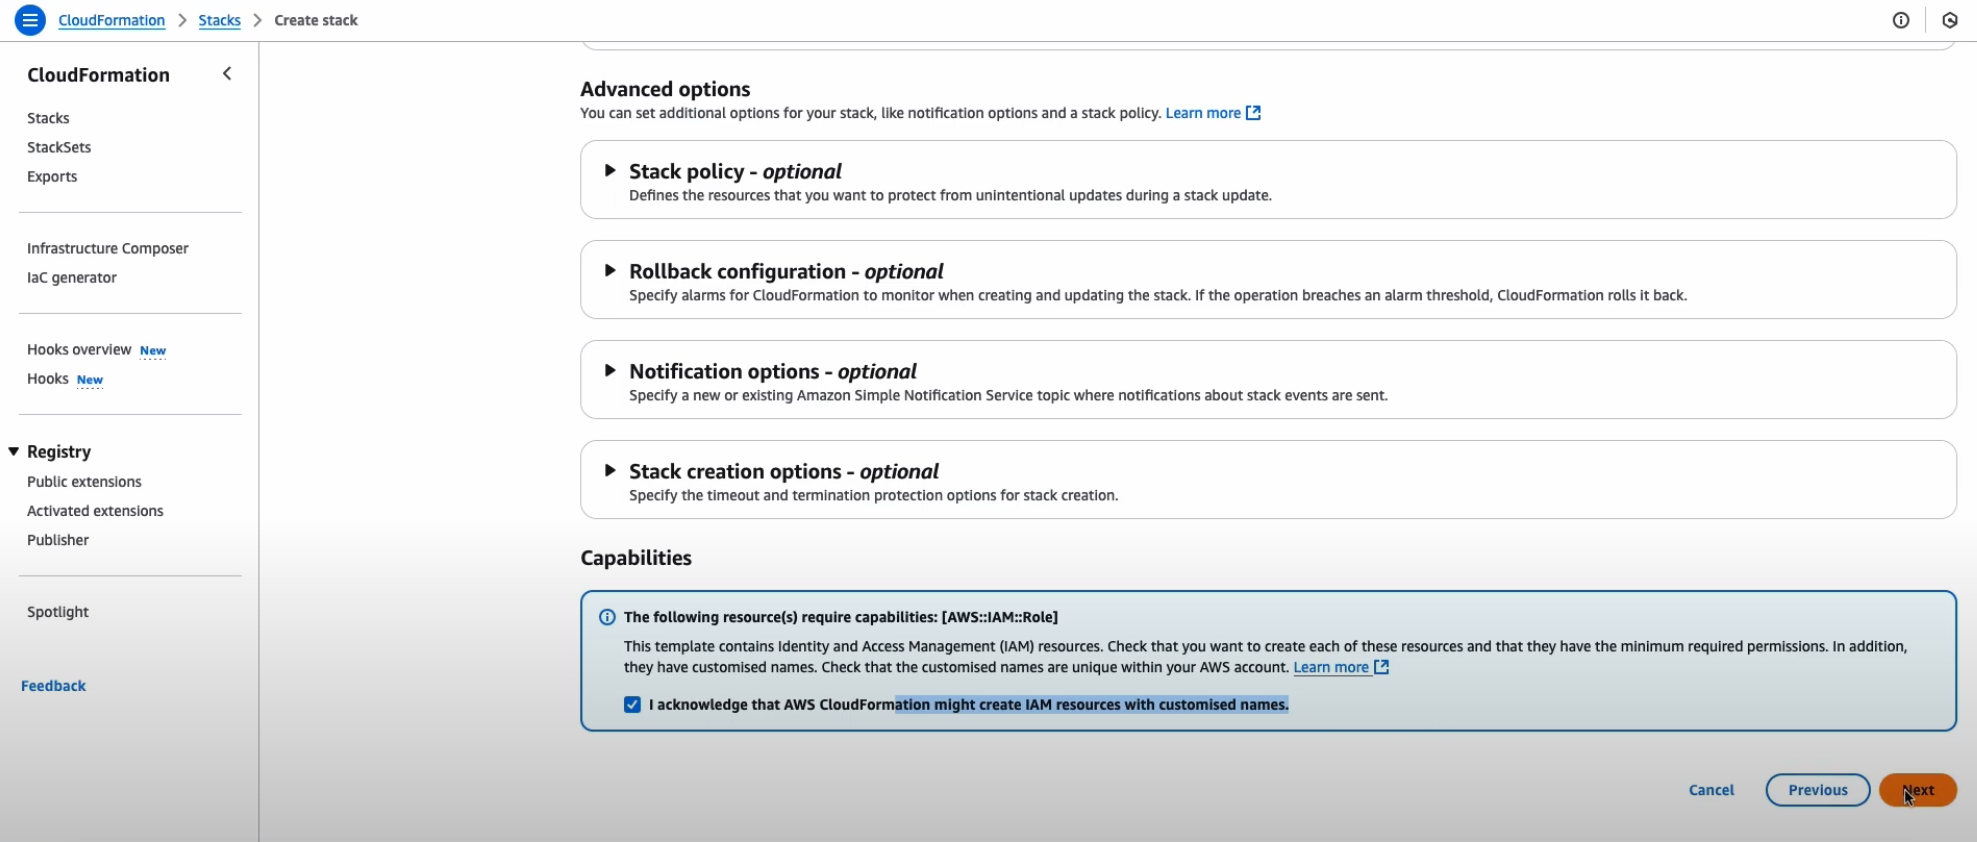 7. Click "Submit" to deploy the stack
 To provision the scan role using Terraform:
1. Run the following commands:
```bash theme={null}
terraform init
terraform plan
terraform apply
```
***
## Configuring AWS SDK Default for Self-Hosted Prowler App
When self-hosting Prowler App with Docker Compose, the API and worker containers do not have AWS credentials by default. Selecting **AWS SDK Default** without configuring those credentials produces:
```
AWSAssumeRoleError[1012]: AWS assume role error - An error occurred (InvalidClientTokenId) when calling the AssumeRole operation: The security token included in the request is invalid.
```
To fix this, expose an IAM identity with `sts:AssumeRole` permission on the target role to both the `api` and `worker` services.
### Option 1: Environment Variables in `.env`
Add the following keys to the `.env` file used by `docker-compose.yml`:
```bash theme={null}
AWS_ACCESS_KEY_ID=""
AWS_SECRET_ACCESS_KEY=""
AWS_SESSION_TOKEN=""
AWS_DEFAULT_REGION="us-east-1"
```
The existing `docker-compose.yml` already loads `.env` into the `api`, `worker`, and `worker-beat` services, so `boto3` will pick them up through the default credential chain.
Treat the `.env` file as a secret. Do not commit it to version control, scope the IAM identity to the minimum permissions required (`sts:AssumeRole` on the target `ProwlerScan` role only), prefer short-lived credentials over long-lived access keys, and rotate the keys immediately if you suspect exposure.
Recreate the containers to apply the change. A plain `docker compose restart` will **not** reload values from a modified `.env` file — you must force-recreate:
```bash theme={null}
docker compose up -d --force-recreate api worker worker-beat
```
### Option 2: IAM Role (Host with Instance Metadata)
If you run Prowler App on an EC2 instance, ECS task, or EKS pod with an attached IAM role that can assume the scan role, no extra configuration is needed — `boto3` resolves credentials through instance or task metadata automatically.
### Trust Policy: Align `IAMPrincipal` With Your Identity
The [Prowler scan role CloudFormation template](https://github.com/prowler-cloud/prowler/blob/master/permissions/templates/cloudformation/prowler-scan-role.yml) restricts the trust policy with:
```
aws:PrincipalArn StringLike arn:aws:iam:::
```
`IAMPrincipal` defaults to `role/prowler*`, which only allows IAM roles whose name starts with `prowler`. If the identity hosting the API and worker containers is anything else, the `sts:AssumeRole` call fails with `AccessDenied` even when the credentials themselves are valid.
Redeploy (or update) the CloudFormation stack with an `IAMPrincipal` that matches your identity:
| Your identity on the API/worker containers | `IAMPrincipal` value |
| ------------------------------------------------ | ----------------------- |
| IAM user (for example `prowler-app`) | `user/prowler-app` |
| IAM role whose name doesn't start with `prowler` | `role/` |
`AccountId` must also point to the account where that identity lives — the default is Prowler Cloud's account and only applies when assuming from Prowler Cloud.
The same `External ID` entered in the Prowler UI must match the `ExternalId` parameter used when deploying the CloudFormation stack. A mismatch produces `AccessDenied` on `sts:AssumeRole`, not `InvalidClientTokenId`.
***
## Credentials
1. Go to the [AWS Console](https://console.aws.amazon.com), open **CloudShell**
To provision the scan role using Terraform:
1. Run the following commands:
```bash theme={null}
terraform init
terraform plan
terraform apply
```
***
## Configuring AWS SDK Default for Self-Hosted Prowler App
When self-hosting Prowler App with Docker Compose, the API and worker containers do not have AWS credentials by default. Selecting **AWS SDK Default** without configuring those credentials produces:
```
AWSAssumeRoleError[1012]: AWS assume role error - An error occurred (InvalidClientTokenId) when calling the AssumeRole operation: The security token included in the request is invalid.
```
To fix this, expose an IAM identity with `sts:AssumeRole` permission on the target role to both the `api` and `worker` services.
### Option 1: Environment Variables in `.env`
Add the following keys to the `.env` file used by `docker-compose.yml`:
```bash theme={null}
AWS_ACCESS_KEY_ID=""
AWS_SECRET_ACCESS_KEY=""
AWS_SESSION_TOKEN=""
AWS_DEFAULT_REGION="us-east-1"
```
The existing `docker-compose.yml` already loads `.env` into the `api`, `worker`, and `worker-beat` services, so `boto3` will pick them up through the default credential chain.
Treat the `.env` file as a secret. Do not commit it to version control, scope the IAM identity to the minimum permissions required (`sts:AssumeRole` on the target `ProwlerScan` role only), prefer short-lived credentials over long-lived access keys, and rotate the keys immediately if you suspect exposure.
Recreate the containers to apply the change. A plain `docker compose restart` will **not** reload values from a modified `.env` file — you must force-recreate:
```bash theme={null}
docker compose up -d --force-recreate api worker worker-beat
```
### Option 2: IAM Role (Host with Instance Metadata)
If you run Prowler App on an EC2 instance, ECS task, or EKS pod with an attached IAM role that can assume the scan role, no extra configuration is needed — `boto3` resolves credentials through instance or task metadata automatically.
### Trust Policy: Align `IAMPrincipal` With Your Identity
The [Prowler scan role CloudFormation template](https://github.com/prowler-cloud/prowler/blob/master/permissions/templates/cloudformation/prowler-scan-role.yml) restricts the trust policy with:
```
aws:PrincipalArn StringLike arn:aws:iam:::
```
`IAMPrincipal` defaults to `role/prowler*`, which only allows IAM roles whose name starts with `prowler`. If the identity hosting the API and worker containers is anything else, the `sts:AssumeRole` call fails with `AccessDenied` even when the credentials themselves are valid.
Redeploy (or update) the CloudFormation stack with an `IAMPrincipal` that matches your identity:
| Your identity on the API/worker containers | `IAMPrincipal` value |
| ------------------------------------------------ | ----------------------- |
| IAM user (for example `prowler-app`) | `user/prowler-app` |
| IAM role whose name doesn't start with `prowler` | `role/` |
`AccountId` must also point to the account where that identity lives — the default is Prowler Cloud's account and only applies when assuming from Prowler Cloud.
The same `External ID` entered in the Prowler UI must match the `ExternalId` parameter used when deploying the CloudFormation stack. A mismatch produces `AccessDenied` on `sts:AssumeRole`, not `InvalidClientTokenId`.
***
## Credentials
1. Go to the [AWS Console](https://console.aws.amazon.com), open **CloudShell**
 2. Run:
```bash theme={null}
aws iam create-access-key
```
Use the [AWS Access Portal](https://docs.aws.amazon.com/singlesignon/latest/userguide/howtogetcredentials.html) or the CLI:
1. Retrieve short-term credentials for the IAM identity using this command:
```bash theme={null}
aws sts get-session-token --duration-seconds 900
```
Check the aws documentation [here](https://docs.aws.amazon.com/IAM/latest/UserGuide/sts_example_sts_GetSessionToken_section.html)
2. Copy the output containing:
* `AccessKeyId`
* `SecretAccessKey`
* `SessionToken`
> Sample output:
```json theme={null}
{
"Credentials": {
"AccessKeyId": "ASIAIOSFODNN7EXAMPLE",
"SecretAccessKey": "wJalrXUtnFEMI/K7MDENG/bPxRfiCYzEXAMPLEKEY",
"SessionToken": "AQoEXAMPLEH4aoAH0gNCAPyJxz4BlCFFxWNE1OPTgk5TthT+FvwqnKwRcOIfrRh3c/LTo6UDdyJwOOvEVPvLXCrrrUtdnniCEXAMPLE/IvU1dYUg2RVAJBanLiHb4IgRmpRV3zrkuWJOgQs8IZZaIv2BXIa2R4OlgkBN9bkUDNCJiBeb/AXlzBBko7b15fjrBs2+cTQtpZ3CYWFXG8C5zqx37wnOE49mRl/+OtkIKGO7fAE",
"Expiration": "2020-05-19T18:06:10+00:00"
}
}
```
2. Run:
```bash theme={null}
aws iam create-access-key
```
Use the [AWS Access Portal](https://docs.aws.amazon.com/singlesignon/latest/userguide/howtogetcredentials.html) or the CLI:
1. Retrieve short-term credentials for the IAM identity using this command:
```bash theme={null}
aws sts get-session-token --duration-seconds 900
```
Check the aws documentation [here](https://docs.aws.amazon.com/IAM/latest/UserGuide/sts_example_sts_GetSessionToken_section.html)
2. Copy the output containing:
* `AccessKeyId`
* `SecretAccessKey`
* `SessionToken`
> Sample output:
```json theme={null}
{
"Credentials": {
"AccessKeyId": "ASIAIOSFODNN7EXAMPLE",
"SecretAccessKey": "wJalrXUtnFEMI/K7MDENG/bPxRfiCYzEXAMPLEKEY",
"SessionToken": "AQoEXAMPLEH4aoAH0gNCAPyJxz4BlCFFxWNE1OPTgk5TthT+FvwqnKwRcOIfrRh3c/LTo6UDdyJwOOvEVPvLXCrrrUtdnniCEXAMPLE/IvU1dYUg2RVAJBanLiHb4IgRmpRV3zrkuWJOgQs8IZZaIv2BXIa2R4OlgkBN9bkUDNCJiBeb/AXlzBBko7b15fjrBs2+cTQtpZ3CYWFXG8C5zqx37wnOE49mRl/+OtkIKGO7fAE",
"Expiration": "2020-05-19T18:06:10+00:00"
}
}
```