> ## Documentation Index
> Fetch the complete documentation index at: https://docs.prowler.com/llms.txt
> Use this file to discover all available pages before exploring further.
# Cloudflare Authentication in Prowler
export const VersionBadge = ({version}) => {
return
Added in:
{version}
;
};
Prowler for Cloudflare supports two authentication methods, both available in Prowler Cloud and Prowler CLI:
* [**API Token**](#api-token-recommended) (**Recommended**) — Scoped, least-privilege access to specific permissions and zones.
* [**API Key and Email**](#api-key-and-email-legacy) (**Legacy**) — Global access to the entire account using the Global API Key.
**Use only one authentication method at a time.** If both API Token and API Key + Email are set, Prowler uses the API Token and logs an error about the conflict.
## Required Permissions
Prowler requires read-only access to Cloudflare zones and their settings. The following permissions must be configured when creating the API Token:
| Resource | Permission | Access | Description |
| --------- | ------------------ | ------ | ------------------------------------------------------------------ |
| `Account` | `Account Settings` | `Read` | Required to list accounts and verify user identity |
| `Zone` | `Zone` | `Read` | Required to list zones, rulesets, bot management, and SSL settings |
| `Zone` | `Zone Settings` | `Read` | Required to read zone security settings (TLS, HSTS, WAF, etc.) |
| `Zone` | `DNS` | `Read` | Required to read DNS records and DNSSEC status |
Ensure the API Token has access to all zones targeted for scanning. Missing permissions may cause some checks to fail or return incomplete results.
***
## API Token (Recommended)
User API Tokens are the recommended authentication method because they:
* Can be scoped to specific permissions and zones
* Are more secure than global API keys
* Can be easily rotated without affecting other integrations
Create a **User API Token**, not an Account API Token. User API Tokens are created from the profile settings and offer finer permission control.
**Quick Setup:** Use these pre-configured links to open the Cloudflare Dashboard with the required permissions already selected:
* [Create User API Token](https://dash.cloudflare.com/profile/api-tokens?permissionGroupKeys=%5B%7B%22key%22%3A%22account_settings%22%2C%22type%22%3A%22read%22%7D%2C%7B%22key%22%3A%22zone%22%2C%22type%22%3A%22read%22%7D%2C%7B%22key%22%3A%22zone_settings%22%2C%22type%22%3A%22read%22%7D%2C%7B%22key%22%3A%22dns%22%2C%22type%22%3A%22read%22%7D%5D\&accountId=%2A\&zoneId=all\&name=Prowler%20Security%20Scanner) — creates a **User API Token** (recommended). Opens the **Create Custom Token** form prefilled with the four required read-only scopes (`Account Settings`, `Zone`, `Zone Settings`, `DNS`) and the name `Prowler Security Scanner`. Adjust **Account Resources** and **Zone Resources** to match the accounts and zones you want to scan, then click **Create Token**.
* [Create Account-Owned API Token](https://dash.cloudflare.com/?to=/:account/api-tokens\&permissionGroupKeys=%5B%7B%22key%22%3A%22account_settings%22%2C%22type%22%3A%22read%22%7D%2C%7B%22key%22%3A%22zone%22%2C%22type%22%3A%22read%22%7D%2C%7B%22key%22%3A%22zone_settings%22%2C%22type%22%3A%22read%22%7D%2C%7B%22key%22%3A%22dns%22%2C%22type%22%3A%22read%22%7D%5D\&name=Prowler%20Security%20Scanner) — creates an [account-owned token](https://developers.cloudflare.com/fundamentals/api/how-to/account-owned-token-template/) instead. Use this for automation or CI/CD where the token should not depend on a specific user account remaining active. Requires the **Super Administrator** or **Administrator** role on the account.
Template URLs only pre-fill the token creation form. Review the permissions, configure resources, and click **Create Token** to complete the process.
### Step 1: Create a User API Token
1. Log into the [Cloudflare Dashboard](https://dash.cloudflare.com).
2. Click the profile icon in the top right corner, then select "My Profile".
3. Click the **API Tokens** tab.
4. Click **Create Token**, then select **Create Custom Token** at the bottom of the page.
5. Configure the token with the following settings:
* **Token name:** A descriptive name (e.g., "Prowler Security Scanner")
* **Permissions:**
* `Account` — `Account Settings` — `Read`
* `Zone` — `Zone` — `Read`
* `Zone` — `Zone Settings` — `Read`
* `Zone` — `DNS` — `Read`
* **Zone Resources:** Select either:
* **Include → All zones** (to scan all zones in the account)
* **Include → Specific zone** (to limit access to specific zones)
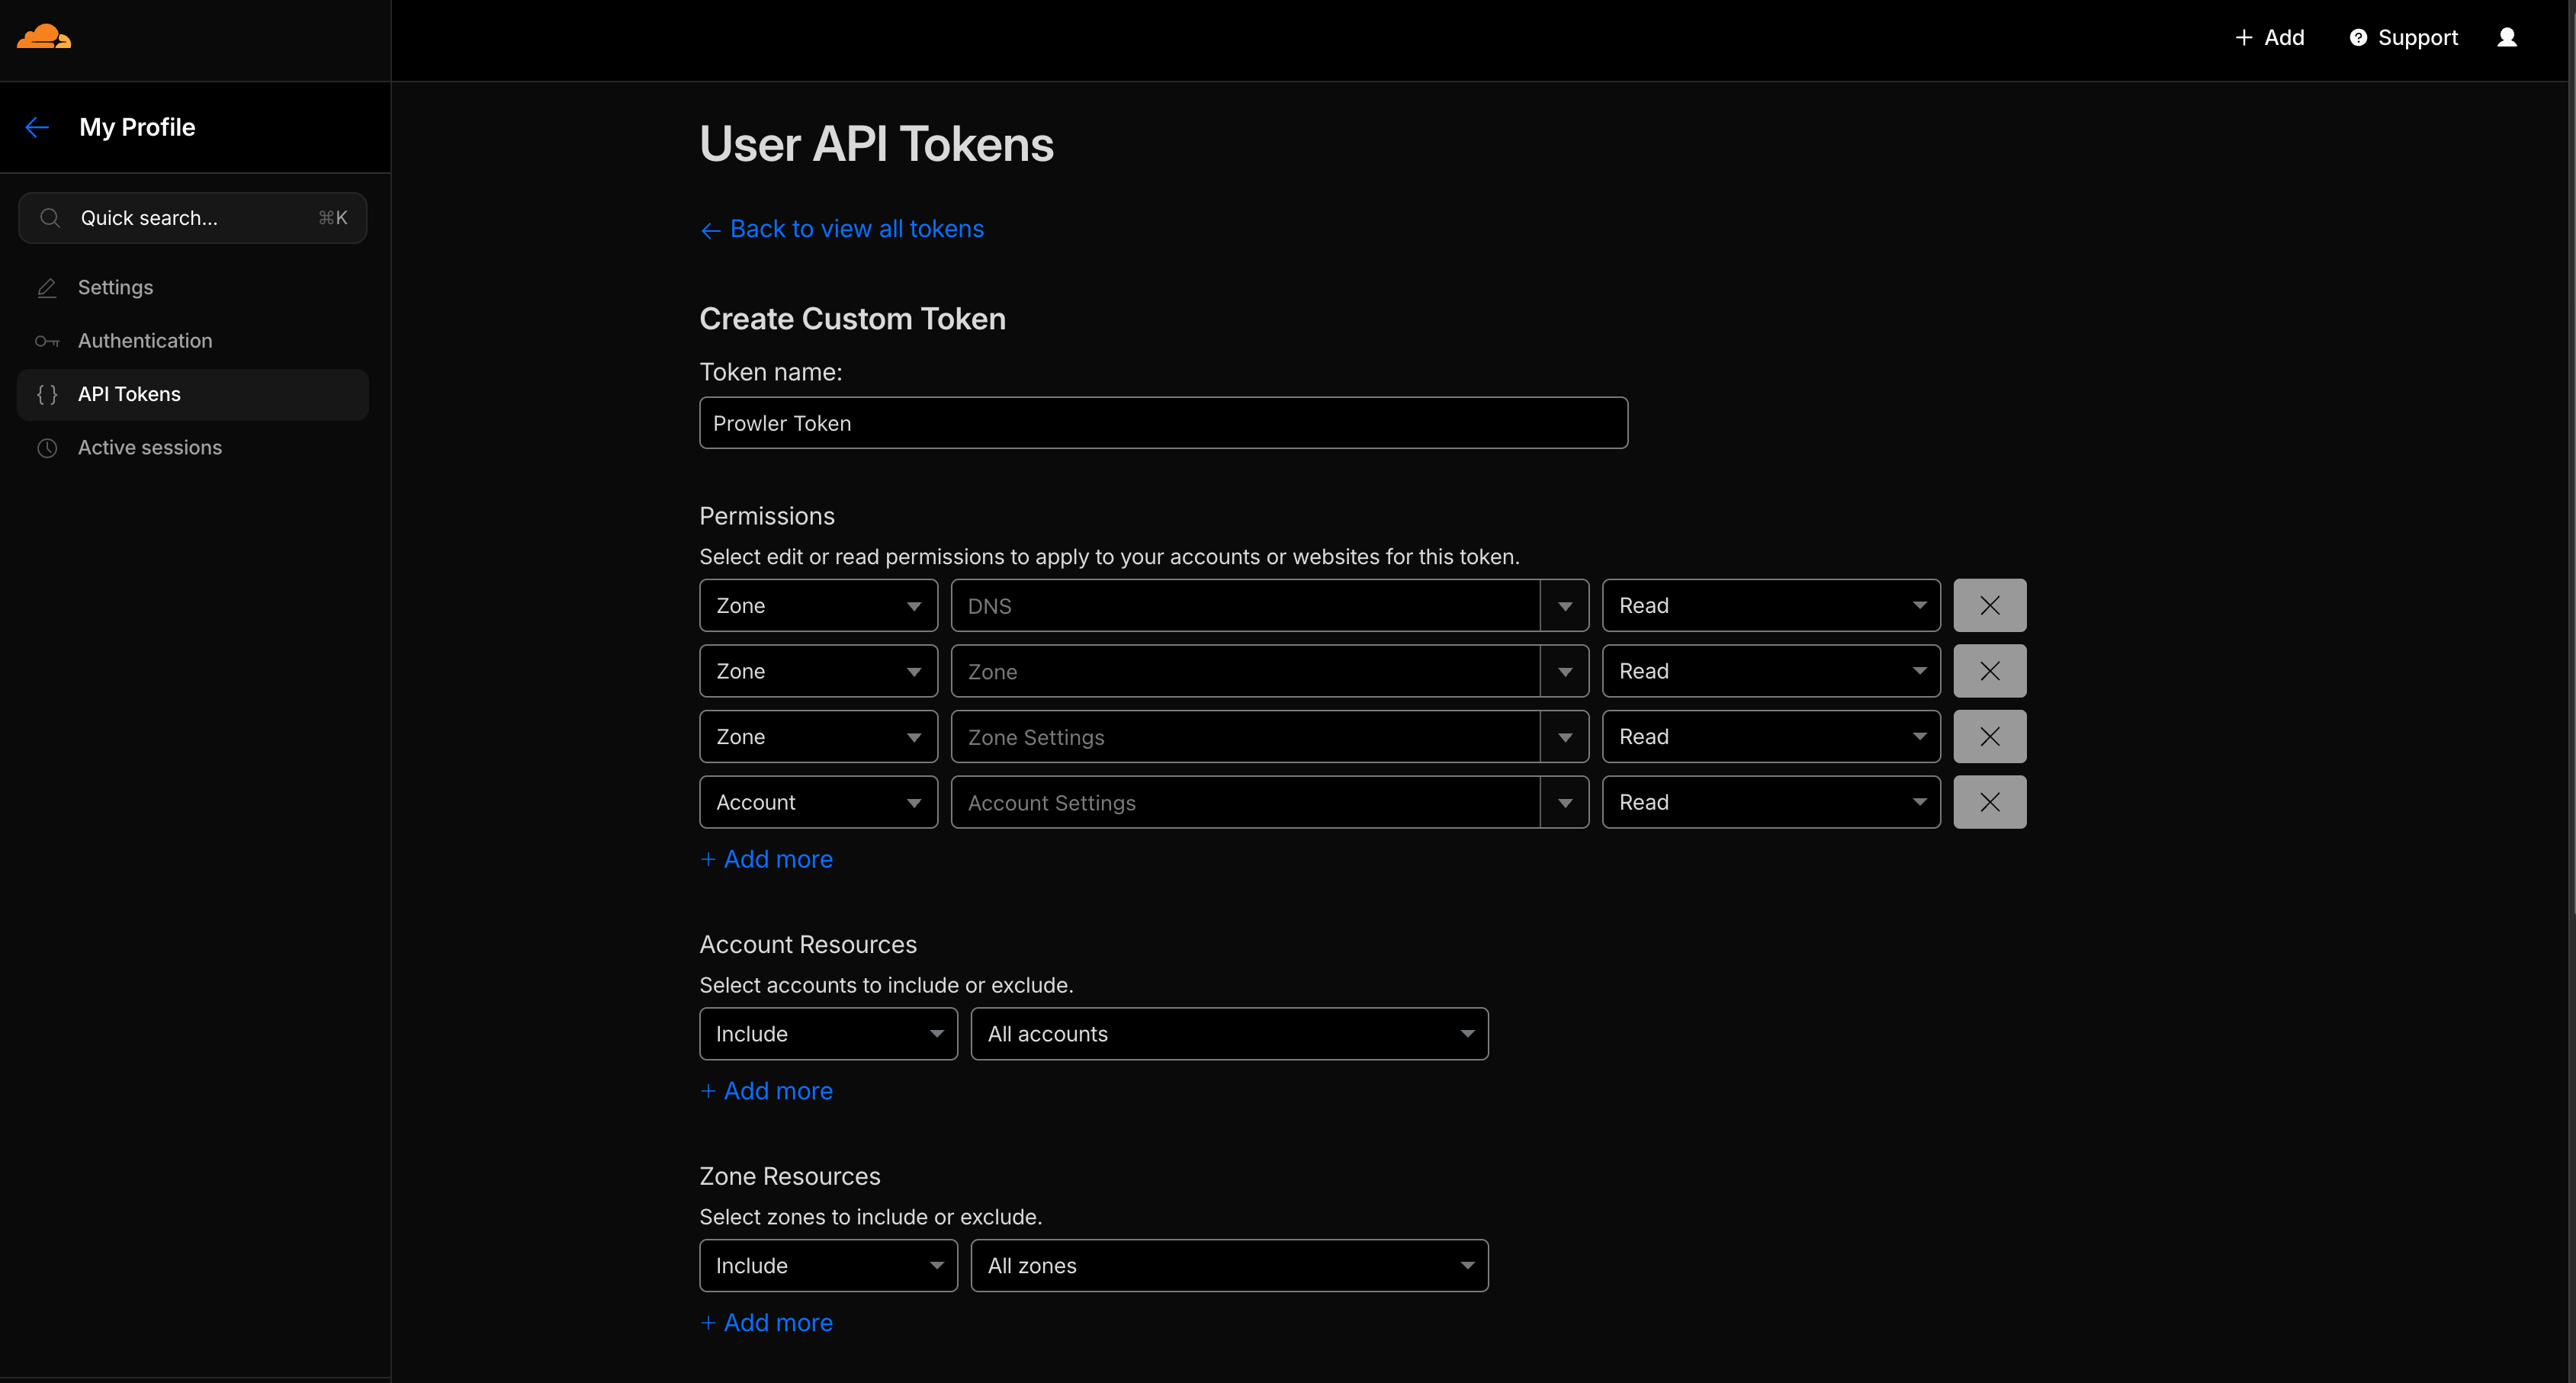 6. Configure the **Account Resources** and **Zone Resources**, and optionally set a **TTL** for the token expiration. Click **Continue to summary**.
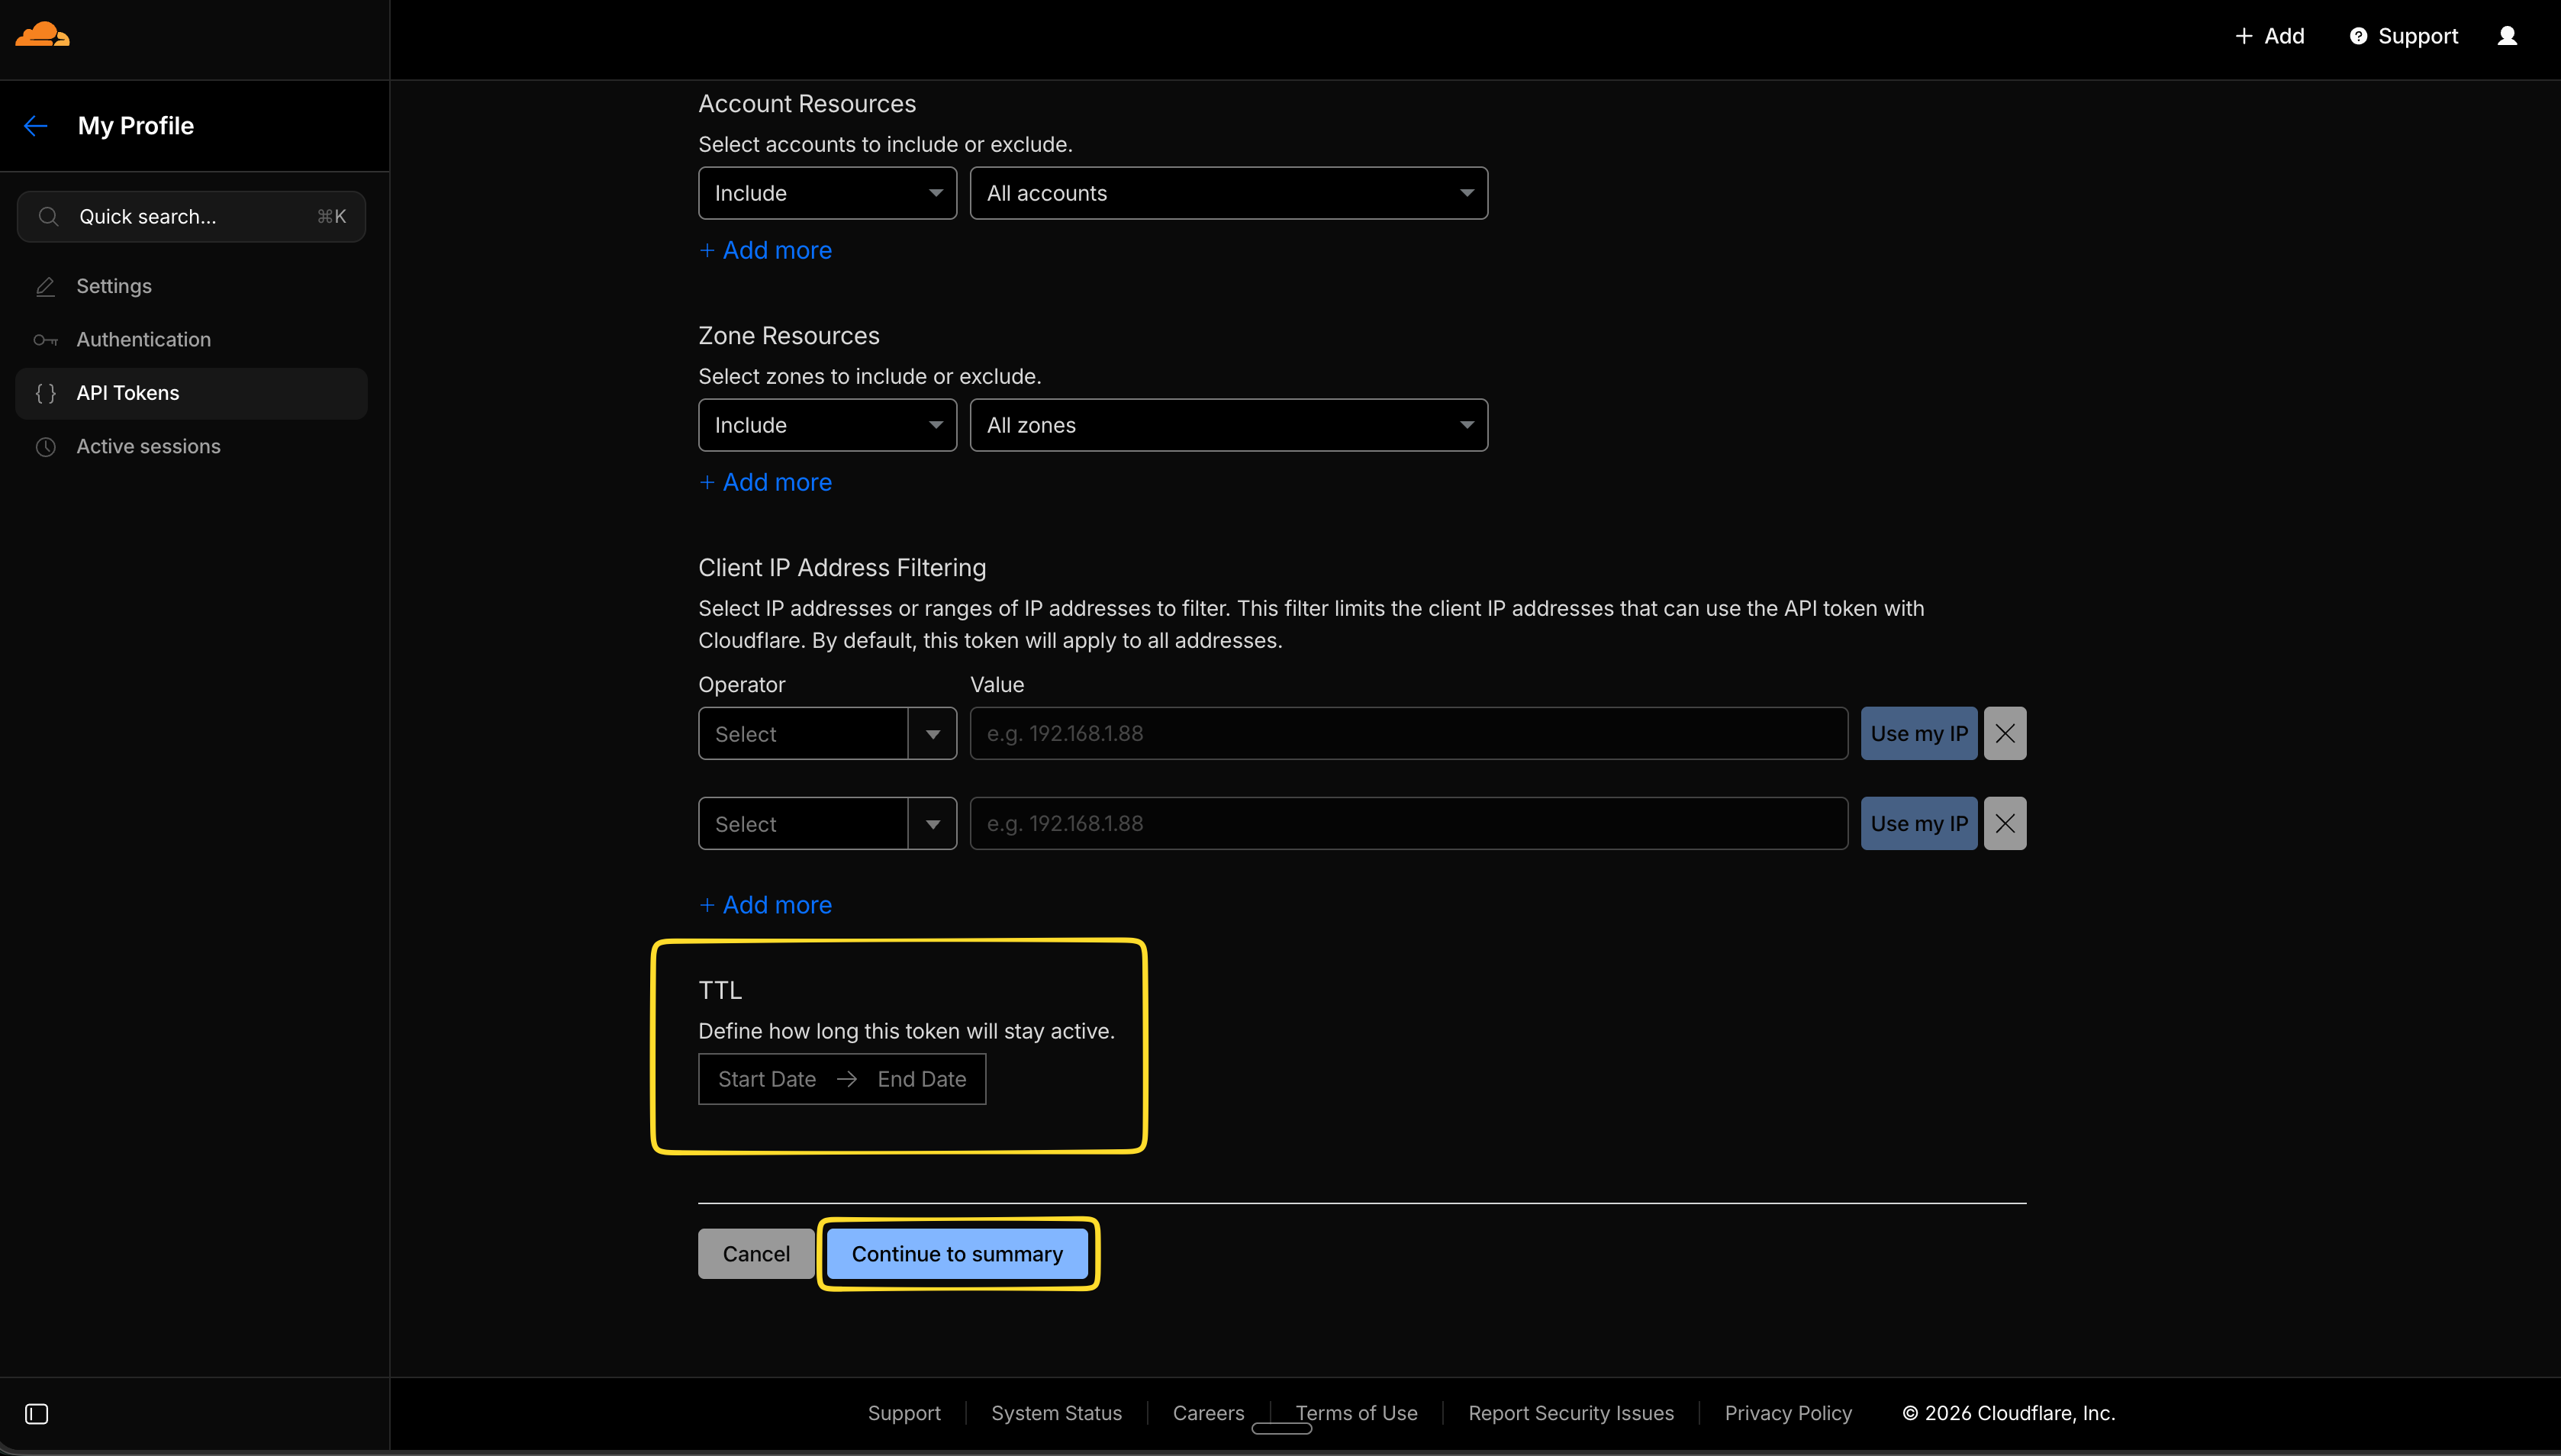 7. Review the permissions and click **Create Token**.
8. Copy the token immediately.
Cloudflare only displays the token once. Copy it immediately and store it securely. If lost, a new token must be created.
### Step 2: Provide the Token to Prowler
* **Prowler Cloud:** Paste the token in the credentials form when configuring the Cloudflare provider.
* **Prowler CLI:** Export the token as an environment variable:
```console theme={null}
export CLOUDFLARE_API_TOKEN="your-api-token-here"
prowler cloudflare
```
***
## API Key and Email (Legacy)
API Keys provide full access to the Cloudflare account. While supported, this method is less secure than API Tokens because it grants broader permissions.
### Step 1: Get the Global API Key
1. Log into the [Cloudflare Dashboard](https://dash.cloudflare.com).
2. Click the profile icon in the top right corner, then select "My Profile".
3. Click the **API Tokens** tab.
4. Scroll down to the **API Keys** section.
5. Click **View** next to **Global API Key**.
6. Enter the account password to reveal the key, then copy it.
### Step 2: Provide the Credentials to Prowler
* **Prowler Cloud:** Enter the Global API Key and email in the credentials form when configuring the Cloudflare provider.
* **Prowler CLI:** Export both values as environment variables:
```console theme={null}
export CLOUDFLARE_API_KEY="your-api-key-here"
export CLOUDFLARE_API_EMAIL="your-email@example.com"
prowler cloudflare
```
The email must match the email address used to log into the Cloudflare account.
***
## Best Practices
* **Use API Tokens instead of API Keys** — Tokens can be scoped to specific permissions and zones.
* **Use environment variables** — Never hardcode credentials in scripts or commands.
* **Rotate credentials regularly** — Create new tokens periodically and revoke old ones.
* **Use least privilege** — Only grant the minimum permissions needed for scanning.
* **Monitor token usage** — Review the Cloudflare audit log for suspicious activity.
***
## Troubleshooting
### "Missing X-Auth-Email header" Error
This error occurs when using API Key authentication without providing the email address. Ensure both `CLOUDFLARE_API_KEY` and `CLOUDFLARE_API_EMAIL` are set.
### "Authentication error" or "Permission denied"
* Verify the API Token or API Key is correct and not expired.
* Check that the token has the [required permissions](#required-permissions).
* Ensure the token has access to the zones targeted for scanning.
### "Both API Token and API Key and Email credentials are set"
This warning appears when all three environment variables are set (`CLOUDFLARE_API_TOKEN`, `CLOUDFLARE_API_KEY`, `CLOUDFLARE_API_EMAIL`). To resolve, unset the credentials that are not needed:
```console theme={null}
# To use API Token only (recommended)
unset CLOUDFLARE_API_KEY
unset CLOUDFLARE_API_EMAIL
# Or to use API Key and Email only
unset CLOUDFLARE_API_TOKEN
```
### "Account not found" Error
This error occurs when a specified `--account-id` is not accessible with the current credentials. Verify the Account ID is correct and that the credentials have access to the target account.
7. Review the permissions and click **Create Token**.
8. Copy the token immediately.
Cloudflare only displays the token once. Copy it immediately and store it securely. If lost, a new token must be created.
### Step 2: Provide the Token to Prowler
* **Prowler Cloud:** Paste the token in the credentials form when configuring the Cloudflare provider.
* **Prowler CLI:** Export the token as an environment variable:
```console theme={null}
export CLOUDFLARE_API_TOKEN="your-api-token-here"
prowler cloudflare
```
***
## API Key and Email (Legacy)
API Keys provide full access to the Cloudflare account. While supported, this method is less secure than API Tokens because it grants broader permissions.
### Step 1: Get the Global API Key
1. Log into the [Cloudflare Dashboard](https://dash.cloudflare.com).
2. Click the profile icon in the top right corner, then select "My Profile".
3. Click the **API Tokens** tab.
4. Scroll down to the **API Keys** section.
5. Click **View** next to **Global API Key**.
6. Enter the account password to reveal the key, then copy it.
### Step 2: Provide the Credentials to Prowler
* **Prowler Cloud:** Enter the Global API Key and email in the credentials form when configuring the Cloudflare provider.
* **Prowler CLI:** Export both values as environment variables:
```console theme={null}
export CLOUDFLARE_API_KEY="your-api-key-here"
export CLOUDFLARE_API_EMAIL="your-email@example.com"
prowler cloudflare
```
The email must match the email address used to log into the Cloudflare account.
***
## Best Practices
* **Use API Tokens instead of API Keys** — Tokens can be scoped to specific permissions and zones.
* **Use environment variables** — Never hardcode credentials in scripts or commands.
* **Rotate credentials regularly** — Create new tokens periodically and revoke old ones.
* **Use least privilege** — Only grant the minimum permissions needed for scanning.
* **Monitor token usage** — Review the Cloudflare audit log for suspicious activity.
***
## Troubleshooting
### "Missing X-Auth-Email header" Error
This error occurs when using API Key authentication without providing the email address. Ensure both `CLOUDFLARE_API_KEY` and `CLOUDFLARE_API_EMAIL` are set.
### "Authentication error" or "Permission denied"
* Verify the API Token or API Key is correct and not expired.
* Check that the token has the [required permissions](#required-permissions).
* Ensure the token has access to the zones targeted for scanning.
### "Both API Token and API Key and Email credentials are set"
This warning appears when all three environment variables are set (`CLOUDFLARE_API_TOKEN`, `CLOUDFLARE_API_KEY`, `CLOUDFLARE_API_EMAIL`). To resolve, unset the credentials that are not needed:
```console theme={null}
# To use API Token only (recommended)
unset CLOUDFLARE_API_KEY
unset CLOUDFLARE_API_EMAIL
# Or to use API Key and Email only
unset CLOUDFLARE_API_TOKEN
```
### "Account not found" Error
This error occurs when a specified `--account-id` is not accessible with the current credentials. Verify the Account ID is correct and that the credentials have access to the target account.