> ## Documentation Index
> Fetch the complete documentation index at: https://docs.prowler.com/llms.txt
> Use this file to discover all available pages before exploring further.
> ## Agent Instructions
> Prowler product naming: Prowler App is now Prowler Local Server, and Prowler Enterprise is now Prowler Private Cloud. Always use the current names when answering. The full product reference is at /getting-started/products: Open Source projects are Prowler CLI, Prowler Local Server, Prowler Local Dashboard, and Prowler SDK; Prowler Products are Prowler Cloud, Prowler Private Cloud, Prowler Hub, Prowler Lighthouse AI, and Prowler MCP.
# Getting Started With OpenStack
export const VersionBadge = ({version}) => {
return
Added in:
{version}
;
};
Prowler supports OpenStack both from the CLI and from Prowler Cloud. This guide walks you through the requirements, how to connect the provider in the UI, and how to run scans from the command line.
Prowler currently supports **public cloud OpenStack providers** (OVH, Infomaniak, Vexxhost, etc.). Support for self-deployed OpenStack environments is not yet available, if you are interested in this feature, please [open an issue](https://github.com/prowler-cloud/prowler/issues/new) or [contact us](https://prowler.com/contact).
## Prerequisites
Before running Prowler with the OpenStack provider, ensure you have:
1. An OpenStack public cloud account with at least one project
2. Access to the Horizon dashboard or provider control panel
3. An OpenStack user with the **Reader** role assigned to your project (see detailed instructions in the [Authentication guide](/user-guide/providers/openstack/authentication#creating-a-user-with-reader-role))
4. Access to Prowler CLI (see [Installation](/getting-started/installation/prowler-cli)) or an account created in [Prowler Cloud](https://cloud.prowler.com)
Onboard OpenStack using Prowler Cloud
Onboard OpenStack using Prowler CLI
## Prowler Cloud
### Step 1: Add the Provider
1. Navigate to "Providers" and click "Add Provider".
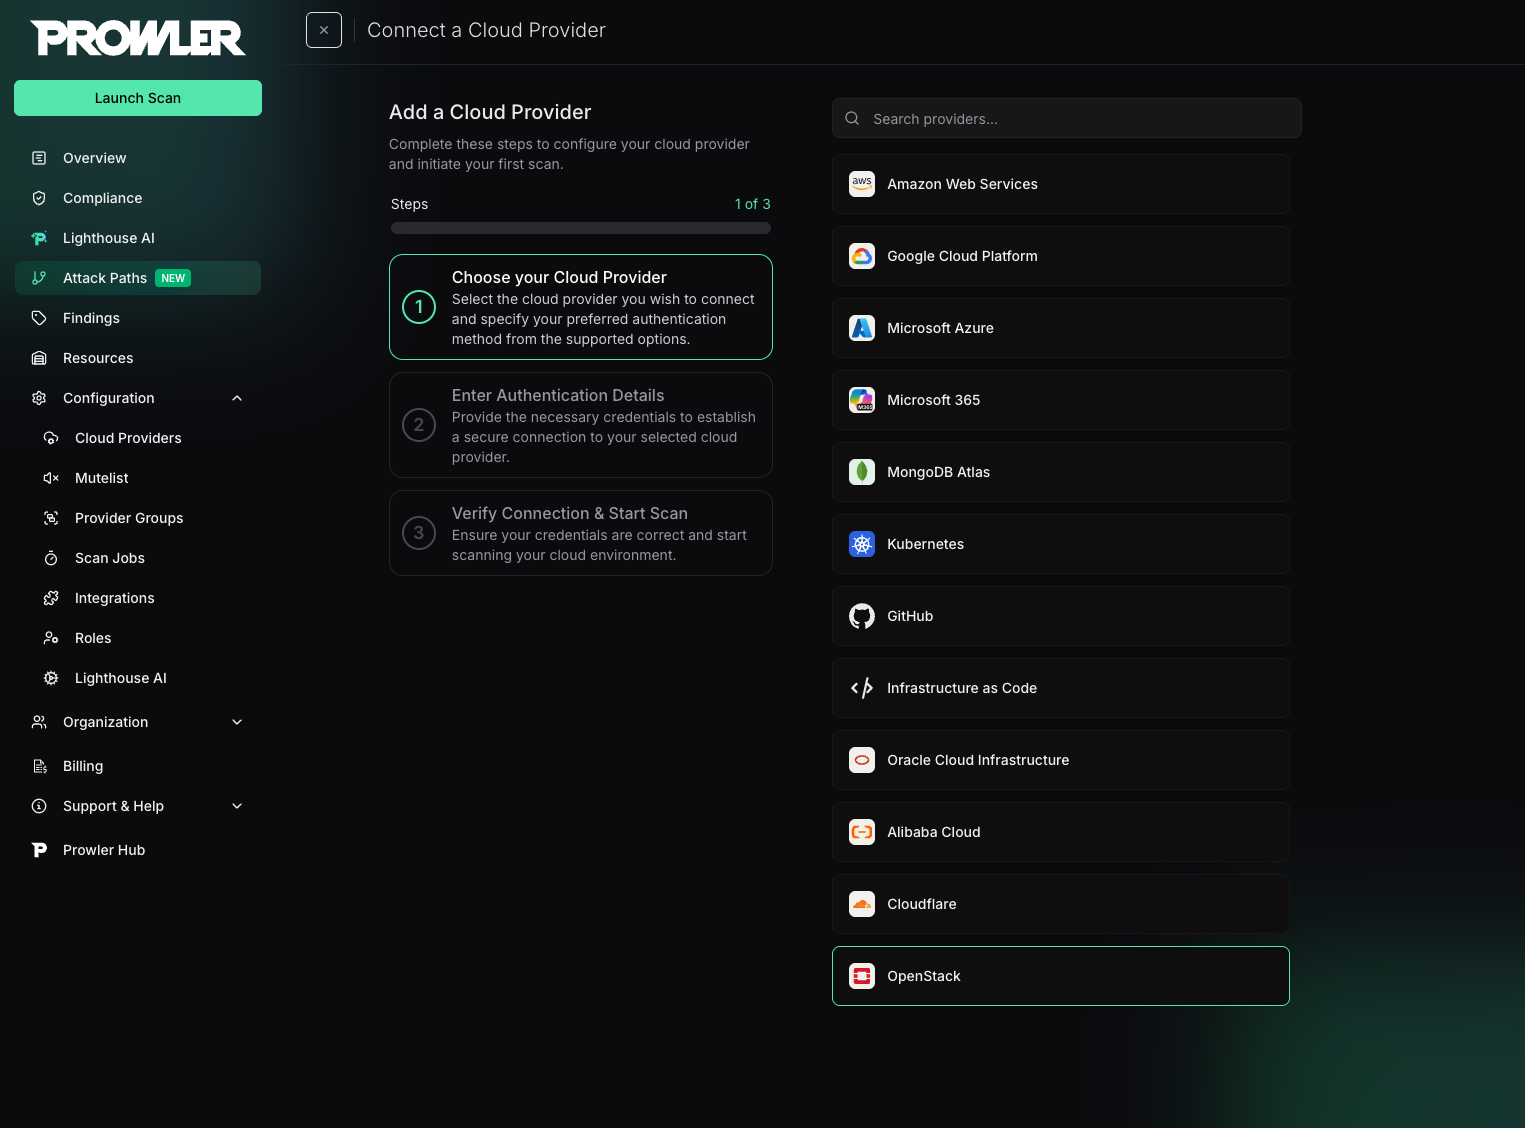 2. Select "OpenStack" from the provider list.
3. Enter the "Project ID" from the OpenStack provider.
2. Select "OpenStack" from the provider list.
3. Enter the "Project ID" from the OpenStack provider.
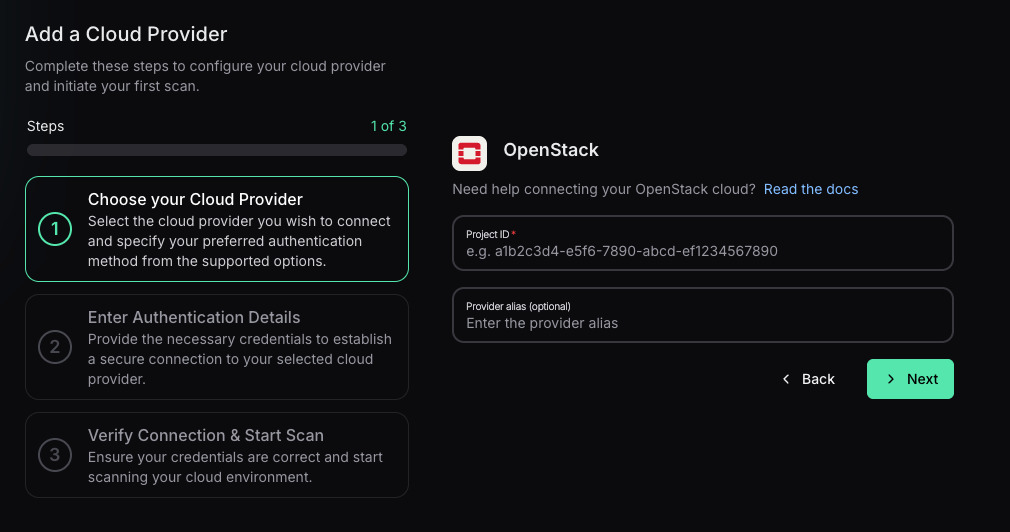 4. (Optional) Add a friendly alias to identify this project in dashboards.
### Step 2: Provide Credentials
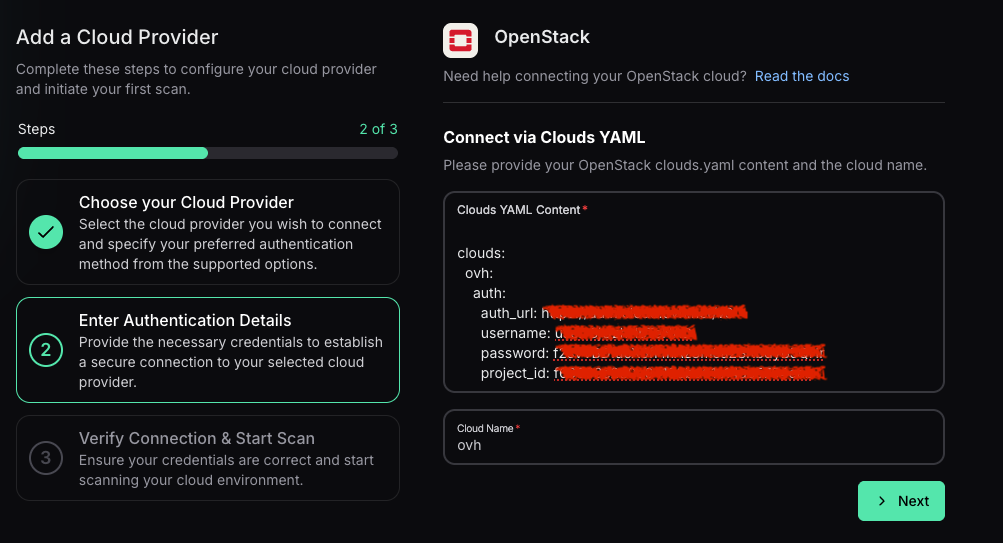
1. Click "Next" to open the credentials form.
2. Paste the full content of the `clouds.yaml` file into the "Clouds YAML Content" field. This file is available in the OpenStack provider's Horizon dashboard (see the [Authentication guide](/user-guide/providers/openstack/authentication) for detailed instructions).
3. Enter the "Cloud Name" — this is the key that identifies the cloud entry inside the `clouds.yaml` file (e.g., `mycloud`).
4. (Optional) Add a friendly alias to identify this project in dashboards.
### Step 2: Provide Credentials
1. Click "Next" to open the credentials form.
2. Paste the full content of the `clouds.yaml` file into the "Clouds YAML Content" field. This file is available in the OpenStack provider's Horizon dashboard (see the [Authentication guide](/user-guide/providers/openstack/authentication) for detailed instructions).
3. Enter the "Cloud Name" — this is the key that identifies the cloud entry inside the `clouds.yaml` file (e.g., `mycloud`).
 ### Step 3: Test the Connection and Start Scanning
1. Click "Test connection" to ensure Prowler Cloud can reach the OpenStack API.
### Step 3: Test the Connection and Start Scanning
1. Click "Test connection" to ensure Prowler Cloud can reach the OpenStack API.
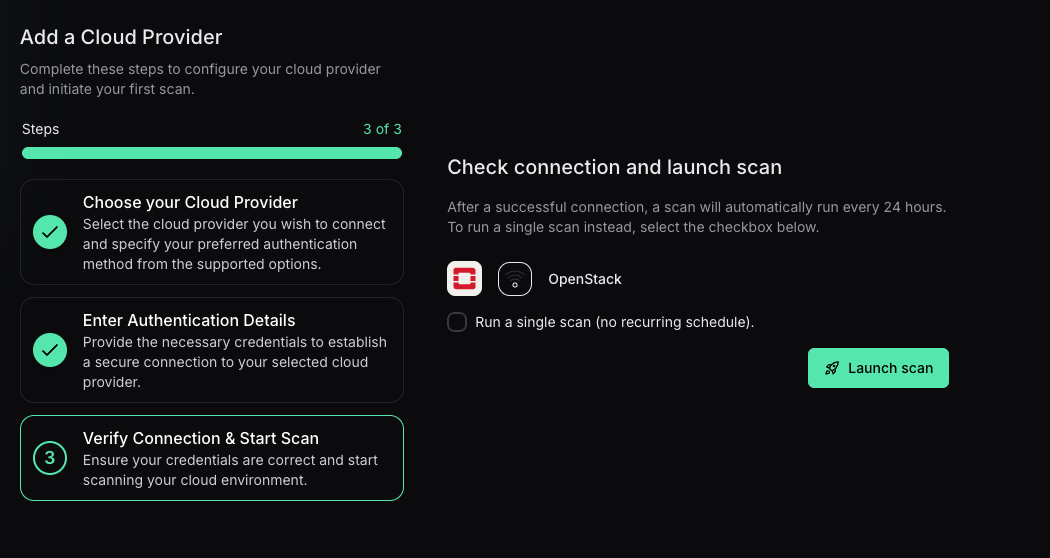 2. The provider will appear in the list with its current connection status.
3. Launch a scan from the provider row or from the "Scans" page.
***
## Prowler CLI
### Step 1: Set Up Authentication
Download the `clouds.yaml` file from your OpenStack provider (see [Authentication guide](/user-guide/providers/openstack/authentication) for detailed instructions) and save it to `~/.config/openstack/clouds.yaml`:
```bash theme={null}
# Create the directory
mkdir -p ~/.config/openstack
# Move the downloaded file
mv ~/Downloads/clouds.yaml ~/.config/openstack/clouds.yaml
# Set secure permissions
chmod 600 ~/.config/openstack/clouds.yaml
```
Prowler supports multiple authentication methods:
**Option 1: Using clouds.yaml (Recommended)**
```bash theme={null}
# Default location (~/.config/openstack/clouds.yaml)
prowler openstack --clouds-yaml-cloud openstack
# Custom location
prowler openstack --clouds-yaml-file /path/to/clouds.yaml --clouds-yaml-cloud openstack
```
**Option 2: Using Environment Variables**
```bash theme={null}
export OS_AUTH_URL=https://auth.example.com:5000/v3
export OS_USERNAME=user-xxxxxxxxxx
export OS_PASSWORD=your-password
export OS_PROJECT_ID=your-project-id
export OS_USER_DOMAIN_NAME=Default
export OS_PROJECT_DOMAIN_NAME=Default
export OS_IDENTITY_API_VERSION=3
prowler openstack
```
**Option 3: Using Flags (CLI Arguments)**
```bash theme={null}
prowler openstack \
--os-auth-url https://auth.example.com:5000/v3 \
--os-username user-xxxxxxxxxx \
--os-password your-password \
--os-project-id your-project-id \
--os-user-domain-name Default \
--os-project-domain-name Default \
--os-identity-api-version 3
```
For detailed step-by-step instructions with screenshots, see the [OpenStack Authentication guide](/user-guide/providers/openstack/authentication).
### Step 2: Run Your First Scan
Run a baseline scan of your OpenStack cloud:
```bash theme={null}
prowler openstack --clouds-yaml-cloud openstack
```
Replace `openstack` with the custom cloud name defined in the `clouds.yaml` file (e.g., `ovh-production`).
Prowler will automatically discover and audit all supported OpenStack services in your project.
**Scan a specific OpenStack service:**
```bash theme={null}
# Audit only compute (Nova) resources
prowler openstack --services compute
# Audit only networking (Neutron) resources
prowler openstack --services network
# Audit only identity (Keystone) resources
prowler openstack --services identity
```
**Run specific security checks:**
```bash theme={null}
# Execute specific checks by name
prowler openstack --checks compute_instance_public_ip_associated
# List all available checks
prowler openstack --list-checks
```
**Filter by check severity:**
```bash theme={null}
# Run only high or critical severity checks
prowler openstack --severity critical high
```
**Generate specific output formats:**
```bash theme={null}
# JSON only
prowler openstack --output-modes json
# CSV and HTML
prowler openstack --output-modes csv html
# All formats
prowler openstack --output-modes csv json html json-asff
# Custom output directory
prowler openstack --output-directory /path/to/reports/
```
**Scan multiple OpenStack clouds:**
Configure `clouds.yaml` with multiple cloud configurations:
```yaml theme={null}
clouds:
production:
auth:
auth_url: https://prod.example.com:5000/v3
username: prod-user
password: prod-password
project_id: prod-project-id
region_name: RegionOne
identity_api_version: "3"
staging:
auth:
auth_url: https://staging.example.com:5000/v3
username: staging-user
password: staging-password
project_id: staging-project-id
region_name: RegionOne
identity_api_version: "3"
```
Run audits against each environment:
```bash theme={null}
prowler openstack --clouds-yaml-cloud production --output-directory ./reports/production/
prowler openstack --clouds-yaml-cloud staging --output-directory ./reports/staging/
```
**Scan all regions in a single run:**
If your OpenStack project spans multiple regions, replace `region_name` with a `regions` list in your `clouds.yaml`:
```yaml theme={null}
clouds:
ovh-multiregion:
auth:
auth_url: https://auth.cloud.ovh.net/v3
username: user-xxxxxxxxxx
password: your-password-here
project_id: your-project-id
user_domain_name: Default
project_domain_name: Default
regions:
- UK1
- DE1
identity_api_version: "3"
```
```bash theme={null}
prowler openstack --clouds-yaml-cloud ovh-multiregion
```
Prowler will connect to each region and scan resources across all of them. See the [Authentication guide](/user-guide/providers/openstack/authentication#multi-region-scanning) for more details.
You must use either `region_name` (single region) or `regions` (multi-region list), not both.
**Use mutelist to suppress findings:**
Create a mutelist file to suppress known findings:
```yaml theme={null}
# mutelist.yaml
Mutelist:
Accounts:
"*":
Checks:
compute_instance_public_ip_associated:
Resources:
- "instance-id-1"
- "instance-id-2"
Reason: "Public IPs required for web servers"
```
Run with mutelist:
```bash theme={null}
prowler openstack --mutelist-file mutelist.yaml
```
### Step 3: Review the Results
Prowler outputs findings to the console and generates reports in multiple formats.
By default, Prowler generates reports in the `output/` directory:
* CSV format: `output/prowler-output-{timestamp}.csv`
* JSON format: `output/prowler-output-{timestamp}.json`
* HTML dashboard: `output/prowler-output-{timestamp}.html`
## Supported OpenStack Services
Prowler currently supports security checks for the following OpenStack services:
| Common Name | OpenStack Service | Description | Example Checks |
| ------------------ | ----------------- | -------------------------------- | -------------------------------------------- |
| **Compute** | Nova | Virtual machine instances | Public IP associations, security group usage |
| **Networking** | Neutron | Virtual networks and security | Security group rules, network isolation |
| **Identity** | Keystone | Authentication and authorization | Password policies, MFA configuration |
| **Image** | Glance | Virtual machine images | Image visibility, image encryption |
| **Block Storage** | Cinder | Persistent block storage | Volume encryption, backup policies |
| **Object Storage** | Swift | Object storage service | Container ACLs, public access |
Support for additional OpenStack services will be added in future releases. Check the [release notes](https://github.com/prowler-cloud/prowler/releases) for updates.
## Troubleshooting
### Authentication Errors
If encountering authentication errors:
1. Verify credentials are correct:
```bash theme={null}
# Test OpenStack CLI with the same credentials
openstack --os-cloud openstack server list
```
2. Check network connectivity to the authentication endpoint:
```bash theme={null}
curl https://openstack.example.com:5000/v3
```
3. Verify the Identity API version is v3:
```bash theme={null}
echo $OS_IDENTITY_API_VERSION
# Should output: 3
```
For detailed troubleshooting, see the [Authentication guide](/user-guide/providers/openstack/authentication#troubleshooting).
### Permission Errors
If checks are failing due to insufficient permissions:
* Ensure your OpenStack user has the **Reader** role assigned to the project
* Check role assignments in your provider's control panel or Horizon dashboard
* Verify that your user has access to all required services (Compute, Networking, Identity, etc.)
* Contact your OpenStack provider support if you need additional permissions
### Keystone/Identity Service Limitations
Public cloud OpenStack providers (OVH, Infomaniak, Vexxhost, etc.) typically **do not expose** the Keystone/Identity service API to customers for security reasons. This means that Identity-related security checks may not be available or may return limited information.
This is expected behavior, not an error. This limitation explains why those checks are not currently available in Prowler.
If you see errors related to the Identity service:
* This is expected behavior for public cloud providers
* Identity-related checks will be added for self-deployed OpenStack environments in future releases
* Focus on other available services (Compute, Networking, Storage, etc.)
## OpenStack Additional Resources
* **Supported OpenStack versions**: Stein (2019.1) and later
* **Minimum Identity API version**: v3
* **Tested providers**: OVH Public Cloud, OpenStack-Ansible, DevStack
* **Cloud compatibility**: Fully compatible with standard OpenStack APIs
2. The provider will appear in the list with its current connection status.
3. Launch a scan from the provider row or from the "Scans" page.
***
## Prowler CLI
### Step 1: Set Up Authentication
Download the `clouds.yaml` file from your OpenStack provider (see [Authentication guide](/user-guide/providers/openstack/authentication) for detailed instructions) and save it to `~/.config/openstack/clouds.yaml`:
```bash theme={null}
# Create the directory
mkdir -p ~/.config/openstack
# Move the downloaded file
mv ~/Downloads/clouds.yaml ~/.config/openstack/clouds.yaml
# Set secure permissions
chmod 600 ~/.config/openstack/clouds.yaml
```
Prowler supports multiple authentication methods:
**Option 1: Using clouds.yaml (Recommended)**
```bash theme={null}
# Default location (~/.config/openstack/clouds.yaml)
prowler openstack --clouds-yaml-cloud openstack
# Custom location
prowler openstack --clouds-yaml-file /path/to/clouds.yaml --clouds-yaml-cloud openstack
```
**Option 2: Using Environment Variables**
```bash theme={null}
export OS_AUTH_URL=https://auth.example.com:5000/v3
export OS_USERNAME=user-xxxxxxxxxx
export OS_PASSWORD=your-password
export OS_PROJECT_ID=your-project-id
export OS_USER_DOMAIN_NAME=Default
export OS_PROJECT_DOMAIN_NAME=Default
export OS_IDENTITY_API_VERSION=3
prowler openstack
```
**Option 3: Using Flags (CLI Arguments)**
```bash theme={null}
prowler openstack \
--os-auth-url https://auth.example.com:5000/v3 \
--os-username user-xxxxxxxxxx \
--os-password your-password \
--os-project-id your-project-id \
--os-user-domain-name Default \
--os-project-domain-name Default \
--os-identity-api-version 3
```
For detailed step-by-step instructions with screenshots, see the [OpenStack Authentication guide](/user-guide/providers/openstack/authentication).
### Step 2: Run Your First Scan
Run a baseline scan of your OpenStack cloud:
```bash theme={null}
prowler openstack --clouds-yaml-cloud openstack
```
Replace `openstack` with the custom cloud name defined in the `clouds.yaml` file (e.g., `ovh-production`).
Prowler will automatically discover and audit all supported OpenStack services in your project.
**Scan a specific OpenStack service:**
```bash theme={null}
# Audit only compute (Nova) resources
prowler openstack --services compute
# Audit only networking (Neutron) resources
prowler openstack --services network
# Audit only identity (Keystone) resources
prowler openstack --services identity
```
**Run specific security checks:**
```bash theme={null}
# Execute specific checks by name
prowler openstack --checks compute_instance_public_ip_associated
# List all available checks
prowler openstack --list-checks
```
**Filter by check severity:**
```bash theme={null}
# Run only high or critical severity checks
prowler openstack --severity critical high
```
**Generate specific output formats:**
```bash theme={null}
# JSON only
prowler openstack --output-modes json
# CSV and HTML
prowler openstack --output-modes csv html
# All formats
prowler openstack --output-modes csv json html json-asff
# Custom output directory
prowler openstack --output-directory /path/to/reports/
```
**Scan multiple OpenStack clouds:**
Configure `clouds.yaml` with multiple cloud configurations:
```yaml theme={null}
clouds:
production:
auth:
auth_url: https://prod.example.com:5000/v3
username: prod-user
password: prod-password
project_id: prod-project-id
region_name: RegionOne
identity_api_version: "3"
staging:
auth:
auth_url: https://staging.example.com:5000/v3
username: staging-user
password: staging-password
project_id: staging-project-id
region_name: RegionOne
identity_api_version: "3"
```
Run audits against each environment:
```bash theme={null}
prowler openstack --clouds-yaml-cloud production --output-directory ./reports/production/
prowler openstack --clouds-yaml-cloud staging --output-directory ./reports/staging/
```
**Scan all regions in a single run:**
If your OpenStack project spans multiple regions, replace `region_name` with a `regions` list in your `clouds.yaml`:
```yaml theme={null}
clouds:
ovh-multiregion:
auth:
auth_url: https://auth.cloud.ovh.net/v3
username: user-xxxxxxxxxx
password: your-password-here
project_id: your-project-id
user_domain_name: Default
project_domain_name: Default
regions:
- UK1
- DE1
identity_api_version: "3"
```
```bash theme={null}
prowler openstack --clouds-yaml-cloud ovh-multiregion
```
Prowler will connect to each region and scan resources across all of them. See the [Authentication guide](/user-guide/providers/openstack/authentication#multi-region-scanning) for more details.
You must use either `region_name` (single region) or `regions` (multi-region list), not both.
**Use mutelist to suppress findings:**
Create a mutelist file to suppress known findings:
```yaml theme={null}
# mutelist.yaml
Mutelist:
Accounts:
"*":
Checks:
compute_instance_public_ip_associated:
Resources:
- "instance-id-1"
- "instance-id-2"
Reason: "Public IPs required for web servers"
```
Run with mutelist:
```bash theme={null}
prowler openstack --mutelist-file mutelist.yaml
```
### Step 3: Review the Results
Prowler outputs findings to the console and generates reports in multiple formats.
By default, Prowler generates reports in the `output/` directory:
* CSV format: `output/prowler-output-{timestamp}.csv`
* JSON format: `output/prowler-output-{timestamp}.json`
* HTML dashboard: `output/prowler-output-{timestamp}.html`
## Supported OpenStack Services
Prowler currently supports security checks for the following OpenStack services:
| Common Name | OpenStack Service | Description | Example Checks |
| ------------------ | ----------------- | -------------------------------- | -------------------------------------------- |
| **Compute** | Nova | Virtual machine instances | Public IP associations, security group usage |
| **Networking** | Neutron | Virtual networks and security | Security group rules, network isolation |
| **Identity** | Keystone | Authentication and authorization | Password policies, MFA configuration |
| **Image** | Glance | Virtual machine images | Image visibility, image encryption |
| **Block Storage** | Cinder | Persistent block storage | Volume encryption, backup policies |
| **Object Storage** | Swift | Object storage service | Container ACLs, public access |
Support for additional OpenStack services will be added in future releases. Check the [release notes](https://github.com/prowler-cloud/prowler/releases) for updates.
## Troubleshooting
### Authentication Errors
If encountering authentication errors:
1. Verify credentials are correct:
```bash theme={null}
# Test OpenStack CLI with the same credentials
openstack --os-cloud openstack server list
```
2. Check network connectivity to the authentication endpoint:
```bash theme={null}
curl https://openstack.example.com:5000/v3
```
3. Verify the Identity API version is v3:
```bash theme={null}
echo $OS_IDENTITY_API_VERSION
# Should output: 3
```
For detailed troubleshooting, see the [Authentication guide](/user-guide/providers/openstack/authentication#troubleshooting).
### Permission Errors
If checks are failing due to insufficient permissions:
* Ensure your OpenStack user has the **Reader** role assigned to the project
* Check role assignments in your provider's control panel or Horizon dashboard
* Verify that your user has access to all required services (Compute, Networking, Identity, etc.)
* Contact your OpenStack provider support if you need additional permissions
### Keystone/Identity Service Limitations
Public cloud OpenStack providers (OVH, Infomaniak, Vexxhost, etc.) typically **do not expose** the Keystone/Identity service API to customers for security reasons. This means that Identity-related security checks may not be available or may return limited information.
This is expected behavior, not an error. This limitation explains why those checks are not currently available in Prowler.
If you see errors related to the Identity service:
* This is expected behavior for public cloud providers
* Identity-related checks will be added for self-deployed OpenStack environments in future releases
* Focus on other available services (Compute, Networking, Storage, etc.)
## OpenStack Additional Resources
* **Supported OpenStack versions**: Stein (2019.1) and later
* **Minimum Identity API version**: v3
* **Tested providers**: OVH Public Cloud, OpenStack-Ansible, DevStack
* **Cloud compatibility**: Fully compatible with standard OpenStack APIs