> ## Documentation Index
> Fetch the complete documentation index at: https://docs.prowler.com/llms.txt
> Use this file to discover all available pages before exploring further.
# Amazon S3 Integration
export const VersionBadge = ({version}) => {
return Added in:{version};
};
**Prowler App** allows automatic export of scan results to Amazon S3 buckets, providing seamless integration with existing data workflows and storage infrastructure. This comprehensive guide demonstrates configuration and management of Amazon S3 integrations to streamline security finding management and reporting.
When enabled and configured, scan results are automatically stored in the configured bucket. Results are provided in `csv`, `html` and `json-ocsf` formats, offering flexibility for custom integrations:
{/* - json-asff */}
Enabling this integration incurs costs in Amazon S3. Refer to [Amazon S3 pricing](https://aws.amazon.com/s3/pricing/) for more information.
The Amazon S3 Integration provides the following capabilities:
* **Automate scan result exports** to designated S3 buckets after each scan
* **Configure separate bucket destinations** for different cloud providers or use cases
* **Customize export paths** within buckets for organized storage
* **Support multiple authentication methods** including IAM roles and static credentials
* **Verify connection reliability** through built-in connection testing
* **Manage integrations independently** with separate configuration and credential controls
## Required Permissions
Before configuring the Amazon S3 Integration, ensure that AWS credentials and optionally the IAM Role used for S3 access have the necessary permissions to write scan results to the designated S3 bucket. This requirement applies when using static credentials, session credentials, or an IAM role (either self-created or generated using [Prowler's permissions templates](#available-templates)).
### IAM Policy
The S3 integration requires the following permissions. Add these to the IAM role policy, or ensure AWS credentials have these permissions:
```json title="s3:DeleteObject" theme={null}
{
"Version": "2012-10-17",
"Statement": [
{
"Condition": {
"StringEquals": {
"s3:ResourceAccount": ""
}
},
"Action": [
"s3:DeleteObject"
],
"Resource": [
"arn:aws:s3:::/*test-prowler-connection.txt"
],
"Effect": "Allow"
}
]
}
```
`s3:DeleteObject` permission is required for connection testing. When testing the S3 integration, Prowler creates a temporary beacon file, `test-prowler-connection.txt`, to verify write permissions, then deletes it to confirm the connection is working properly.
```json title="s3:PutObject" theme={null}
{
"Version": "2012-10-17",
"Statement": [
{
"Condition": {
"StringEquals": {
"s3:ResourceAccount": ""
}
},
"Action": [
"s3:PutObject"
],
"Resource": [
"arn:aws:s3:::/*"
],
"Effect": "Allow"
}
]
}
```
```json title="s3:ListBucket" theme={null}
{
"Version": "2012-10-17",
"Statement": [
{
"Condition": {
"StringEquals": {
"s3:ResourceAccount": ""
}
},
"Action": [
"s3:ListBucket"
],
"Resource": [
"arn:aws:s3:::"
],
"Effect": "Allow"
}
]
}
```
Replace `` with the AWS account ID that owns the destination S3 bucket, and `` with the actual bucket name.
### Cross-Account S3 Bucket
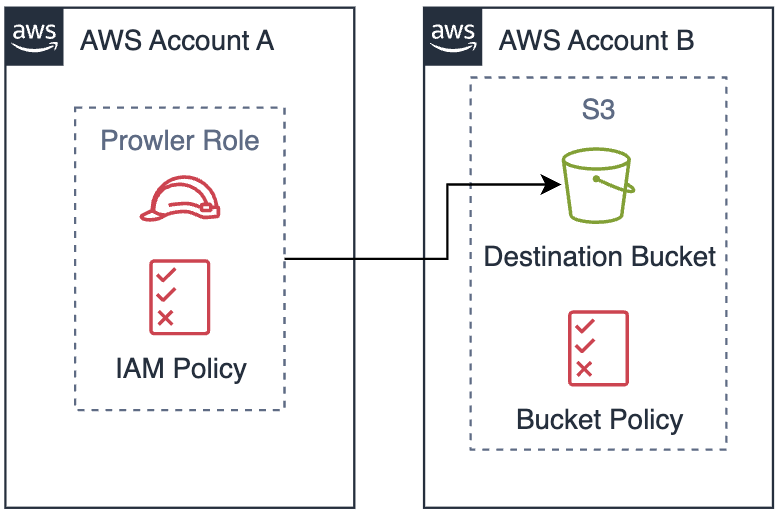
If the S3 destination bucket is in a different AWS account than the one providing the credentials for S3 access, configure a bucket policy on the destination bucket to allow cross-account access.
The following diagrams illustrate the three common S3 integration scenarios:
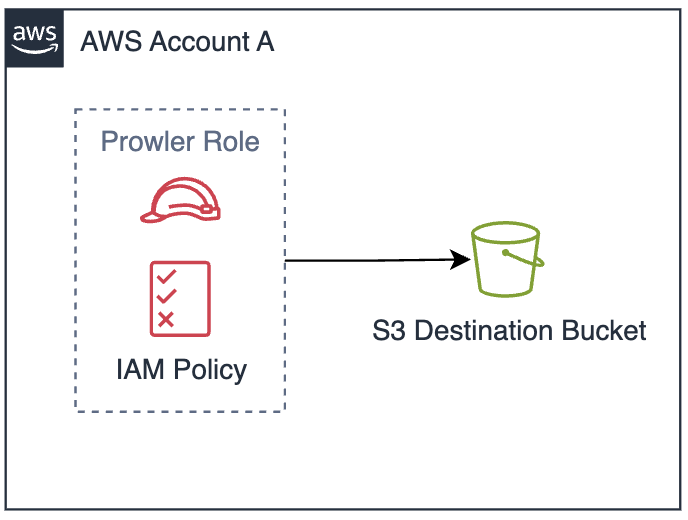
##### Same Account Setup (No Bucket Policy Required)
When both the IAM credentials and destination S3 bucket are in the same AWS account, no additional bucket policy is required.
##### Cross-Account Setup (Bucket Policy Required)
When the S3 bucket is in a different AWS account, you must configure a bucket policy to allow cross-account access.
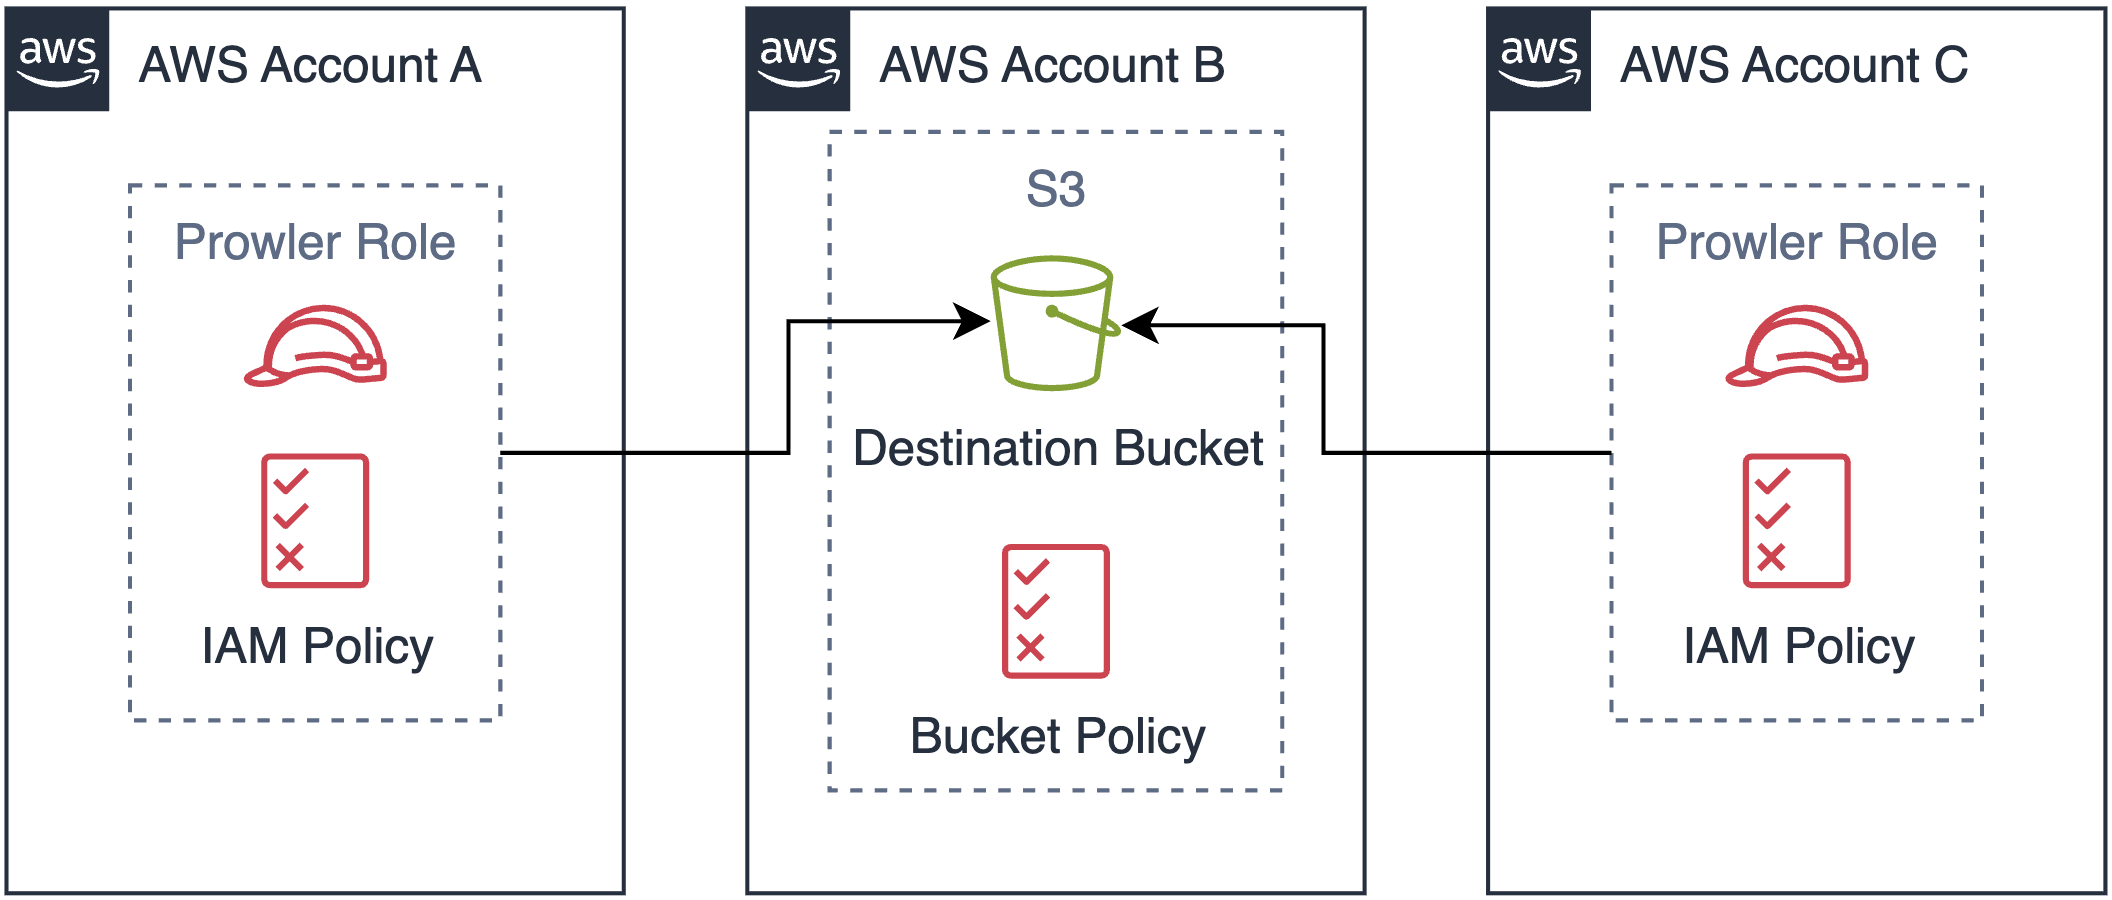
##### Multi-Account Setup (Multiple Principals in Bucket Policy)
When multiple AWS accounts need to write to the same destination bucket, configure the bucket policy with multiple principals.
#### S3 Bucket Policy
Apply the following bucket policy to the destination S3 bucket:
```json theme={null}
{
"Version": "2012-10-17",
"Statement": [
{
"Effect": "Allow",
"Principal": {
"AWS": "arn:aws:iam:::role/ProwlerScan"
},
"Action": "s3:PutObject",
"Resource": "arn:aws:s3:::/*"
},
{
"Effect": "Allow",
"Principal": {
"AWS": "arn:aws:iam:::role/ProwlerScan"
},
"Action": "s3:DeleteObject",
"Resource": "arn:aws:s3:::/*test-prowler-connection.txt"
},
{
"Effect": "Allow",
"Principal": {
"AWS": "arn:aws:iam:::role/ProwlerScan"
},
"Action": "s3:ListBucket",
"Resource": "arn:aws:s3:::"
}
]
}
```
Replace `` with the AWS account ID that contains the IAM role and `` with the destination bucket name. The role name `ProwlerScan` is the default name when using Prowler's permissions templates. If using a custom IAM role or different authentication method, replace `ProwlerScan` with the actual role name.
##### Multi-Account Configuration
For multiple AWS accounts, modify the `Principal` field to an array:
```json theme={null}
"Principal": {
"AWS": [
"arn:aws:iam:::role/ProwlerScan",
"arn:aws:iam:::role/ProwlerScan"
]
}
```
Replace `` with the AWS account ID that contains the IAM role and `` with the destination bucket name. The role name `ProwlerScan` is the default name when using Prowler's permissions templates. If using a custom IAM role or different authentication method, replace `ProwlerScan` with the actual role name.
### Available Templates
**Prowler App** provides Infrastructure as Code (IaC) templates to automate IAM role setup with S3 integration permissions.
Templates are optional. Custom IAM roles or static credentials can be used instead.
Choose from the following deployment options:
* [CloudFormation](https://prowler-cloud-public.s3.eu-west-1.amazonaws.com/permissions/templates/aws/cloudformation/prowler-scan-role.yml)
* [Terraform](https://github.com/prowler-cloud/prowler/tree/master/permissions/templates/terraform)
#### CloudFormation
##### AWS CLI
When using Prowler's CloudFormation template, execute the following command to update the existing Prowler stack:
```bash theme={null}
aws cloudformation update-stack \
--capabilities CAPABILITY_IAM --capabilities CAPABILITY_NAMED_IAM \
--stack-name "Prowler" \
--template-url "https://prowler-cloud-public.s3.eu-west-1.amazonaws.com/permissions/templates/aws/cloudformation/prowler-scan-role.yml" \
--parameters \
ParameterKey=EnableS3Integration,ParameterValue="true" \
ParameterKey=ExternalId,ParameterValue="your-external-id" \
ParameterKey=S3IntegrationBucketName,ParameterValue="your-bucket-name" \
ParameterKey=S3IntegrationBucketAccountId,ParameterValue="your-bucket-aws-account-id-owner"
```
Alternatively, if you don't have the `ProwlerScan` IAM Role, execute the following command to create the CloudFormation stack:
```bash theme={null}
aws cloudformation create-stack \
--capabilities CAPABILITY_IAM --capabilities CAPABILITY_NAMED_IAM \
--stack-name "Prowler" \
--template-url "https://prowler-cloud-public.s3.eu-west-1.amazonaws.com/permissions/templates/aws/cloudformation/prowler-scan-role.yml" \
--parameters \
ParameterKey=EnableS3Integration,ParameterValue="true" \
ParameterKey=ExternalId,ParameterValue="your-external-id" \
ParameterKey=S3IntegrationBucketName,ParameterValue="your-bucket-name" \
ParameterKey=S3IntegrationBucketAccountId,ParameterValue="your-bucket-aws-account-id-owner"
```
A CloudFormation Quick Link is also available [here](https://us-east-1.console.aws.amazon.com/cloudformation/home?region=us-east-1#/stacks/quickcreate?templateURL=https%3A%2F%2Fprowler-cloud-public.s3.eu-west-1.amazonaws.com%2Fpermissions%2Ftemplates%2Faws%2Fcloudformation%2Fprowler-scan-role.yml\&stackName=Prowler\¶m_EnableS3Integration=true)
##### AWS Console
If using Prowler's CloudFormation template, execute the following command to update the existing Prowler stack:
1. Navigate to CloudFormation service in the AWS region you are using
2. Select "ProwlerScan", click "Update" and then "Make a direct update"
3. Replace template, uploading the [CloudFormation template](https://prowler-cloud-public.s3.eu-west-1.amazonaws.com/permissions/templates/aws/cloudformation/prowler-scan-role.yml)
4. Configure parameters:
* `ExternalId`: Keep existing value
* `EnableS3Integration`: Select "true"
* `S3IntegrationBucketName`: Your bucket name
* `S3IntegrationBucketAccountId`: Bucket owner's AWS account ID
5. In the "Configure stack options" screen, again, leave everything as it is and click on "Next"
6. Finally, under "Review Prowler", at the bottom click on "Submit"
#### Terraform
1. Download the Terraform code:
```bash theme={null}
# Clone or download from GitHub
git clone https://github.com/prowler-cloud/prowler.git
cd prowler/permissions/templates/terraform
```
2. Configure your variables:
```bash theme={null}
cp terraform.tfvars.example terraform.tfvars
```
3. Edit `terraform.tfvars` with your specific values:
```hcl theme={null}
# Required: External ID from Prowler App
external_id = "your-unique-external-id-here"
# S3 Integration Configuration
enable_s3_integration = true
s3_integration_bucket_name = "your-s3-bucket-name"
s3_integration_bucket_account_id = "123456789012" # Bucket owner's AWS Account ID
```
4. Deploy the infrastructure:
```bash theme={null}
terraform init
terraform plan # Review the planned changes
terraform apply # Type 'yes' when prompted
```
5. After successful deployment, Terraform will display important values:
```
Outputs:
prowler_role_arn = "arn:aws:iam::123456789012:role/ProwlerScan"
prowler_role_name = "ProwlerScan"
s3_integration_enabled = "true"
```
6. Copy the `prowler_role_arn`, as it's required to complete the S3 integration credentials configuration.
For detailed information, refer to the [Terraform README](https://github.com/prowler-cloud/prowler/blob/master/permissions/templates/terraform/README.md).
***
## Configuration
Once the required permissions are set up, proceed to configure the S3 integration in **Prowler App**.
1. Navigate to "Integrations"
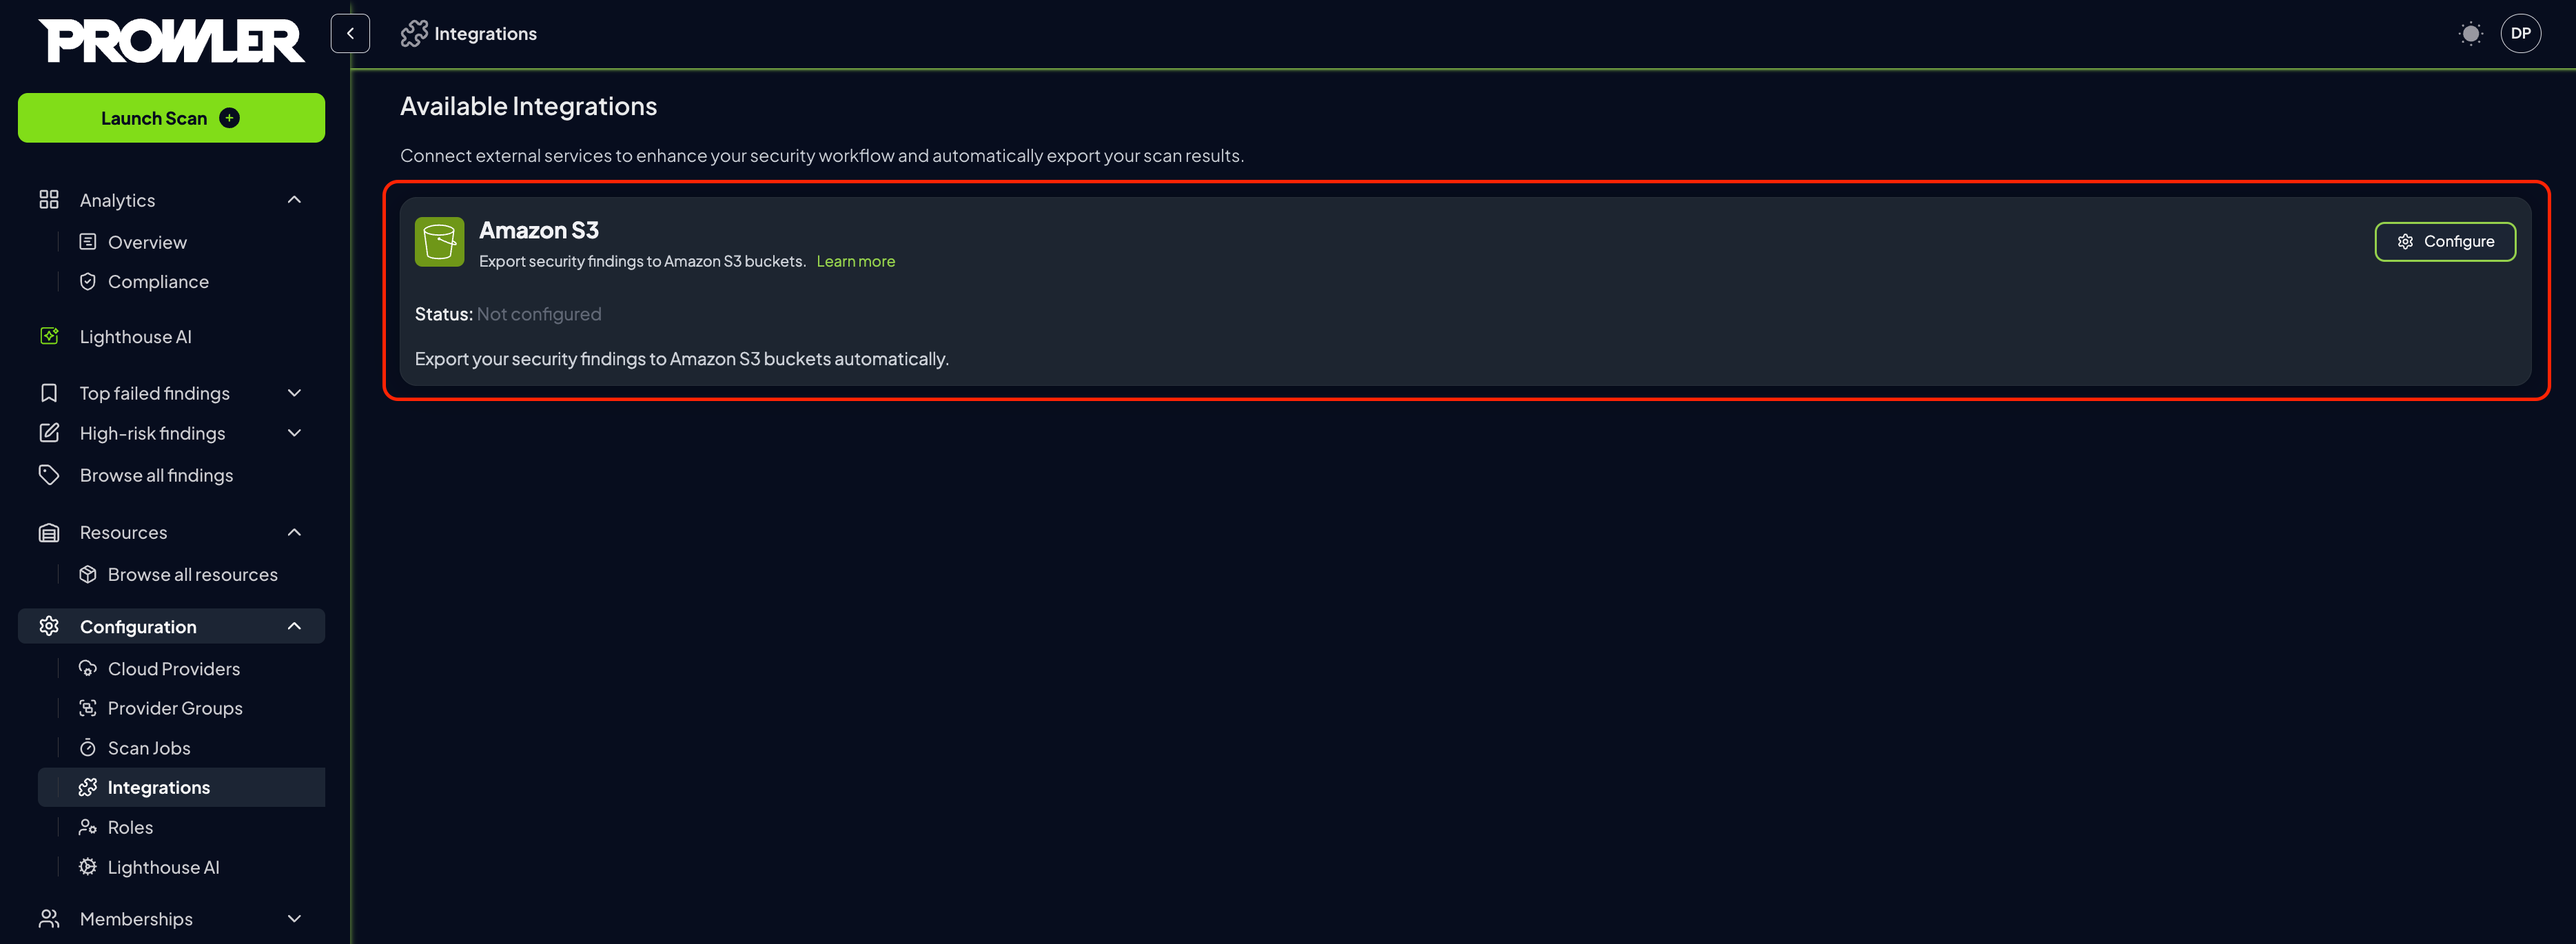
2. Locate the Amazon S3 Integration card and click on the "Configure" button
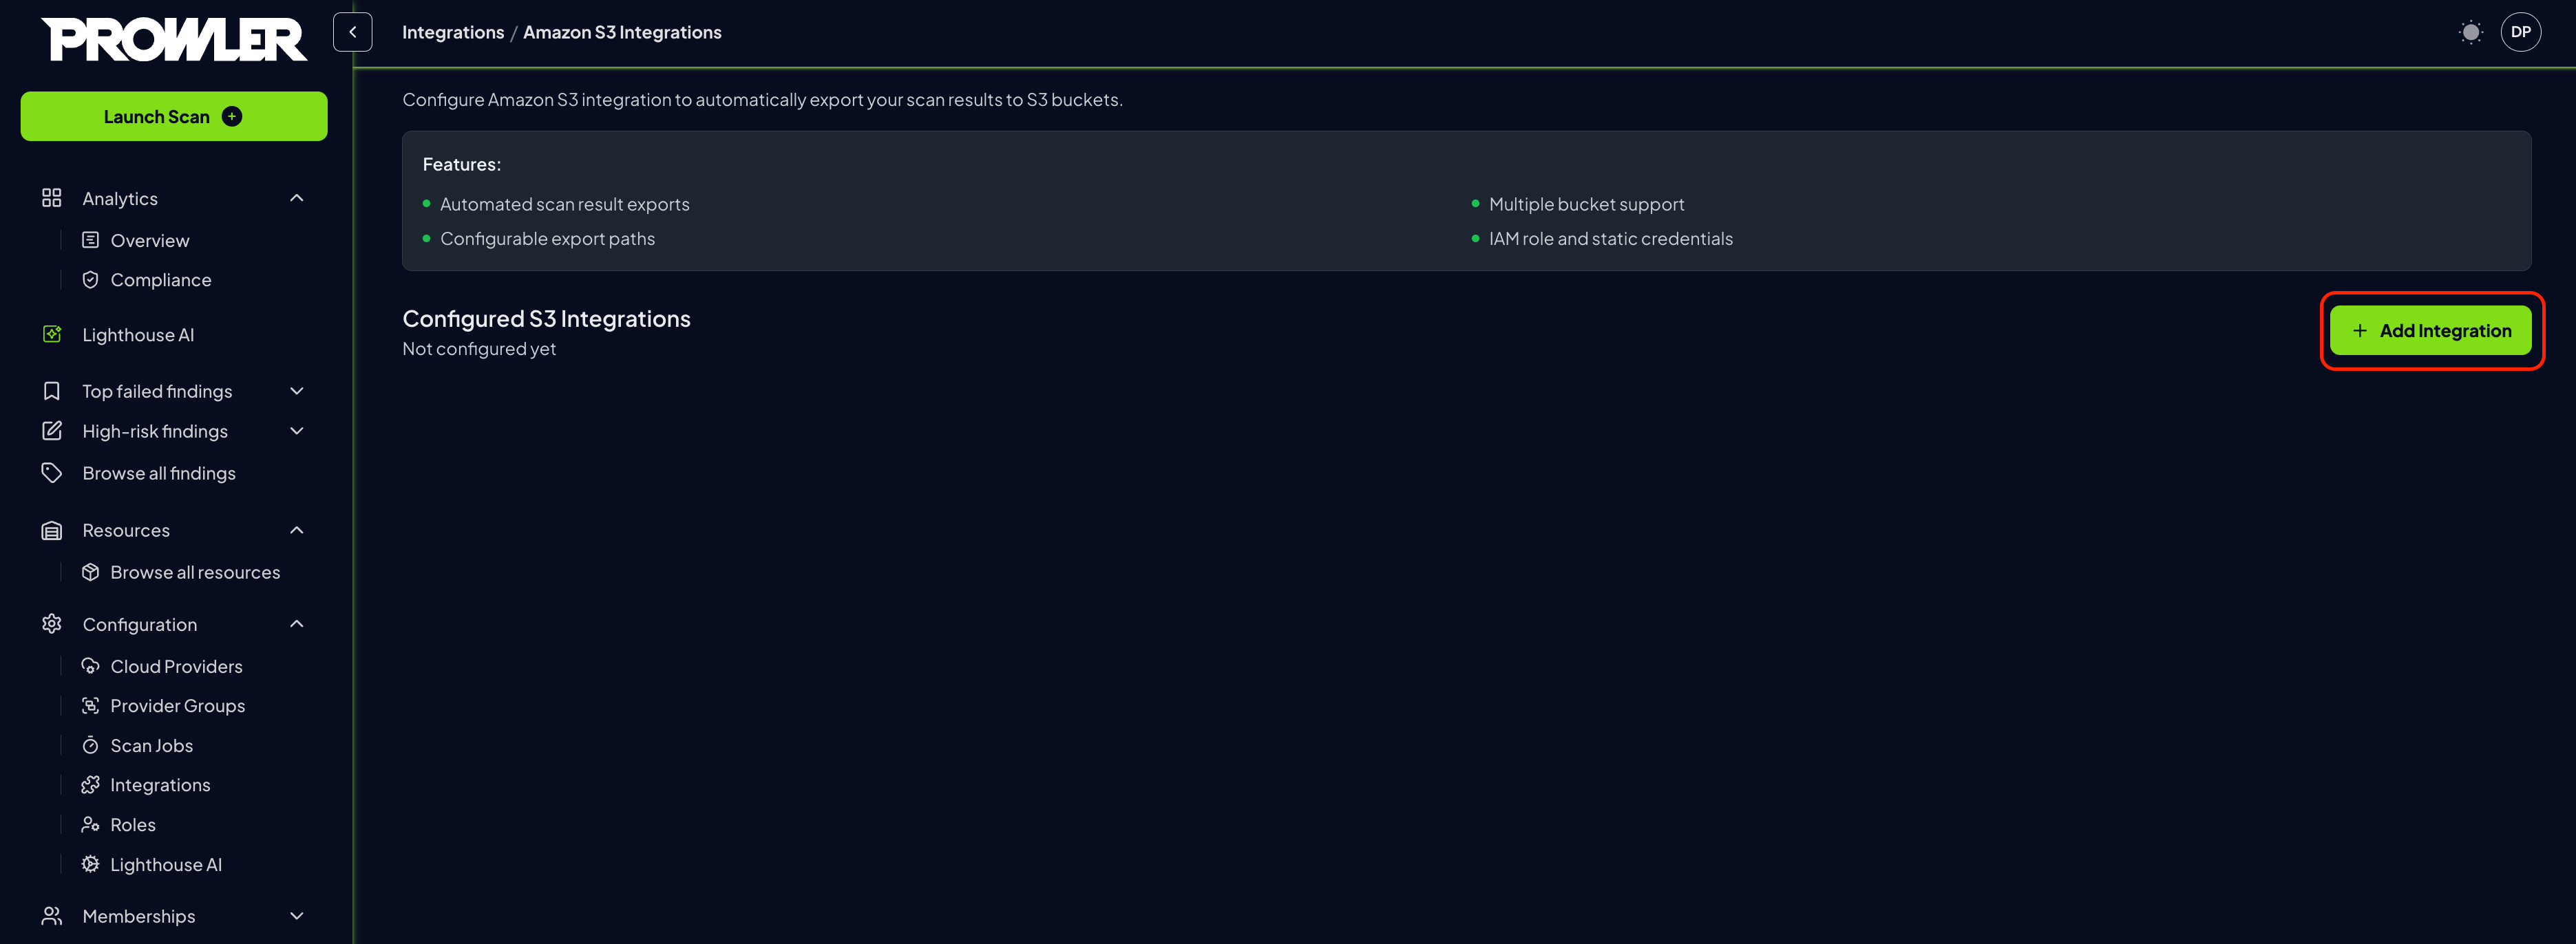
3. Click the "Add Integration" button
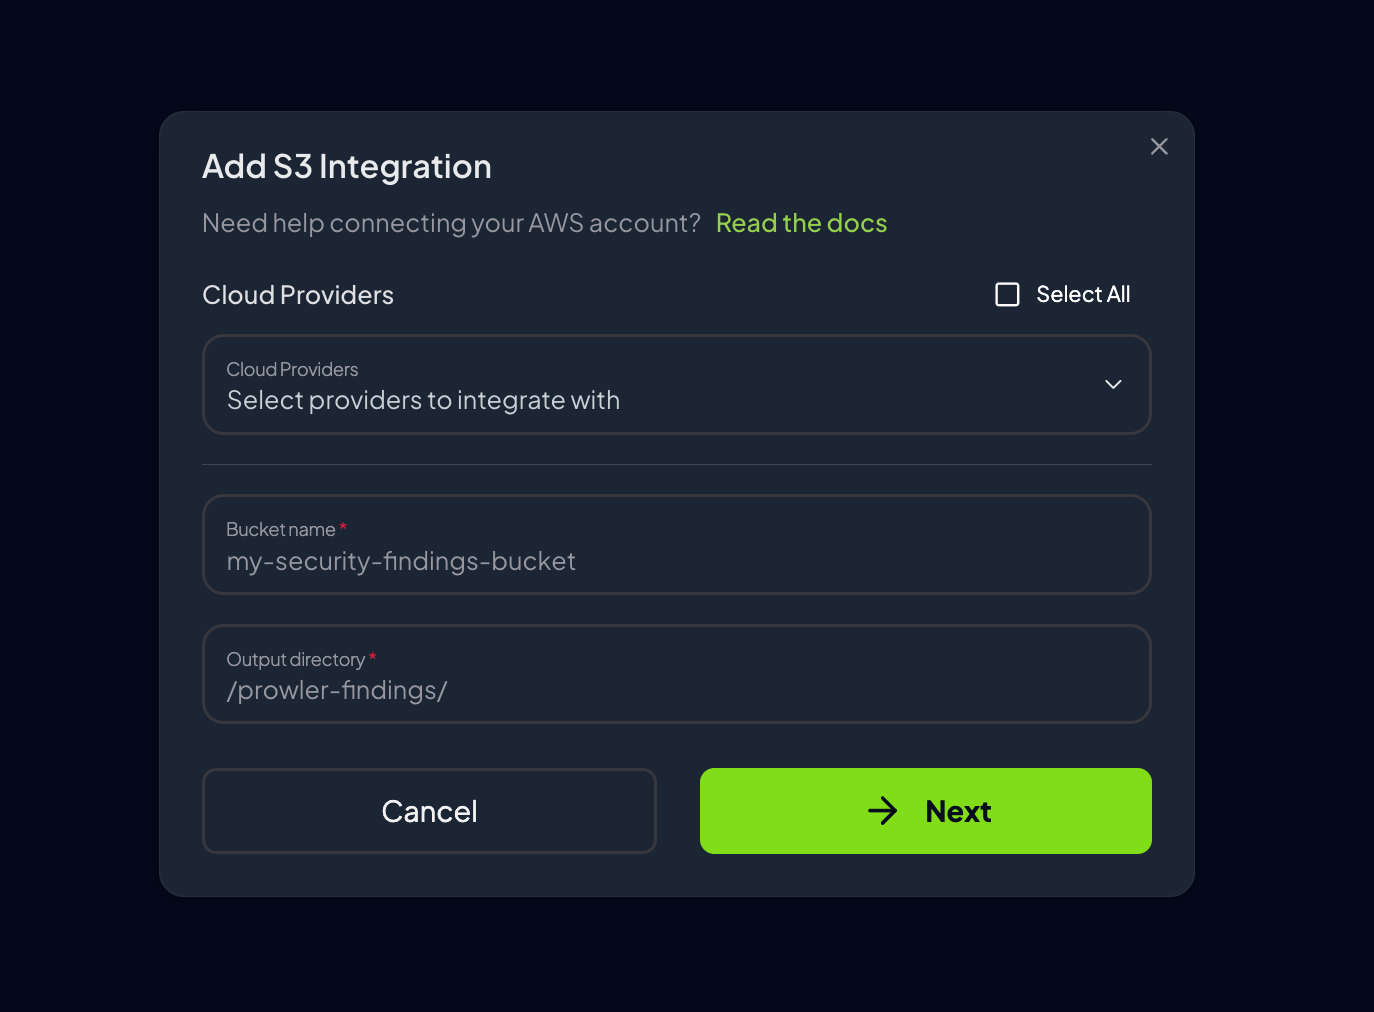
4. Complete the configuration form with the following details:
* **Providers:** Select the providers whose scan results should be exported to this S3 bucket
* **Bucket Name:** Enter the name of the target S3 bucket (e.g., `my-security-findings-bucket`)
* **Output Directory:** Specify the directory path within the bucket (e.g., `/prowler-findings/`, defaults to `output`)
5. Click "Next" to configure credentials
6. Configure AWS authentication using one of the supported methods:
* **AWS SDK Default:** Use default AWS credentials from the environment. For Prowler Cloud users, this is the recommended option as the service has AWS credentials to assume IAM roles with ARNs matching `arn:aws:iam::*:role/Prowler*` or `arn:aws:iam::*:role/prowler*`
* **Access Keys:** Provide AWS access key ID and secret access key
* **IAM Role (optional):** Specify the IAM Role ARN, external ID, and optional session parameters
7. Optional - For IAM role authentication, complete the required fields:
* **Role ARN:** The Amazon Resource Name of the IAM role
* **External ID:** Unique identifier for additional security (defaults to Tenant/Organization ID) - mandatory and automatically filled
* **Role Session Name:** Optional - name for the assumed role session
* **Session Duration:** Optional - duration in seconds for the session
8. Click "Create Integration" to verify the connection and complete the setup
Once credentials are configured and the connection test passes, the S3 integration will be active. Scan results will automatically be exported to the specified bucket after each scan completes. Run a new scan and check the S3 bucket to verify the integration is working.
Scan outputs are processed after scan completion. Depending on scan size and network conditions, exports may take a few minutes to appear in the S3 bucket.
***
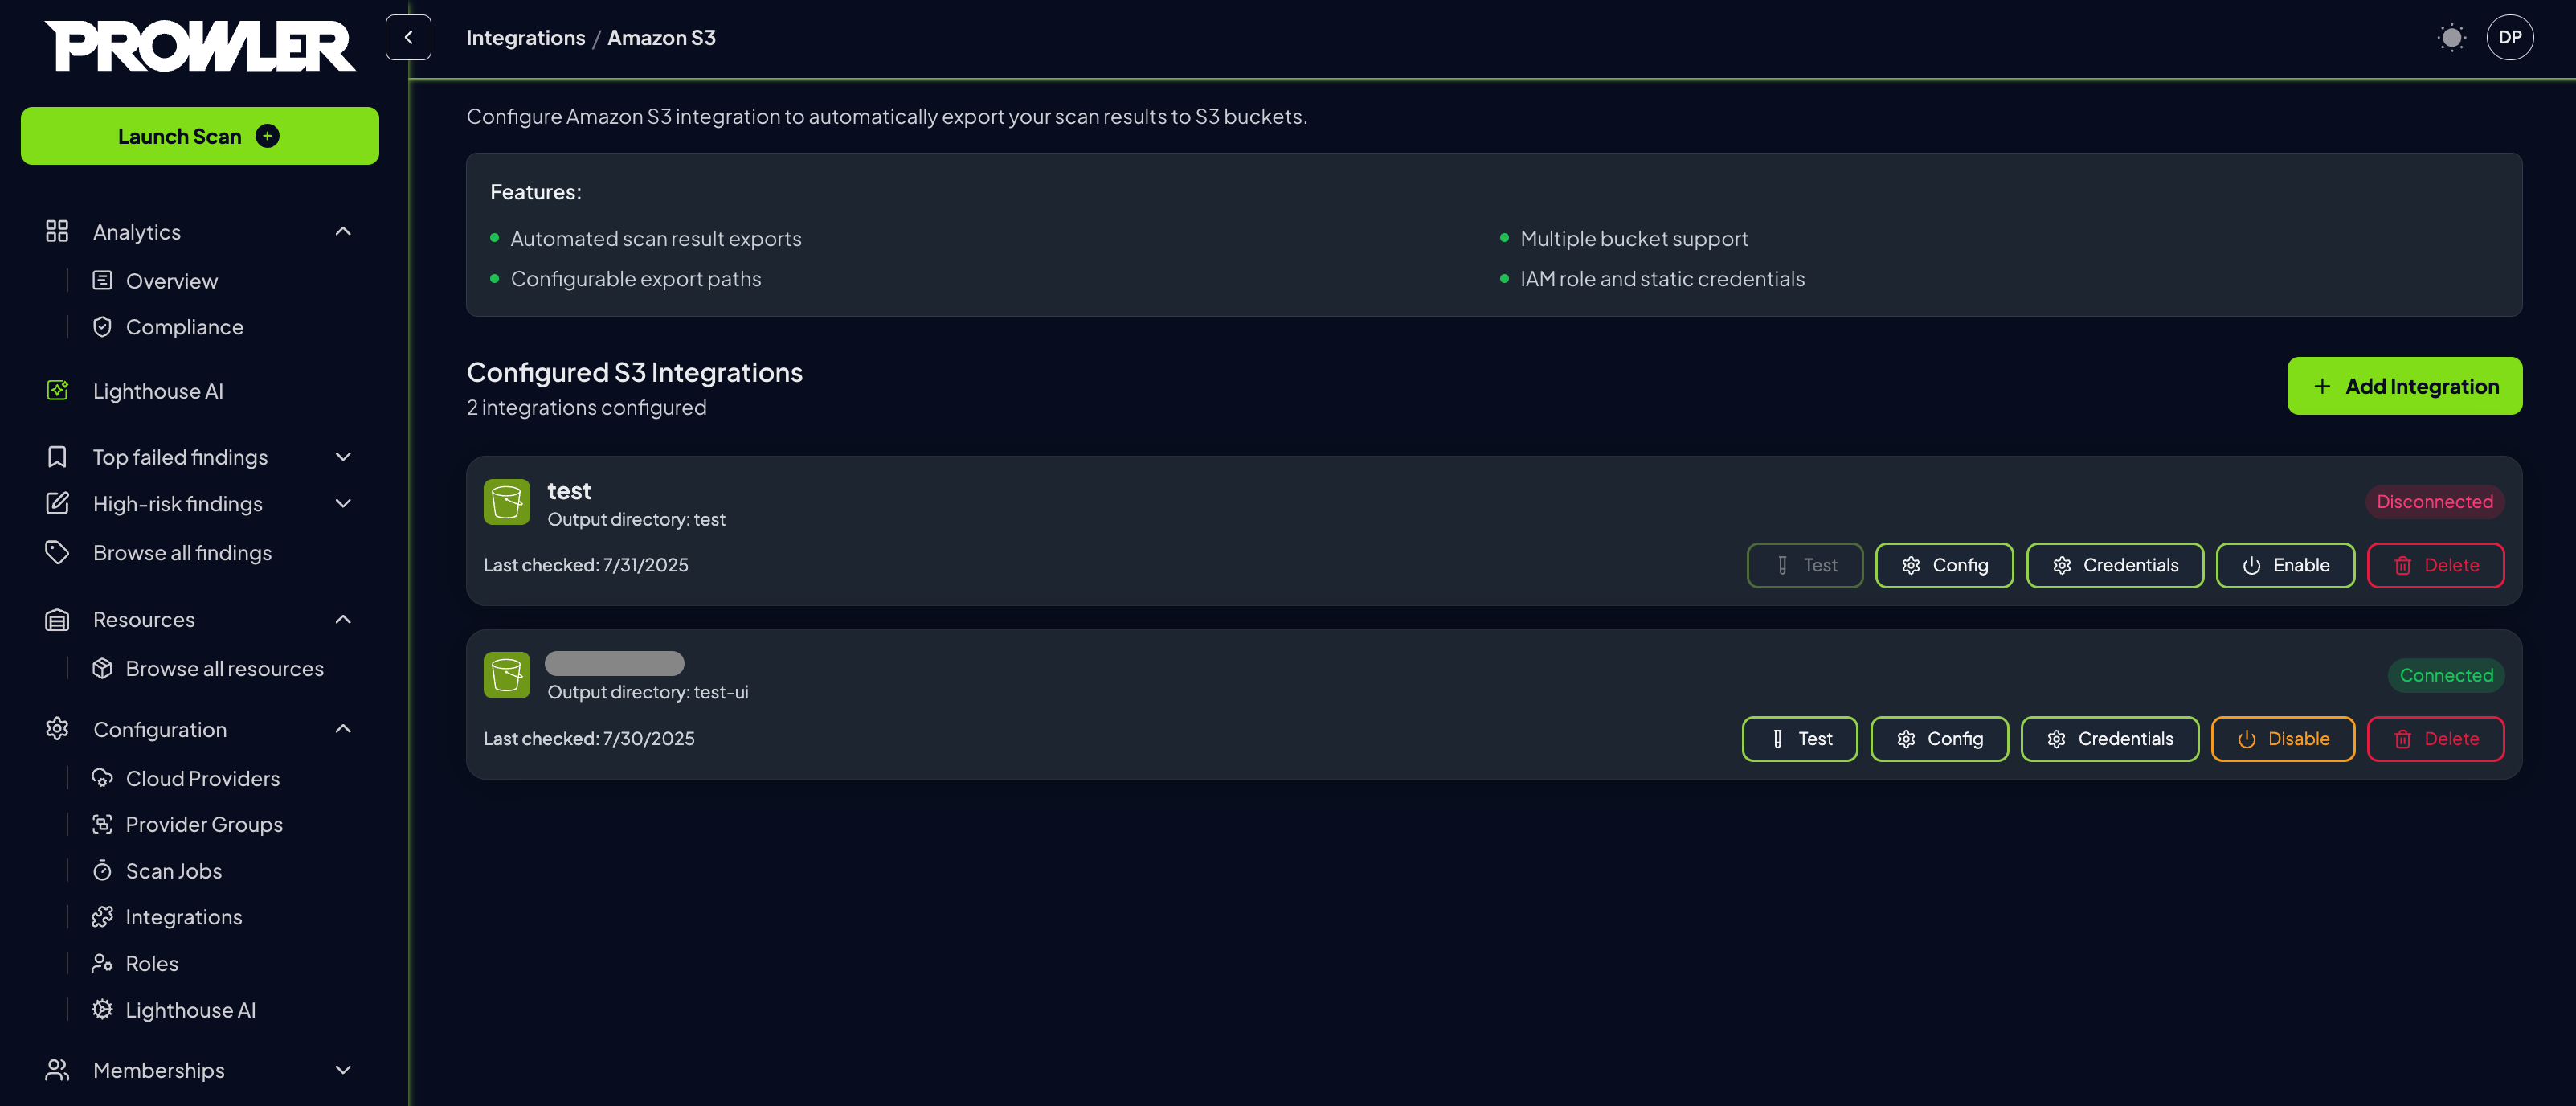
### Integration Status
Once the integration is active, monitor its status and make adjustments as needed through the integrations management interface.
1. Review configured integrations in the management interface
2. Each integration displays:
* **Connection Status:** Connected or Disconnected indicator
* **Bucket Information:** Bucket name and output directory
* **Last Checked:** Timestamp of the most recent connection test
#### Actions
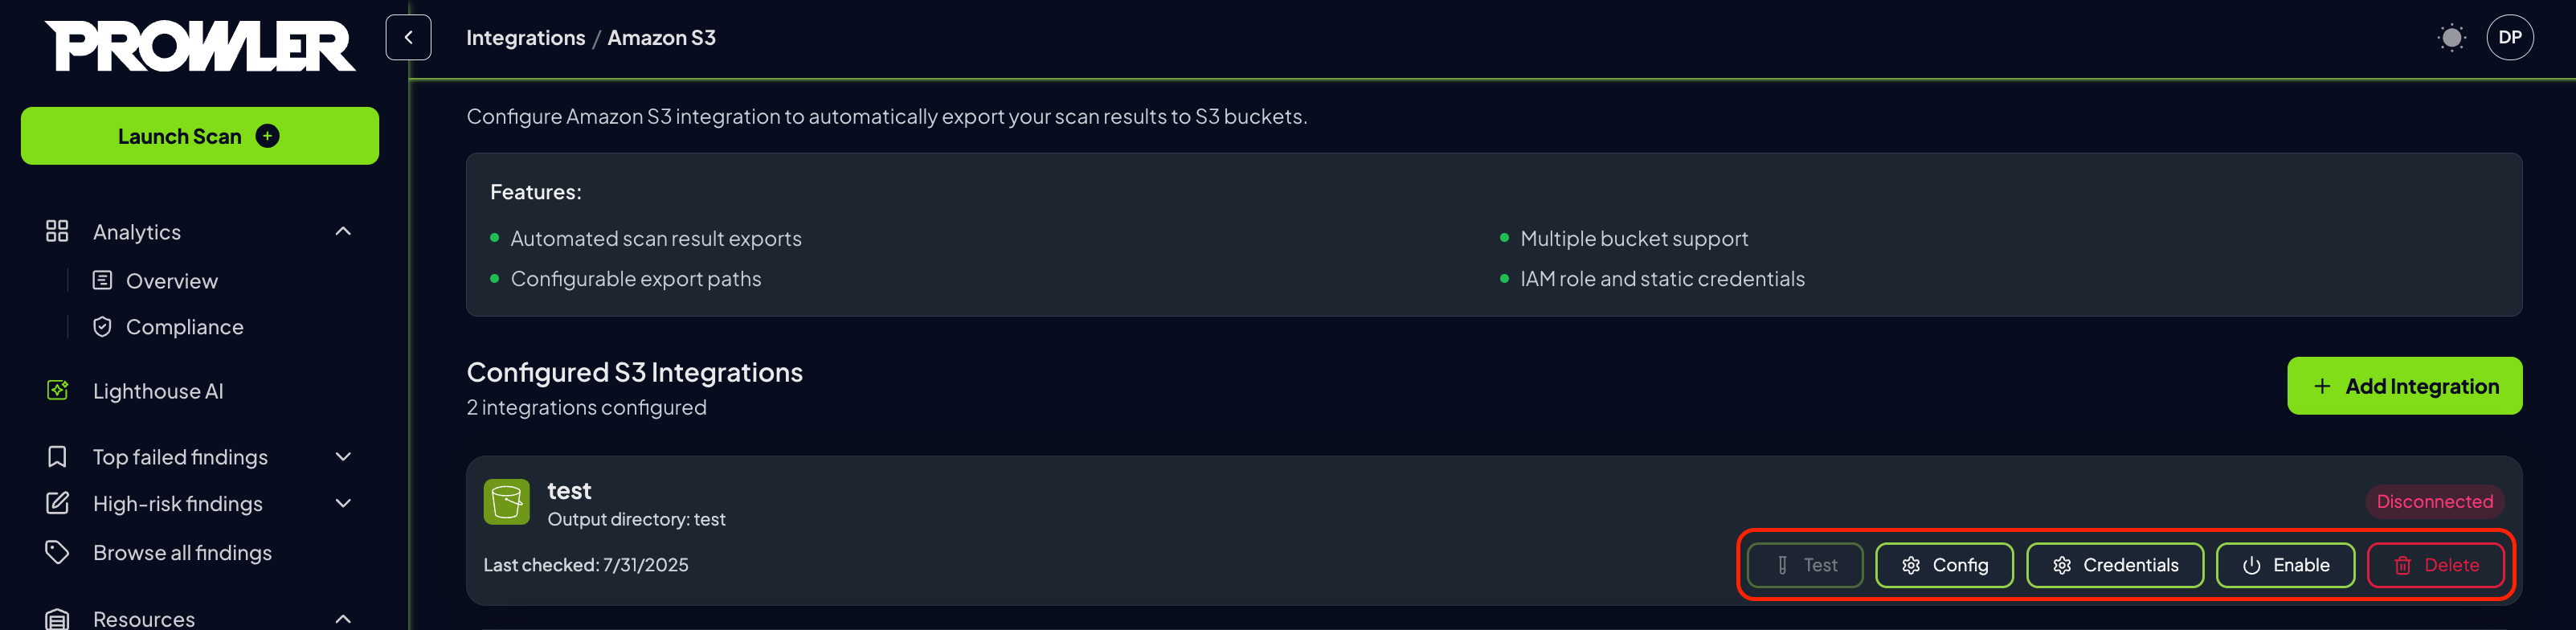
Each S3 integration provides several management actions accessible through dedicated buttons:
| Button | Purpose | Available Actions | Notes |
| ------------------ | ------------------------------- | ------------------------------------------------------------------------------------------------------------------------------------ | ------------------------------------------------- |
| **Test** | Verify integration connectivity | • Test AWS credential validity • Check S3 bucket accessibility • Verify write permissions • Validate connection setup | Results displayed in notification message |
| **Config** | Modify integration settings | • Update selected cloud providers • Change bucket name • Modify output directory path | Click "Update Configuration" to save changes |
| **Credentials** | Update authentication settings | • Modify AWS access keys • Update IAM role configuration • Change authentication method | Click "Update Credentials" to save changes |
| **Enable/Disable** | Toggle integration status | • Enable integration to start exporting results • Disable integration to pause exports | Status change takes effect immediately |
| **Delete** | Remove integration permanently | • Permanently delete integration • Remove all configuration data | ⚠️ **Cannot be undone** - confirm before deleting |
**Management Best Practices**
* Test the integration after any configuration changes
* Use the Enable/Disable toggle for temporary changes instead of deleting
***
## Understanding S3 Export Structure
When the S3 integration is enabled and a scan completes, Prowler creates a folder inside the specified bucket path (using `output` as the default folder name) with subfolders for each output format:
* Regular: `prowler-output-{provider-uid}-{timestamp}.{extension}`
* Compliance: `prowler-output-{provider-uid}-{timestamp}_{compliance_framework}.{extension}`
```
output/
├── compliance/
│ └── prowler-output-111122223333-20250805120000_cis_5.0_aws.csv
├── csv/
│ └── prowler-output-111122223333-20250805120000.csv
├── html/
│ └── prowler-output-111122223333-20250805120000.html
└── json-ocsf/
└── prowler-output-111122223333-20250805120000.ocsf.json
```
For detailed information about Prowler's reporting formats, refer to the [Prowler reporting documentation](https://docs.prowler.com/projects/prowler-open-source/en/latest/tutorials/reporting/).
## Troubleshooting
**Connection test fails:**
* Check AWS credentials are valid
* If using IAM Role, check its permissions
* Verify bucket permissions and region
* Confirm network access to S3
**No scan results in bucket:**
* Ensure integration shows "Connected"
* Check that provider is associated with integration
* Verify bucket policies allow writes
 ##### Cross-Account Setup (Bucket Policy Required)
When the S3 bucket is in a different AWS account, you must configure a bucket policy to allow cross-account access.
##### Cross-Account Setup (Bucket Policy Required)
When the S3 bucket is in a different AWS account, you must configure a bucket policy to allow cross-account access.
 ##### Multi-Account Setup (Multiple Principals in Bucket Policy)
When multiple AWS accounts need to write to the same destination bucket, configure the bucket policy with multiple principals.
##### Multi-Account Setup (Multiple Principals in Bucket Policy)
When multiple AWS accounts need to write to the same destination bucket, configure the bucket policy with multiple principals.
 #### S3 Bucket Policy
Apply the following bucket policy to the destination S3 bucket:
```json theme={null}
{
"Version": "2012-10-17",
"Statement": [
{
"Effect": "Allow",
"Principal": {
"AWS": "arn:aws:iam::
#### S3 Bucket Policy
Apply the following bucket policy to the destination S3 bucket:
```json theme={null}
{
"Version": "2012-10-17",
"Statement": [
{
"Effect": "Allow",
"Principal": {
"AWS": "arn:aws:iam::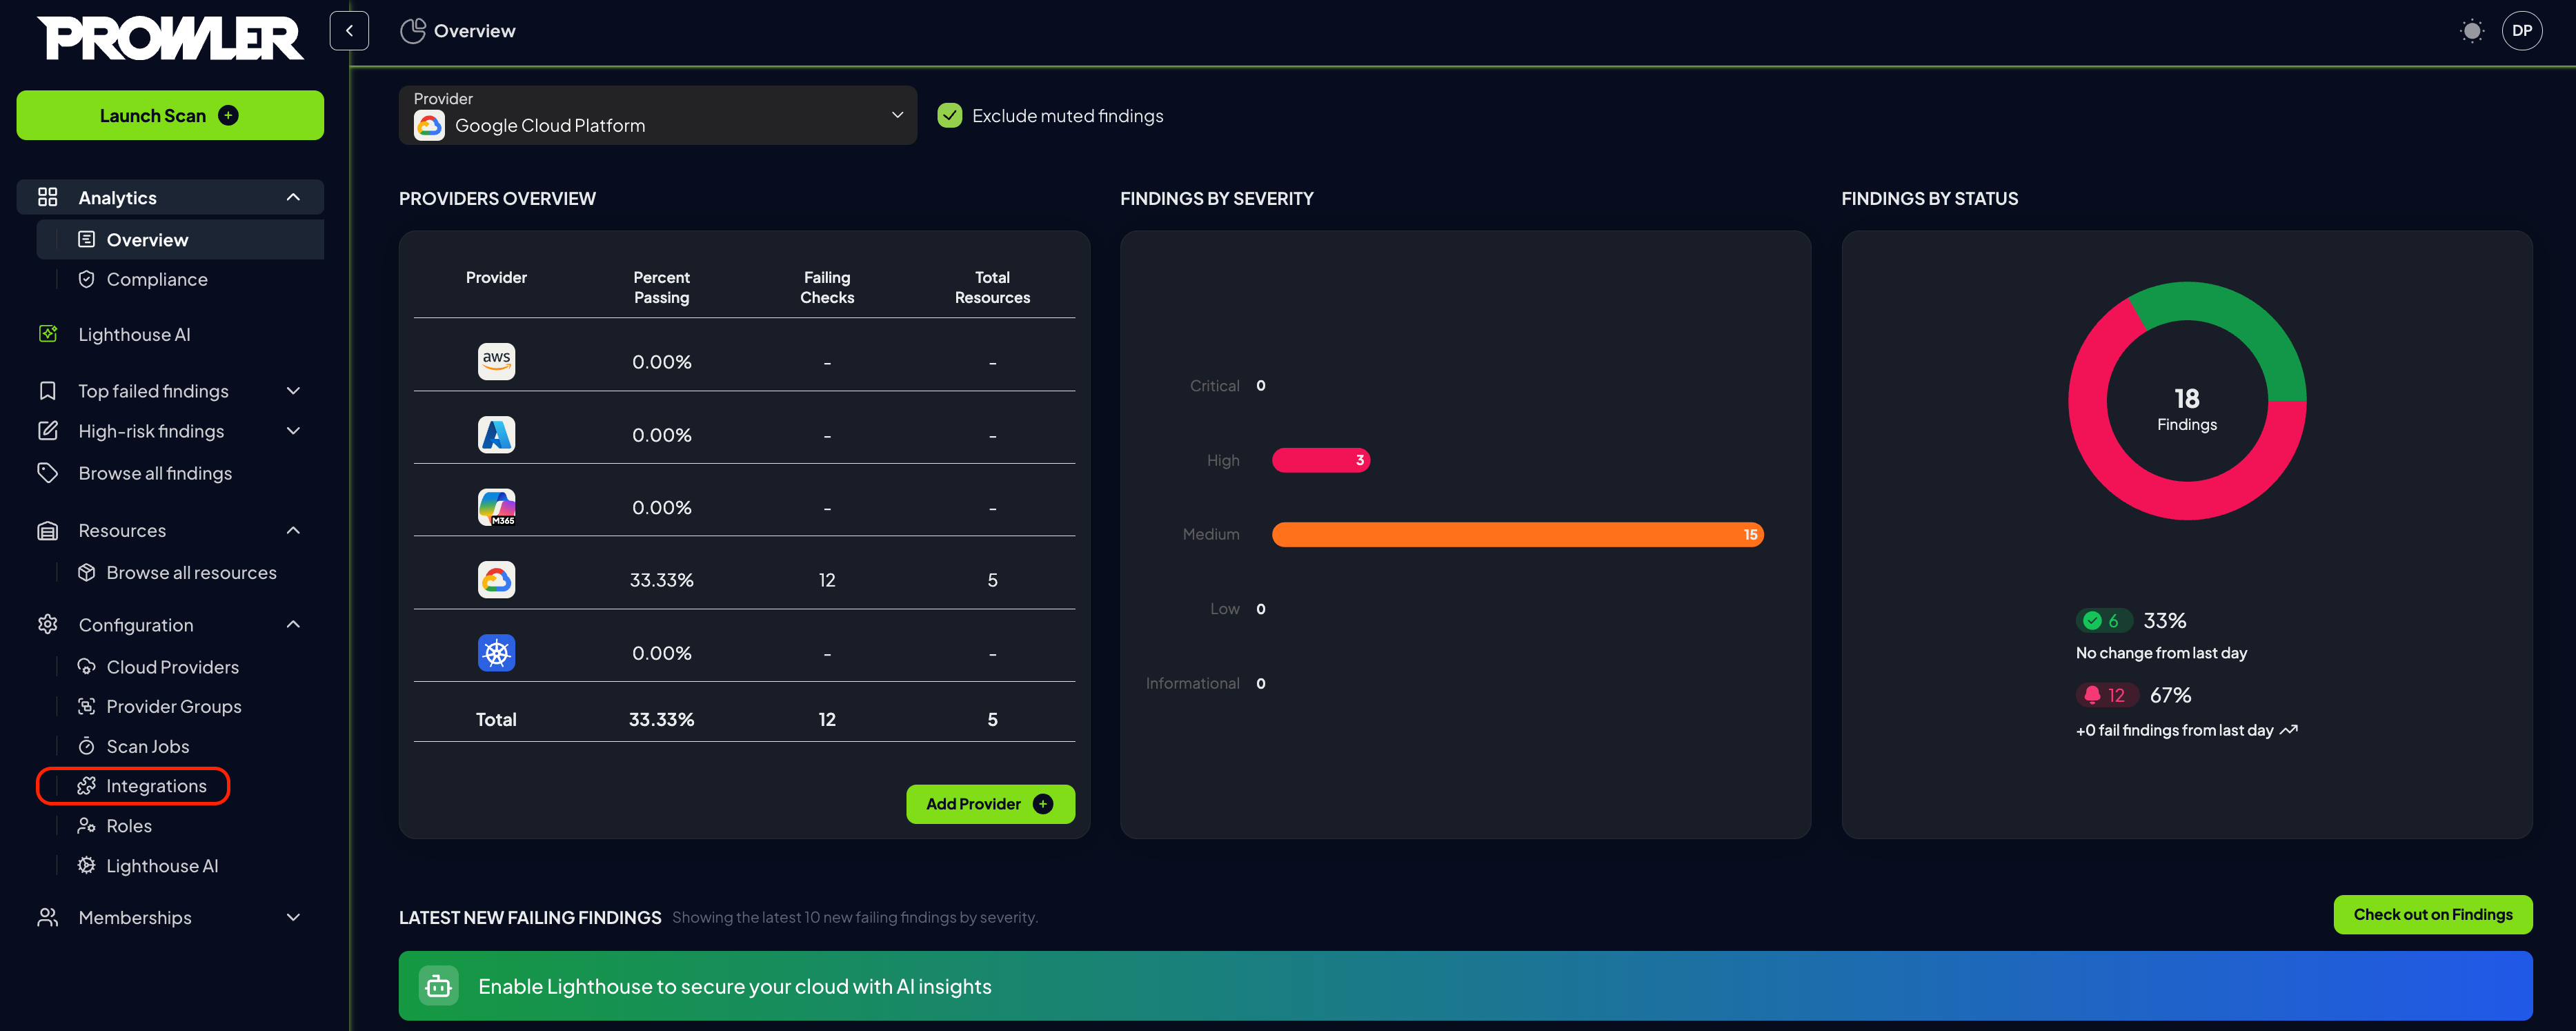 2. Locate the Amazon S3 Integration card and click on the "Configure" button
 3. Click the "Add Integration" button
 4. Complete the configuration form with the following details:
* **Providers:** Select the providers whose scan results should be exported to this S3 bucket
* **Bucket Name:** Enter the name of the target S3 bucket (e.g., `my-security-findings-bucket`)
* **Output Directory:** Specify the directory path within the bucket (e.g., `/prowler-findings/`, defaults to `output`)
4. Complete the configuration form with the following details:
* **Providers:** Select the providers whose scan results should be exported to this S3 bucket
* **Bucket Name:** Enter the name of the target S3 bucket (e.g., `my-security-findings-bucket`)
* **Output Directory:** Specify the directory path within the bucket (e.g., `/prowler-findings/`, defaults to `output`)
 5. Click "Next" to configure credentials
6. Configure AWS authentication using one of the supported methods:
* **AWS SDK Default:** Use default AWS credentials from the environment. For Prowler Cloud users, this is the recommended option as the service has AWS credentials to assume IAM roles with ARNs matching `arn:aws:iam::*:role/Prowler*` or `arn:aws:iam::*:role/prowler*`
* **Access Keys:** Provide AWS access key ID and secret access key
* **IAM Role (optional):** Specify the IAM Role ARN, external ID, and optional session parameters
5. Click "Next" to configure credentials
6. Configure AWS authentication using one of the supported methods:
* **AWS SDK Default:** Use default AWS credentials from the environment. For Prowler Cloud users, this is the recommended option as the service has AWS credentials to assume IAM roles with ARNs matching `arn:aws:iam::*:role/Prowler*` or `arn:aws:iam::*:role/prowler*`
* **Access Keys:** Provide AWS access key ID and secret access key
* **IAM Role (optional):** Specify the IAM Role ARN, external ID, and optional session parameters
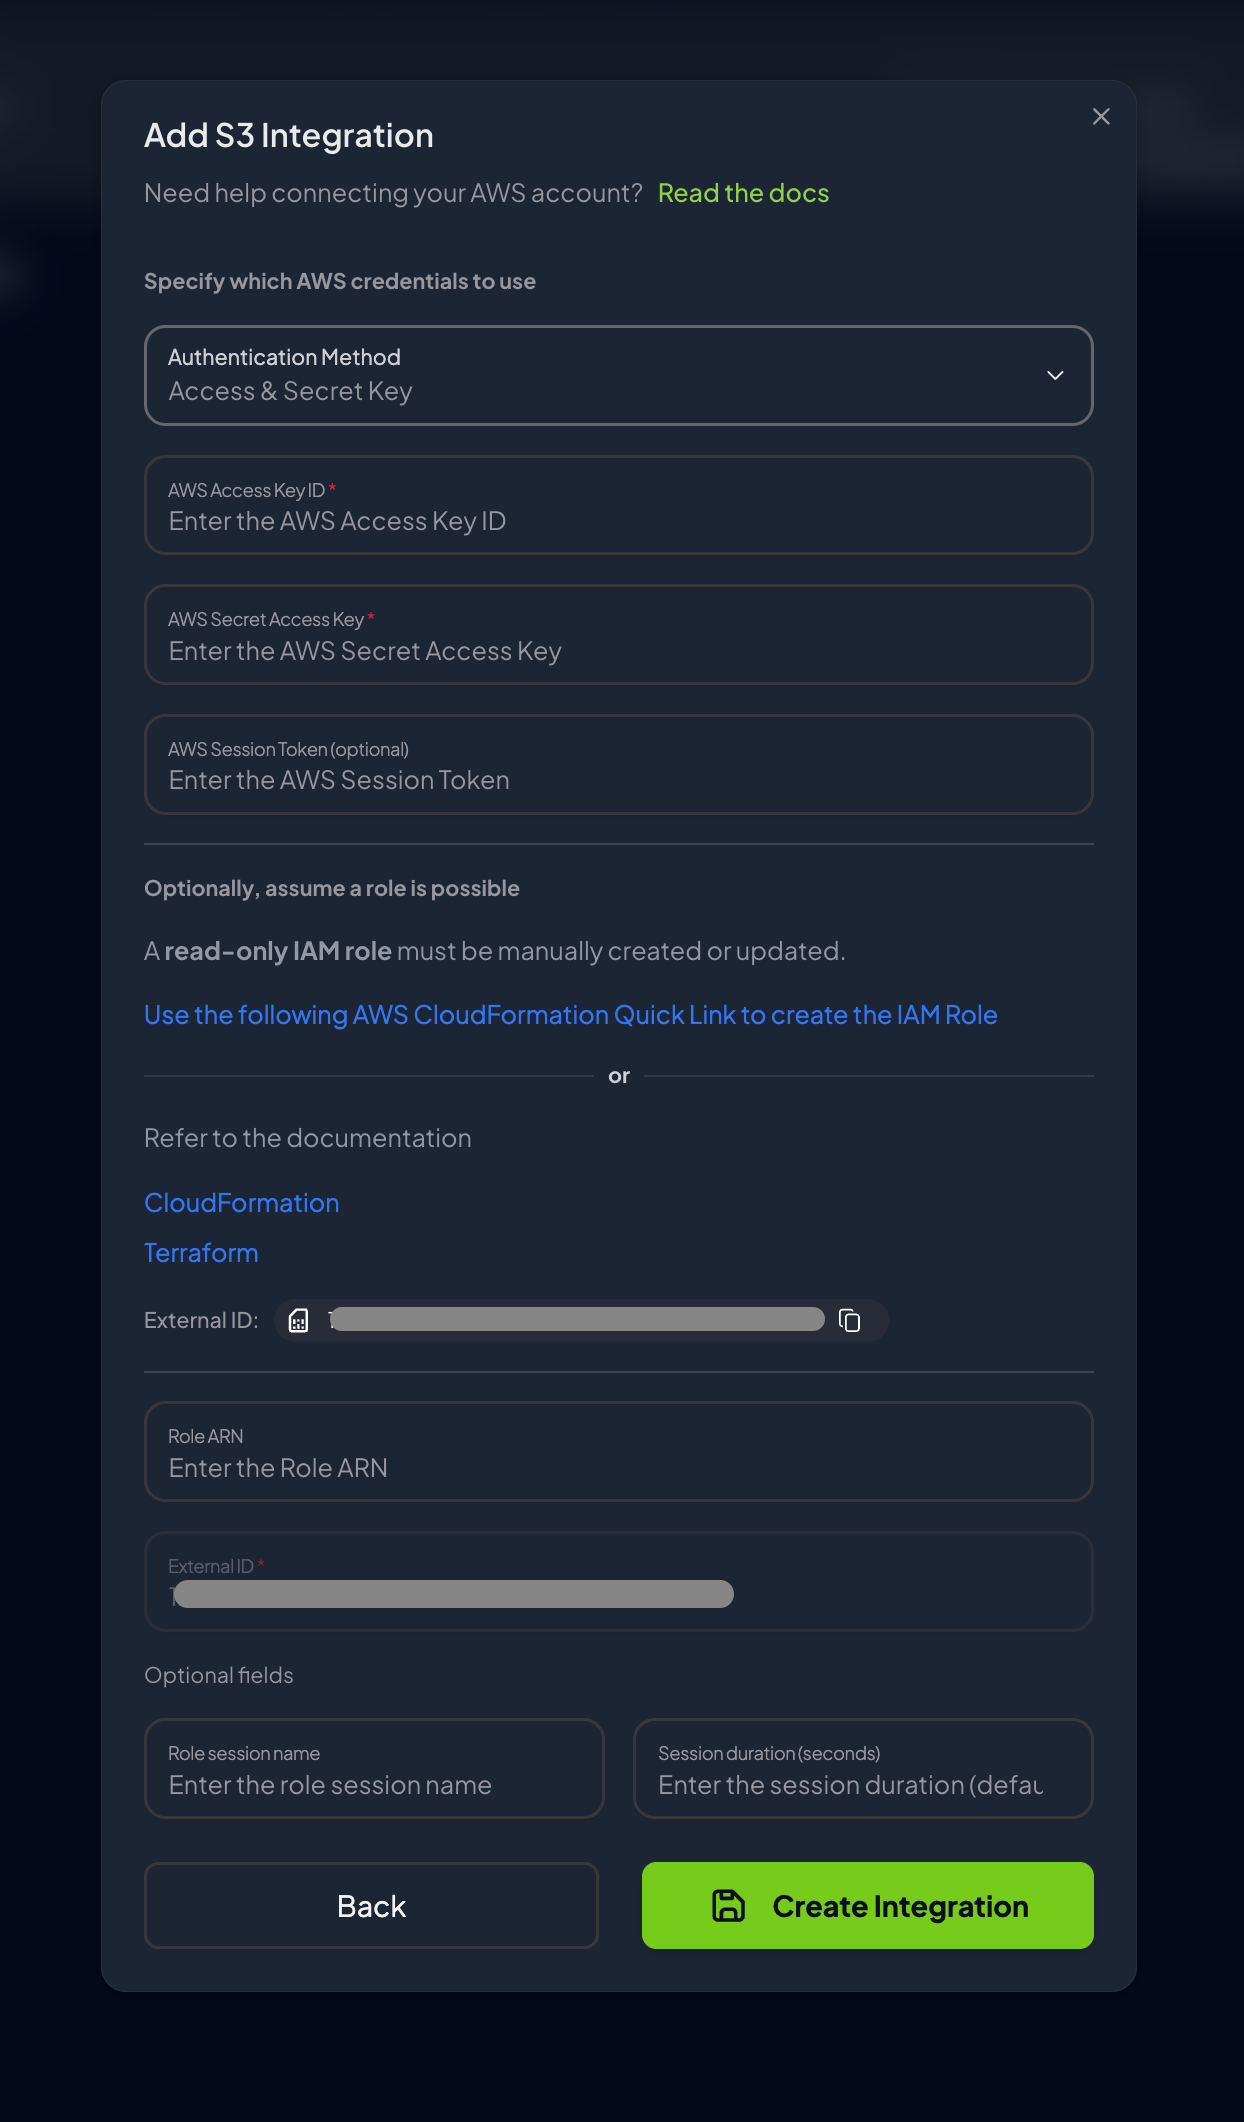 7. Optional - For IAM role authentication, complete the required fields:
* **Role ARN:** The Amazon Resource Name of the IAM role
* **External ID:** Unique identifier for additional security (defaults to Tenant/Organization ID) - mandatory and automatically filled
* **Role Session Name:** Optional - name for the assumed role session
* **Session Duration:** Optional - duration in seconds for the session
8. Click "Create Integration" to verify the connection and complete the setup
7. Optional - For IAM role authentication, complete the required fields:
* **Role ARN:** The Amazon Resource Name of the IAM role
* **External ID:** Unique identifier for additional security (defaults to Tenant/Organization ID) - mandatory and automatically filled
* **Role Session Name:** Optional - name for the assumed role session
* **Session Duration:** Optional - duration in seconds for the session
8. Click "Create Integration" to verify the connection and complete the setup
 #### Actions
 Each S3 integration provides several management actions accessible through dedicated buttons:
| Button | Purpose | Available Actions | Notes |
| ------------------ | ------------------------------- | ------------------------------------------------------------------------------------------------------------------------------------ | ------------------------------------------------- |
| **Test** | Verify integration connectivity | • Test AWS credential validity
Each S3 integration provides several management actions accessible through dedicated buttons:
| Button | Purpose | Available Actions | Notes |
| ------------------ | ------------------------------- | ------------------------------------------------------------------------------------------------------------------------------------ | ------------------------------------------------- |
| **Test** | Verify integration connectivity | • Test AWS credential validity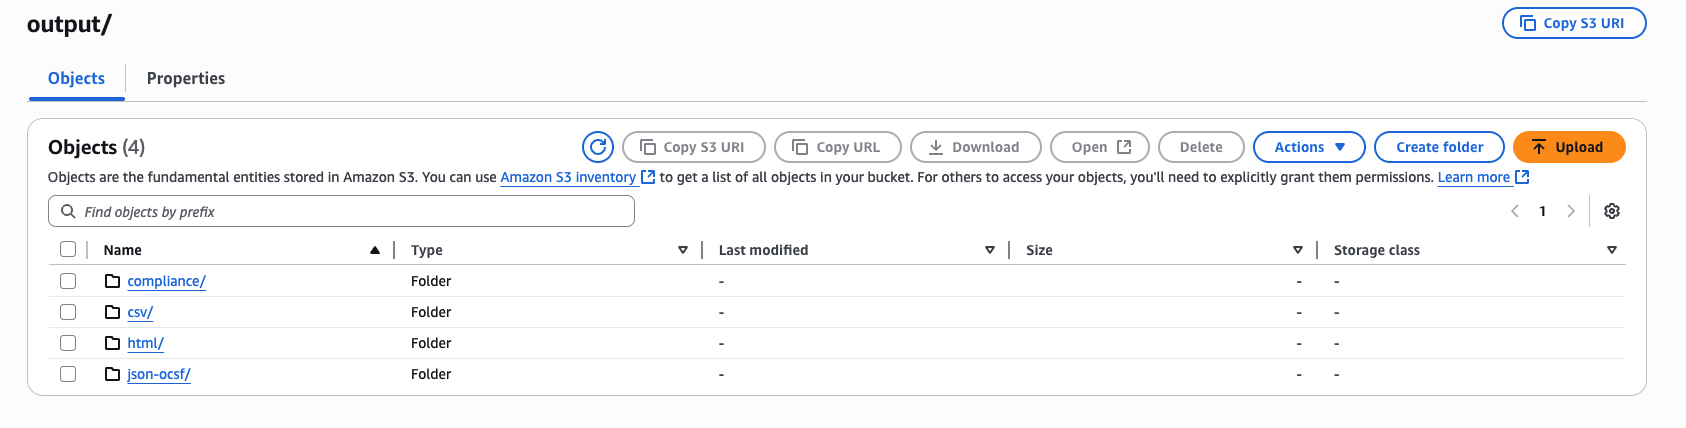 For detailed information about Prowler's reporting formats, refer to the [Prowler reporting documentation](https://docs.prowler.com/projects/prowler-open-source/en/latest/tutorials/reporting/).
## Troubleshooting
**Connection test fails:**
* Check AWS credentials are valid
* If using IAM Role, check its permissions
* Verify bucket permissions and region
* Confirm network access to S3
**No scan results in bucket:**
* Ensure integration shows "Connected"
* Check that provider is associated with integration
* Verify bucket policies allow writes
For detailed information about Prowler's reporting formats, refer to the [Prowler reporting documentation](https://docs.prowler.com/projects/prowler-open-source/en/latest/tutorials/reporting/).
## Troubleshooting
**Connection test fails:**
* Check AWS credentials are valid
* If using IAM Role, check its permissions
* Verify bucket permissions and region
* Confirm network access to S3
**No scan results in bucket:**
* Ensure integration shows "Connected"
* Check that provider is associated with integration
* Verify bucket policies allow writes