> ## Documentation Index
> Fetch the complete documentation index at: https://docs.prowler.com/llms.txt
> Use this file to discover all available pages before exploring further.
# SAML SSO: Google Workspace
This page explains how to configure SAML-based Single Sign-On (SSO) in Prowler App using **Google Workspace** as the Identity Provider (IdP). The setup is divided into two parts: create a custom SAML app in Google Admin Console, then complete the configuration in Prowler App.
**Parallel Setup Required**
Google Admin Console requires the ACS URL and Entity ID from Prowler App, while Prowler App displays these values only after opening the SAML configuration dialog. To work around this, open Prowler App in a separate browser tab, navigate to the profile page, open the "Configure SAML SSO" dialog, and copy the ACS URL and Entity ID before proceeding with the Google configuration.
## Prerequisites
* **Google Workspace**: Super Admin access (or delegated admin with app management permissions).
* **Prowler App**: Administrator access to the organization (role with "Manage Account" permission).
* Prowler App version **5.9.0** or later.
***
## Part A - Google Admin Console
### Step 1: Navigate to Web & Mobile Apps
1. Go to [admin.google.com](https://admin.google.com).
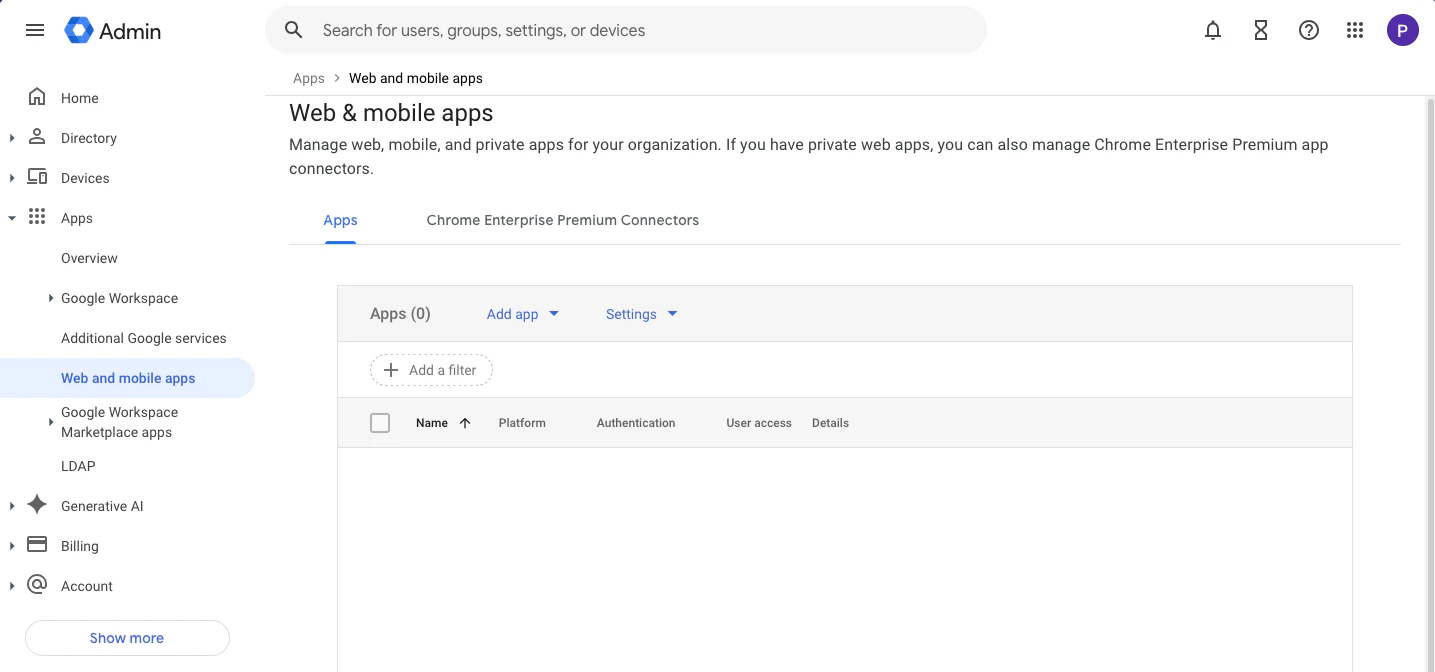
2. In the left sidebar, navigate to **Apps > Web and mobile apps**.
3. Click "Add app", then select "Add custom SAML app".
 ### Step 2: Enter App Details
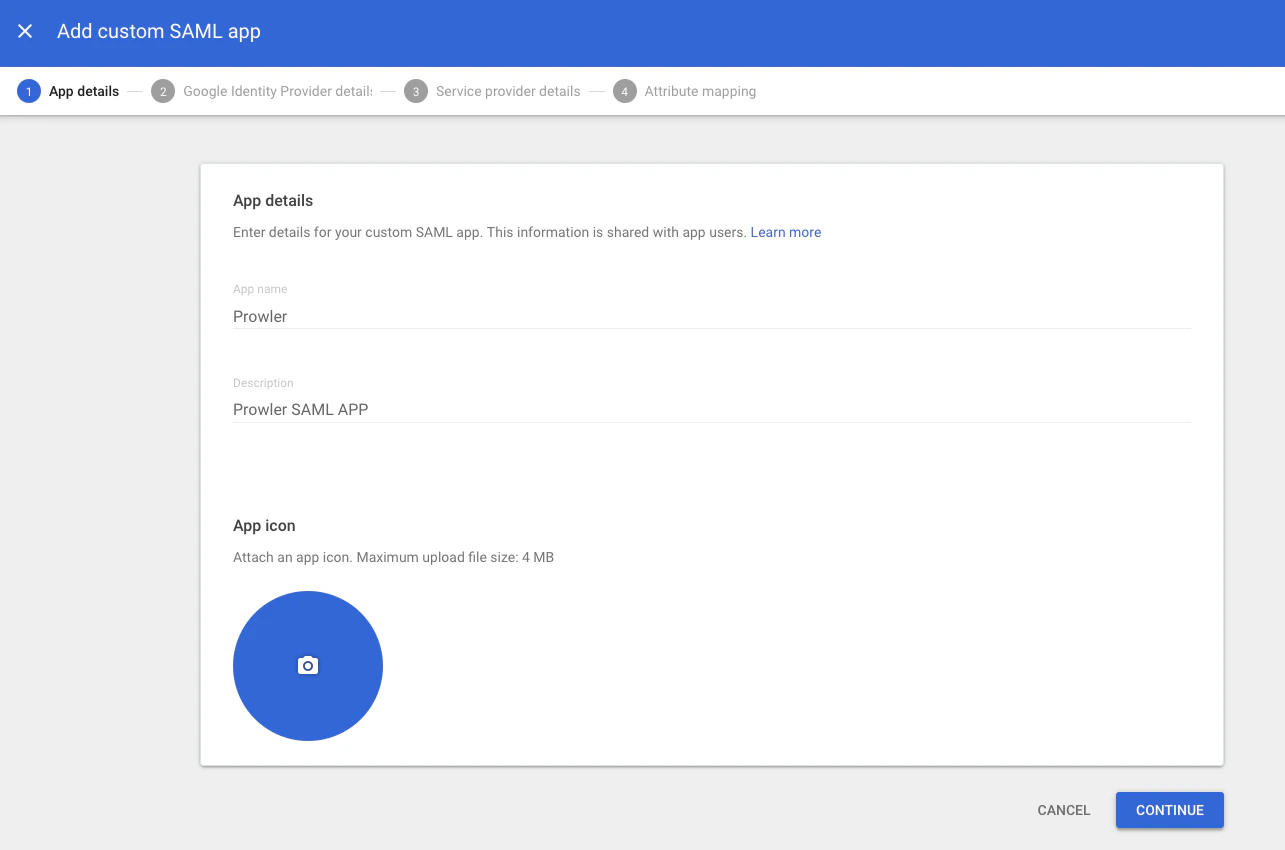
1. In the **App name** field, enter a name (e.g., `Prowler`).
2. Optionally, add a description (e.g., `Prowler SAML APP`) and upload a logo.
3. Click "Continue".
### Step 2: Enter App Details
1. In the **App name** field, enter a name (e.g., `Prowler`).
2. Optionally, add a description (e.g., `Prowler SAML APP`) and upload a logo.
3. Click "Continue".
 ### Step 3: Download the IdP Metadata
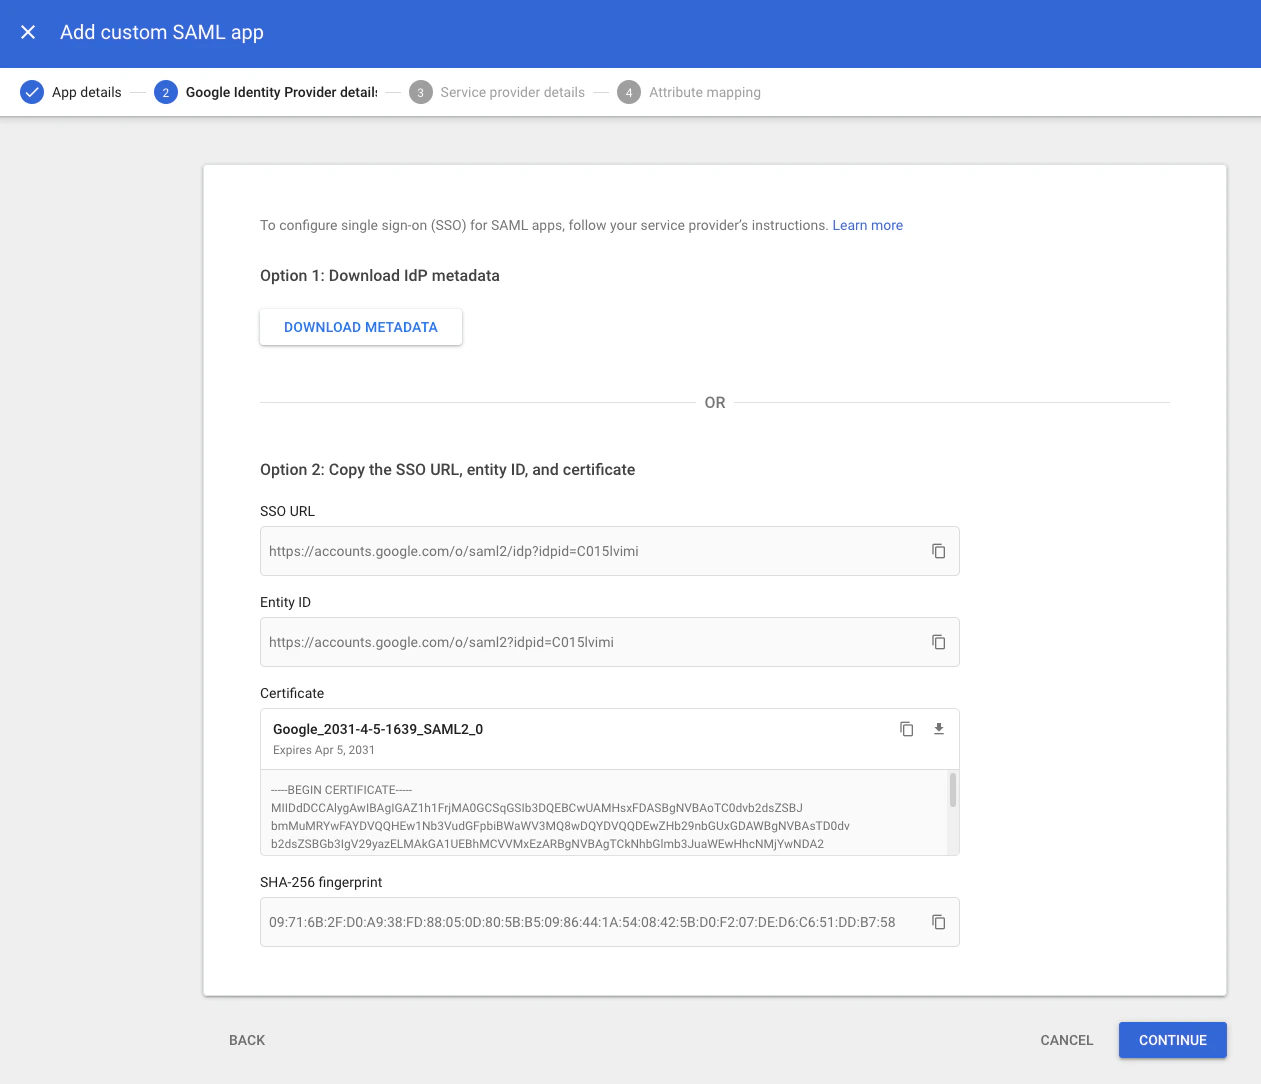
On the **Google Identity Provider details** screen:
1. Google displays two options:
* **Option 1**: Click "Download Metadata" to save the XML file directly. This is the recommended approach.
* **Option 2**: Manually copy the **SSO URL**, **Entity ID**, and **Certificate**.
2. Download the metadata. This file is required to complete the Prowler App configuration in Part B.
3. Click "Continue".
### Step 3: Download the IdP Metadata
On the **Google Identity Provider details** screen:
1. Google displays two options:
* **Option 1**: Click "Download Metadata" to save the XML file directly. This is the recommended approach.
* **Option 2**: Manually copy the **SSO URL**, **Entity ID**, and **Certificate**.
2. Download the metadata. This file is required to complete the Prowler App configuration in Part B.
3. Click "Continue".
 **Save the Metadata File**
Download and save the IdP metadata XML file before proceeding. This file cannot be easily retrieved later and is required to complete the SAML configuration in Prowler App.
### Step 4: Configure the Service Provider Details
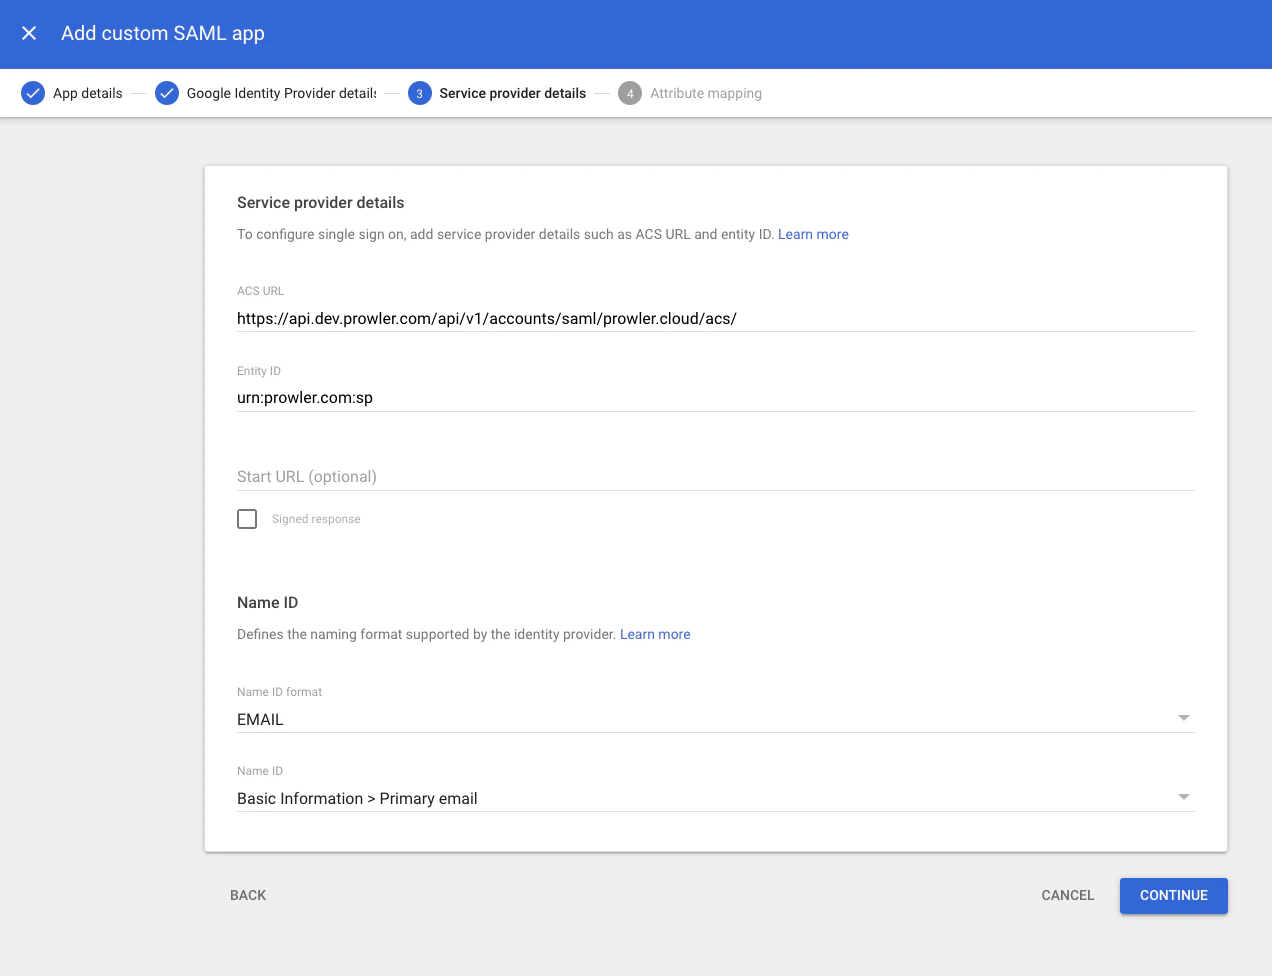
Enter the following values obtained from the SAML SSO configuration dialog in Prowler App (see [Part B, Step 1](#step-1-open-the-saml-configuration-dialog) for details on where to find them):
| Google Workspace Field | Value |
| ---------------------- | ------------------------------------------------------------------------------------------------------------------------------------------------------------------------------------------------ |
| **ACS URL** | The Assertion Consumer Service (ACS) URL displayed in Prowler App (e.g., `https://api.prowler.com/api/v1/accounts/saml/your-domain.com/acs/`). Self-hosted deployments use a different base URL. |
| **Entity ID** | The Audience URI displayed in Prowler App (e.g., `urn:prowler.com:sp`). |
| **Name ID format** | Select `EMAIL` from the dropdown. |
| **Name ID** | Select `Basic Information > Primary email` from the dropdown. |
Click "Continue".
**Save the Metadata File**
Download and save the IdP metadata XML file before proceeding. This file cannot be easily retrieved later and is required to complete the SAML configuration in Prowler App.
### Step 4: Configure the Service Provider Details
Enter the following values obtained from the SAML SSO configuration dialog in Prowler App (see [Part B, Step 1](#step-1-open-the-saml-configuration-dialog) for details on where to find them):
| Google Workspace Field | Value |
| ---------------------- | ------------------------------------------------------------------------------------------------------------------------------------------------------------------------------------------------ |
| **ACS URL** | The Assertion Consumer Service (ACS) URL displayed in Prowler App (e.g., `https://api.prowler.com/api/v1/accounts/saml/your-domain.com/acs/`). Self-hosted deployments use a different base URL. |
| **Entity ID** | The Audience URI displayed in Prowler App (e.g., `urn:prowler.com:sp`). |
| **Name ID format** | Select `EMAIL` from the dropdown. |
| **Name ID** | Select `Basic Information > Primary email` from the dropdown. |
Click "Continue".
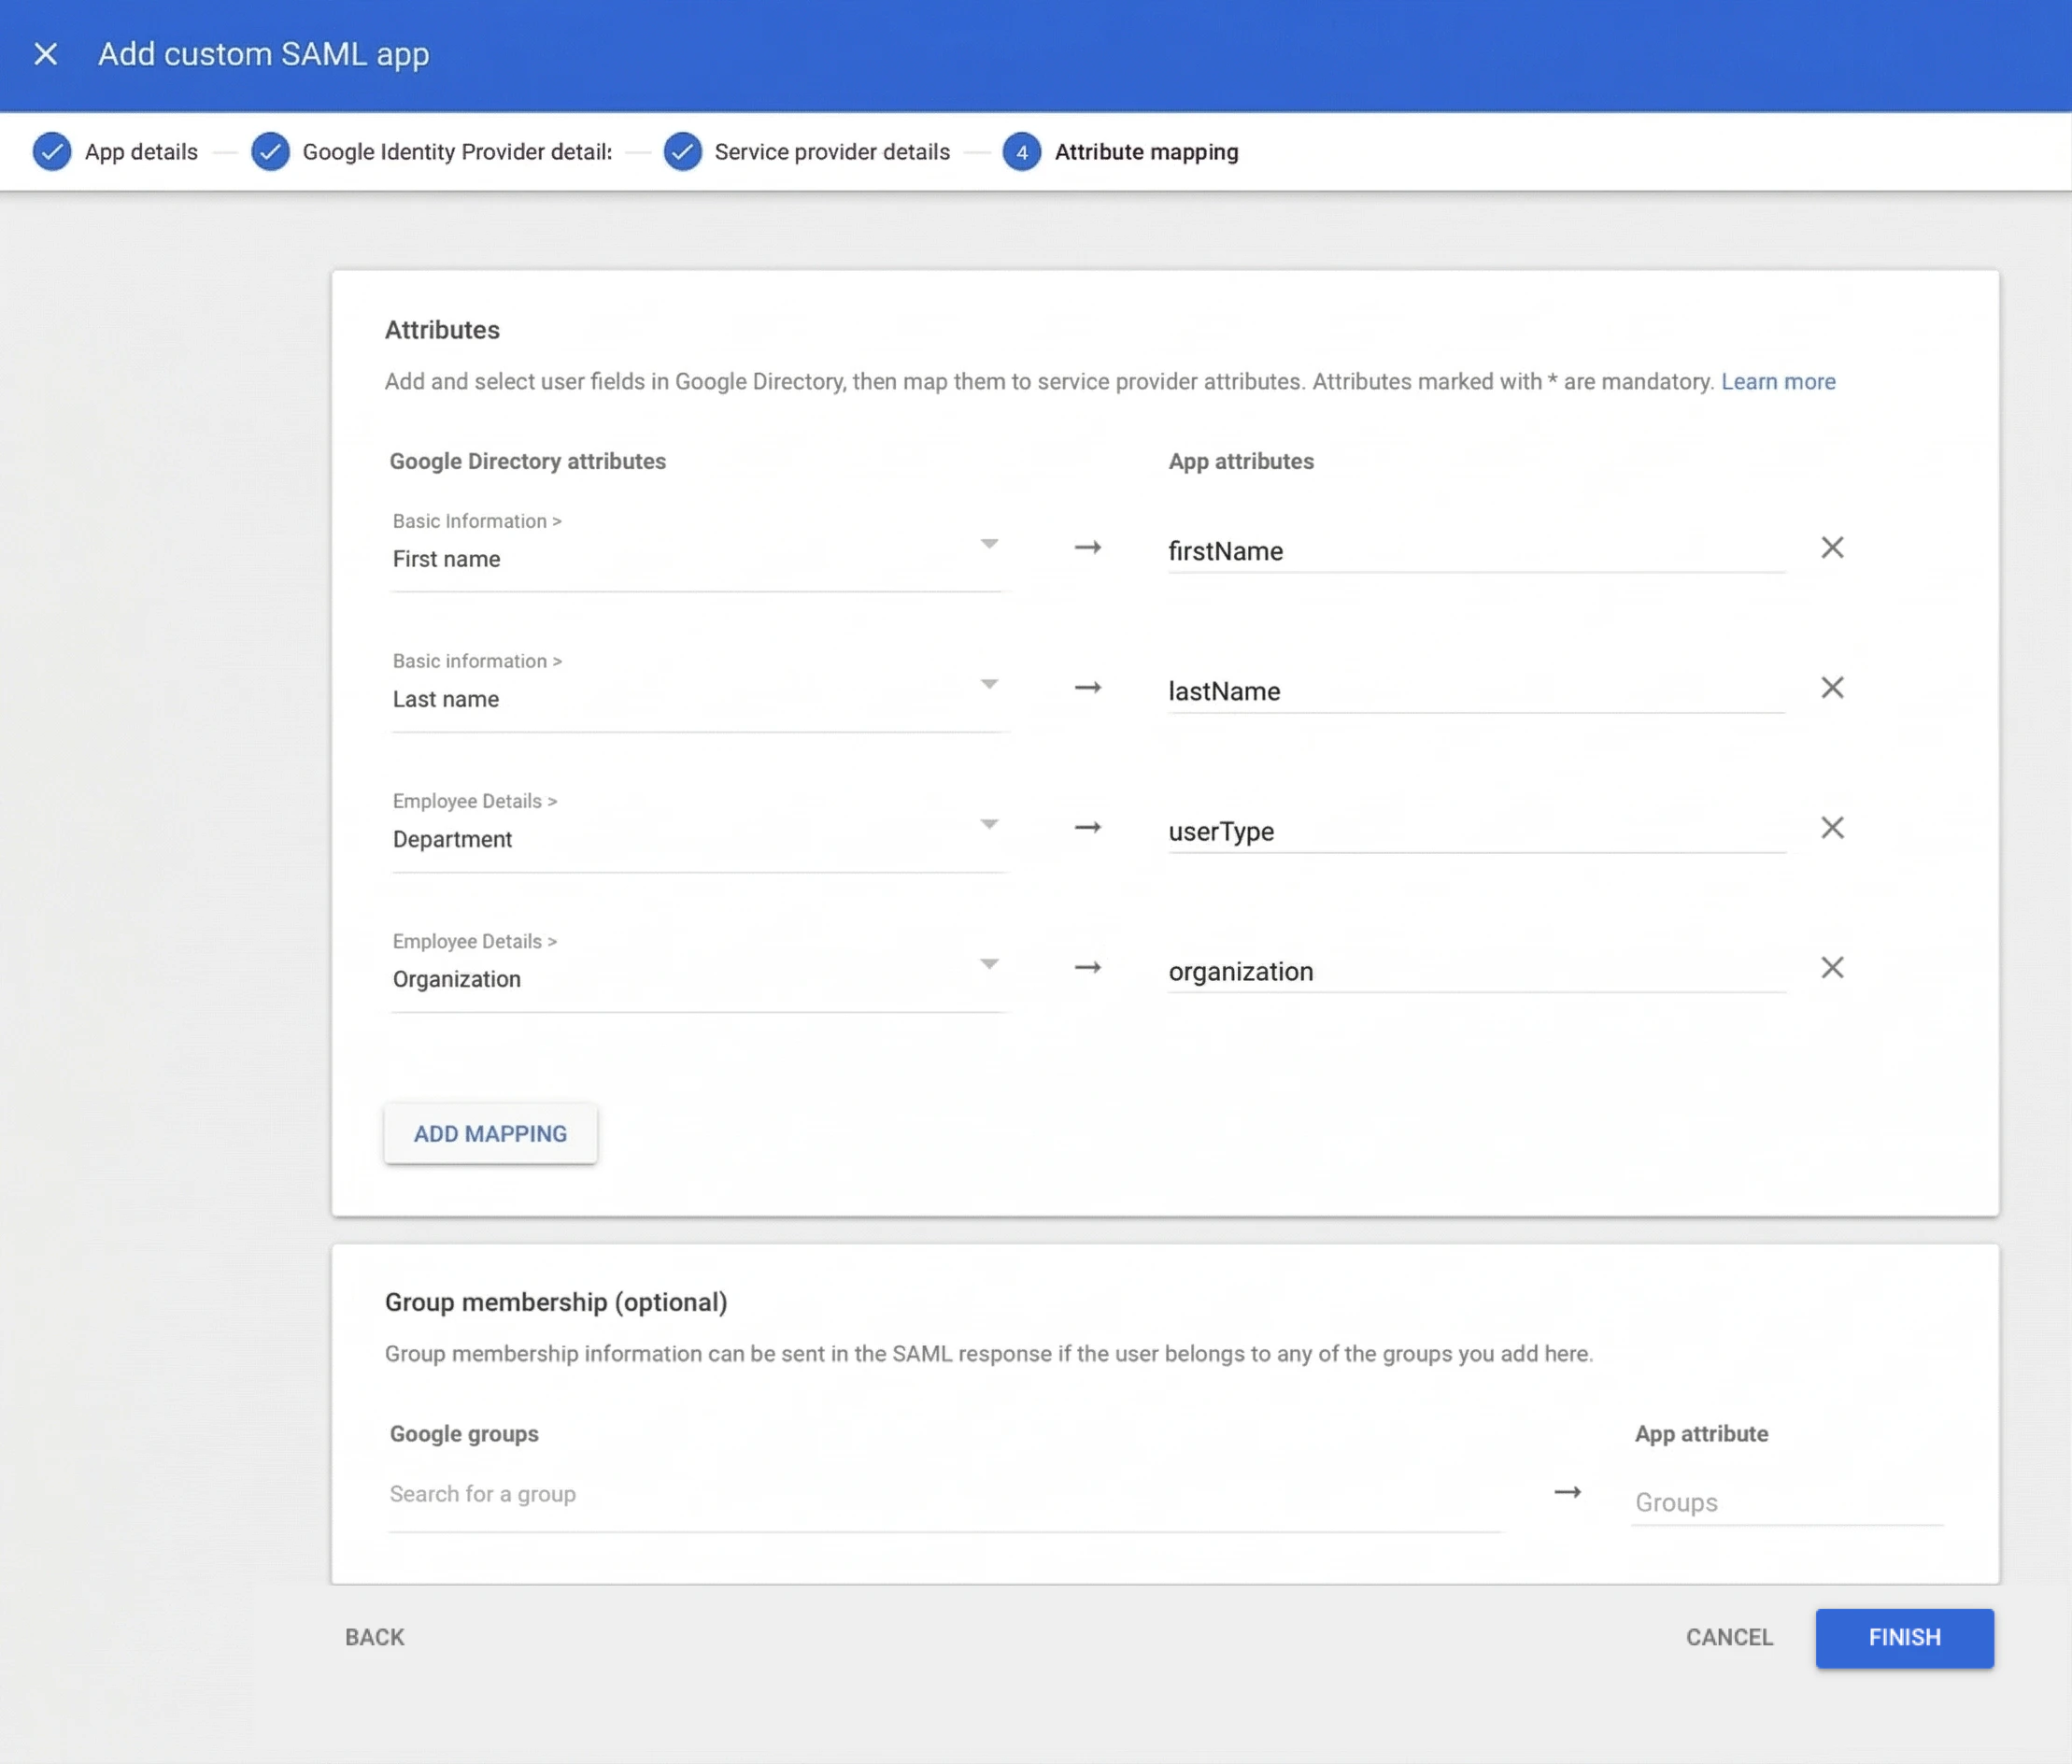
 ### Step 5: Configure Attribute Mapping
To correctly provision users, configure the IdP to send the following attributes in the SAML assertion. The **App Attribute (SAML)** column lists the attribute names that Prowler expects. The **Google Directory Attribute** column shows a recommended source field, but any Google directory attribute can be used as long as it is mapped to the correct Prowler attribute name.
Click "Add mapping" for each entry:
| Google Directory Attribute | App Attribute (SAML) | Required | Notes |
| --------------------------------- | -------------------- | -------- | ------------------------------------------------ |
| `Basic Information > First name` | `firstName` | Yes | |
| `Basic Information > Last name` | `lastName` | Yes | |
| `Employee Details > Department` | `userType` | No | Determines the Prowler role. **Case-sensitive.** |
| `Employee Details > Organization` | `organization` | No | Company name displayed in Prowler App profile. |
**Remember the Mapped Fields**
Take note of which Google directory attributes are mapped to each Prowler attribute. To update a user's role or organization in Prowler, modify the corresponding field in the user's Google Workspace profile (e.g., **Department** if mapped to `userType`). Changes propagate to Prowler on the next SAML login.
Click "Finish" to create the SAML app.
### Step 5: Configure Attribute Mapping
To correctly provision users, configure the IdP to send the following attributes in the SAML assertion. The **App Attribute (SAML)** column lists the attribute names that Prowler expects. The **Google Directory Attribute** column shows a recommended source field, but any Google directory attribute can be used as long as it is mapped to the correct Prowler attribute name.
Click "Add mapping" for each entry:
| Google Directory Attribute | App Attribute (SAML) | Required | Notes |
| --------------------------------- | -------------------- | -------- | ------------------------------------------------ |
| `Basic Information > First name` | `firstName` | Yes | |
| `Basic Information > Last name` | `lastName` | Yes | |
| `Employee Details > Department` | `userType` | No | Determines the Prowler role. **Case-sensitive.** |
| `Employee Details > Organization` | `organization` | No | Company name displayed in Prowler App profile. |
**Remember the Mapped Fields**
Take note of which Google directory attributes are mapped to each Prowler attribute. To update a user's role or organization in Prowler, modify the corresponding field in the user's Google Workspace profile (e.g., **Department** if mapped to `userType`). Changes propagate to Prowler on the next SAML login.
Click "Finish" to create the SAML app.
 **Dynamic Updates**
Prowler App updates user attributes each time a user logs in. Any changes made in Google Workspace are reflected on the next login.
**Role Assignment via `userType`**
The `userType` attribute controls which Prowler role is assigned to the user:
* If `userType` matches an existing Prowler role name, the user receives that role automatically.
* If `userType` does not match any existing role, Prowler App creates a new role with that name **with read-only access** (visibility over all providers, no management permissions). A Prowler administrator can adjust its permissions afterward through the [RBAC Management](/user-guide/tutorials/prowler-app-rbac) tab.
* If `userType` is not set, the user's existing roles are left unchanged.
The `userType` value is **case-sensitive** - for example, `Backend` and `backend` are treated as different roles.
### Step 6: Enable the App for Users
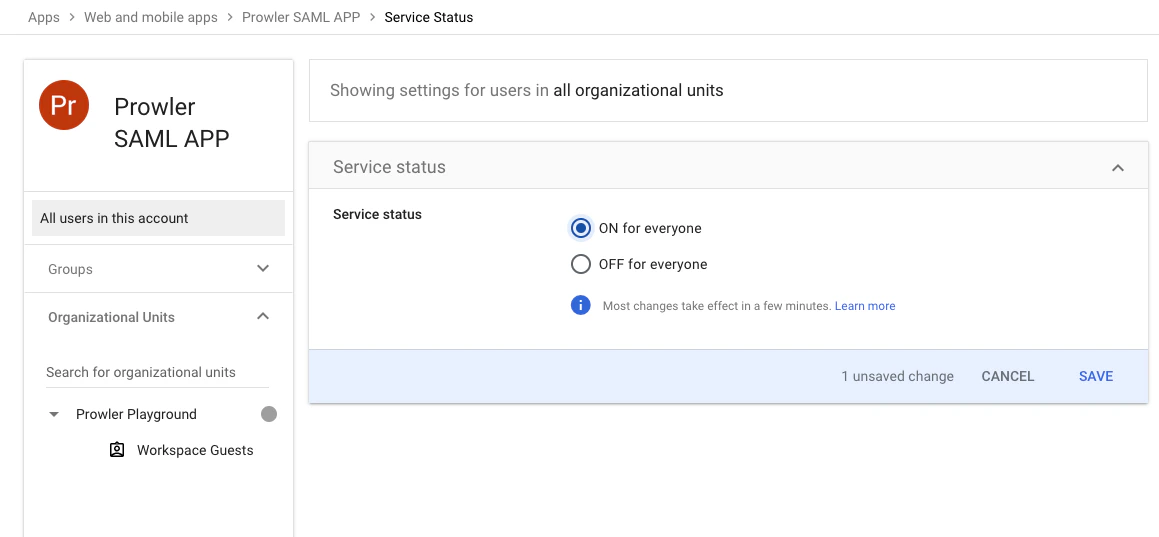
By default, newly created SAML apps have user access set to **OFF**. To enable access:
1. Return to **Apps > Web and mobile apps** and select the Prowler SAML app.
2. Click "User access" (or "View details" under the "User access" section).
3. Set the service status to **ON for everyone**, or enable it for specific organizational units or groups.
4. Click "Save".
**Dynamic Updates**
Prowler App updates user attributes each time a user logs in. Any changes made in Google Workspace are reflected on the next login.
**Role Assignment via `userType`**
The `userType` attribute controls which Prowler role is assigned to the user:
* If `userType` matches an existing Prowler role name, the user receives that role automatically.
* If `userType` does not match any existing role, Prowler App creates a new role with that name **with read-only access** (visibility over all providers, no management permissions). A Prowler administrator can adjust its permissions afterward through the [RBAC Management](/user-guide/tutorials/prowler-app-rbac) tab.
* If `userType` is not set, the user's existing roles are left unchanged.
The `userType` value is **case-sensitive** - for example, `Backend` and `backend` are treated as different roles.
### Step 6: Enable the App for Users
By default, newly created SAML apps have user access set to **OFF**. To enable access:
1. Return to **Apps > Web and mobile apps** and select the Prowler SAML app.
2. Click "User access" (or "View details" under the "User access" section).
3. Set the service status to **ON for everyone**, or enable it for specific organizational units or groups.
4. Click "Save".
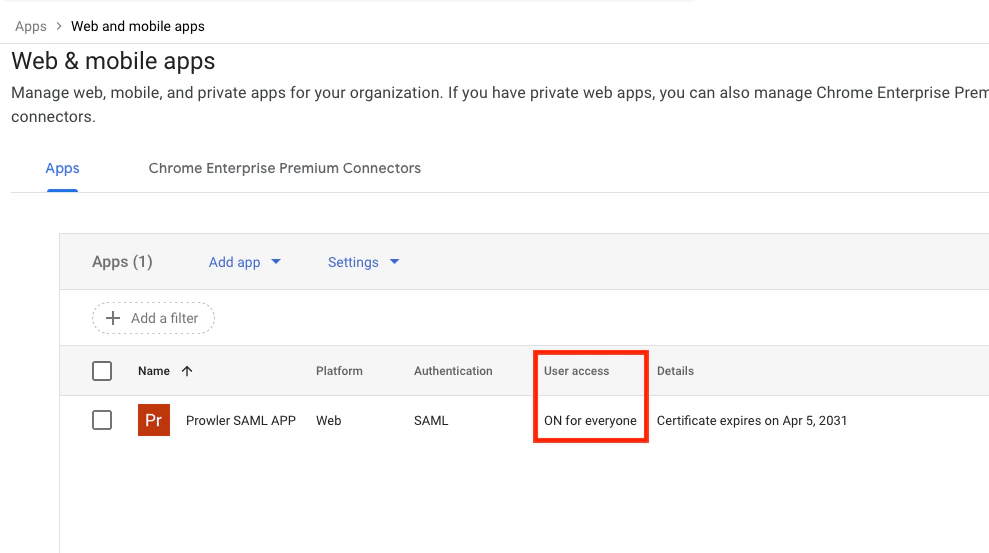
 5. Verify in the apps list that the "User access" column displays **"ON for everyone"**.
 **Propagation Delay**
Changes to the app status can take up to 24 hours to propagate across Google Workspace, although they typically take effect within a few minutes.
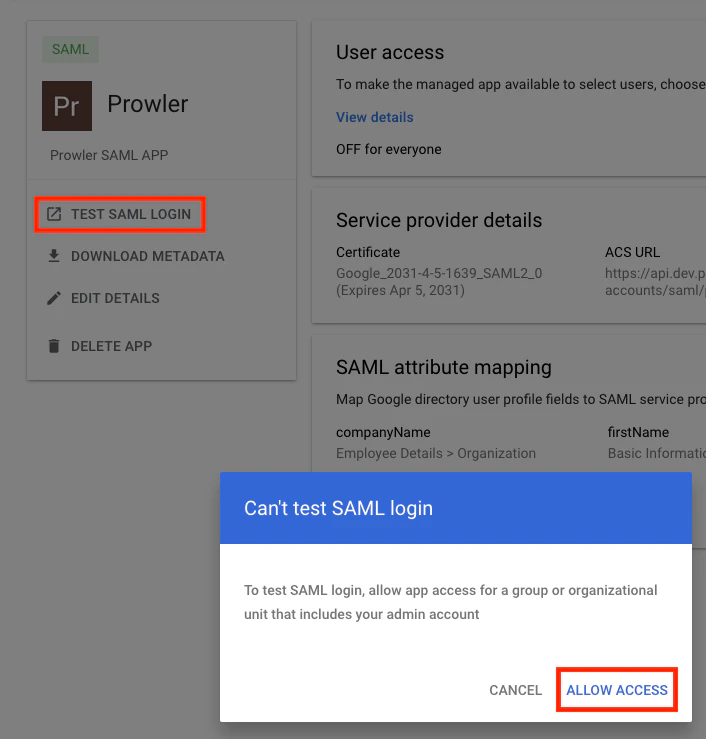
**"Can't Test SAML Login" Error**
If attempting to use the "Test SAML login" option in Google Admin Console and receiving a "Can't test SAML login" message, click "Allow Access" to enable the app for the organizational unit that includes the admin account. This is the same as setting the service status to **ON** as described above.
**Propagation Delay**
Changes to the app status can take up to 24 hours to propagate across Google Workspace, although they typically take effect within a few minutes.
**"Can't Test SAML Login" Error**
If attempting to use the "Test SAML login" option in Google Admin Console and receiving a "Can't test SAML login" message, click "Allow Access" to enable the app for the organizational unit that includes the admin account. This is the same as setting the service status to **ON** as described above.
 ***
## Part B - Prowler App Configuration
### Step 1: Open the SAML Configuration Dialog
1. Navigate to the profile settings page:
* **Prowler Cloud**: `https://cloud.prowler.com/profile`
* **Self-hosted**: `http://{your-domain}/profile`
2. Find the "SAML SSO Integration" card and click "Enable" (or "Update" if already configured).
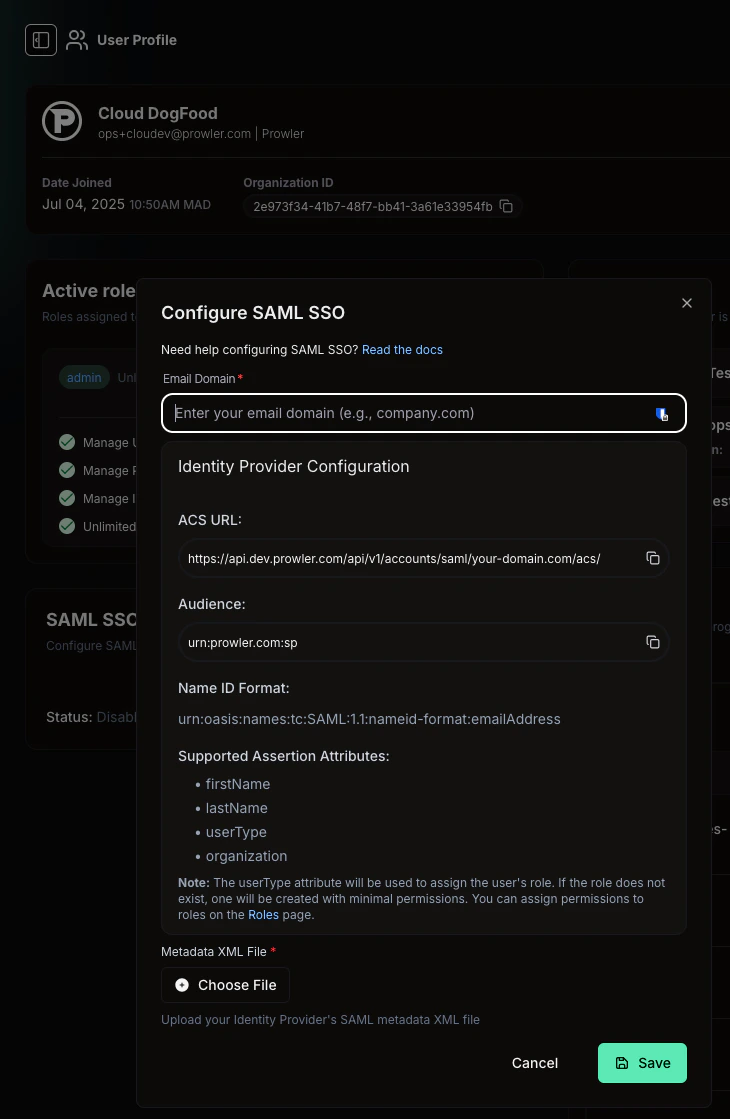
3. The "Configure SAML SSO" dialog opens, displaying:
* **ACS URL**: The Assertion Consumer Service URL (copy this value for Part A, Step 4). This URL updates dynamically when the email domain is entered.
* **Audience**: The Entity ID (copy this value for Part A, Step 4).
* **Name ID Format**: The expected format (`urn:oasis:names:tc:SAML:1.1:nameid-format:emailAddress`).
* **Supported Assertion Attributes**: The list of accepted attributes (`firstName`, `lastName`, `userType`, `organization`).
***
## Part B - Prowler App Configuration
### Step 1: Open the SAML Configuration Dialog
1. Navigate to the profile settings page:
* **Prowler Cloud**: `https://cloud.prowler.com/profile`
* **Self-hosted**: `http://{your-domain}/profile`
2. Find the "SAML SSO Integration" card and click "Enable" (or "Update" if already configured).
3. The "Configure SAML SSO" dialog opens, displaying:
* **ACS URL**: The Assertion Consumer Service URL (copy this value for Part A, Step 4). This URL updates dynamically when the email domain is entered.
* **Audience**: The Entity ID (copy this value for Part A, Step 4).
* **Name ID Format**: The expected format (`urn:oasis:names:tc:SAML:1.1:nameid-format:emailAddress`).
* **Supported Assertion Attributes**: The list of accepted attributes (`firstName`, `lastName`, `userType`, `organization`).
 ### Step 2: Enter the Email Domain and Upload Metadata
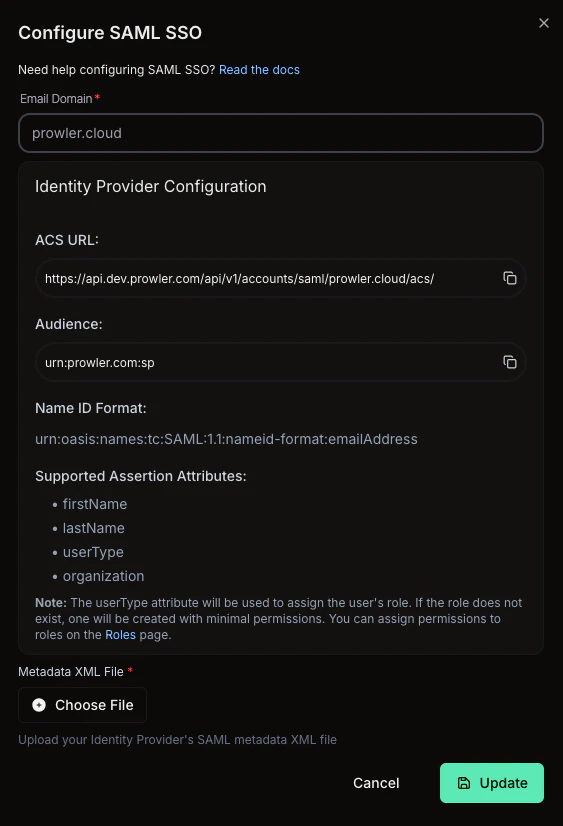
1. Enter the **email domain** for the organization (e.g., `prowler.cloud`). Prowler App uses this domain to identify users who should authenticate via SAML. The ACS URL updates automatically to reflect the configured domain.
2. Upload the **metadata XML file** downloaded in Part A, Step 3.
3. Click "Save".
### Step 2: Enter the Email Domain and Upload Metadata
1. Enter the **email domain** for the organization (e.g., `prowler.cloud`). Prowler App uses this domain to identify users who should authenticate via SAML. The ACS URL updates automatically to reflect the configured domain.
2. Upload the **metadata XML file** downloaded in Part A, Step 3.
3. Click "Save".
 ### Step 3: Verify the Enabled Status
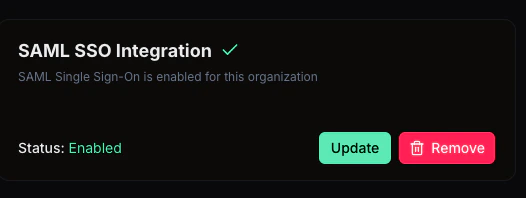
The "SAML SSO Integration" card should now display a **"Status: Enabled"** indicator with a checkmark, confirming that the configuration is complete.
### Step 3: Verify the Enabled Status
The "SAML SSO Integration" card should now display a **"Status: Enabled"** indicator with a checkmark, confirming that the configuration is complete.
 ***
## Testing the Integration
### Optional: Create a Test User in Google Workspace
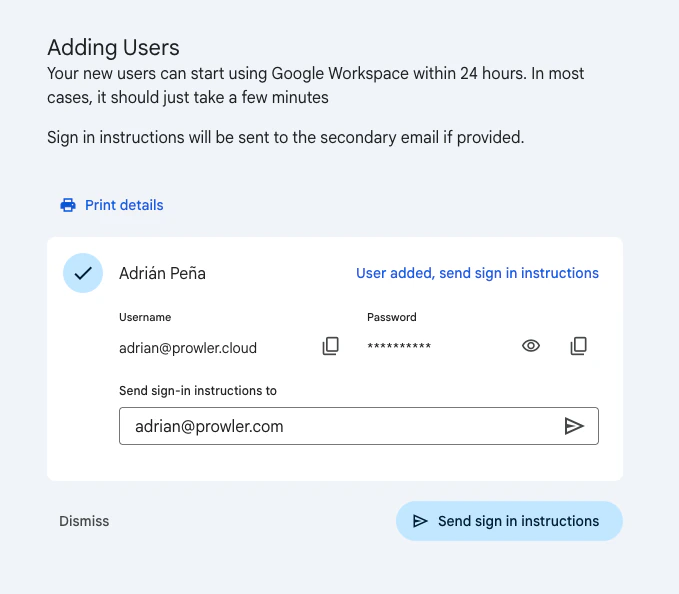
To verify the integration without affecting existing users, create a dedicated test user in Google Admin Console:
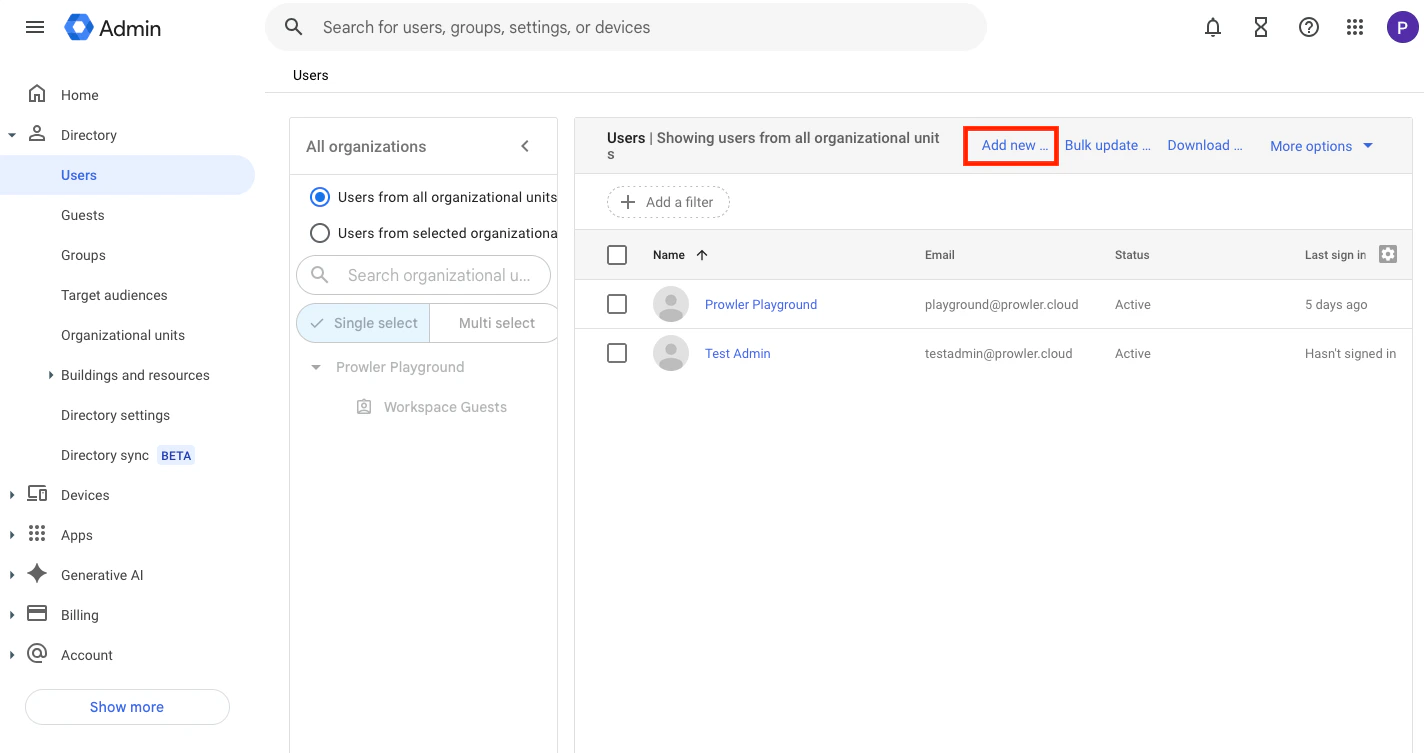
1. Navigate to **Directory > Users** in Google Admin Console.
2. Click "Add new user".
***
## Testing the Integration
### Optional: Create a Test User in Google Workspace
To verify the integration without affecting existing users, create a dedicated test user in Google Admin Console:
1. Navigate to **Directory > Users** in Google Admin Console.
2. Click "Add new user".
 3. Fill in the user details (first name, last name, and primary email address in the configured domain).
 4. Complete the user creation. Google Workspace generates temporary credentials for the new account.
 ### Optional: Configure User Attributes for Role Mapping
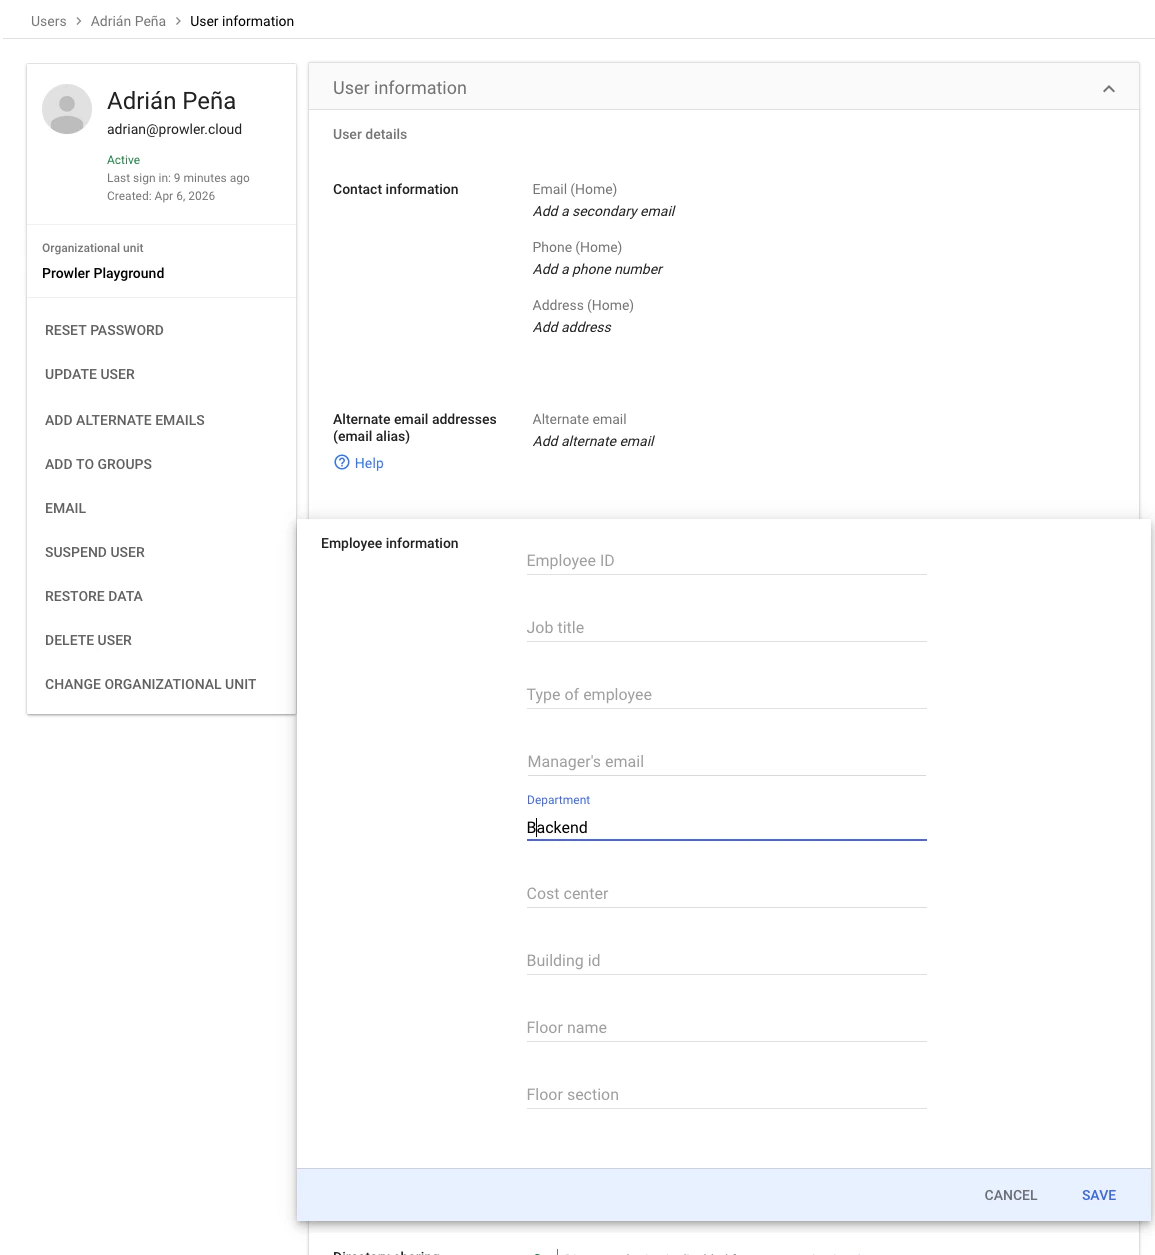
To test the `userType` → role mapping, set the **Department** attribute in the test user's profile. This value is sent as the `userType` SAML attribute based on the mapping configured in Part A, Step 5.
1. In **Directory > Users**, click the test user's name to open the profile.
2. Click "User details", scroll to **Employee information**, and enter a value in the **Department** field (e.g., `Backend`). This value determines the Prowler role assigned to the user.
3. Click "Save".
### Optional: Configure User Attributes for Role Mapping
To test the `userType` → role mapping, set the **Department** attribute in the test user's profile. This value is sent as the `userType` SAML attribute based on the mapping configured in Part A, Step 5.
1. In **Directory > Users**, click the test user's name to open the profile.
2. Click "User details", scroll to **Employee information**, and enter a value in the **Department** field (e.g., `Backend`). This value determines the Prowler role assigned to the user.
3. Click "Save".
 ### SP-Initiated SSO (from Prowler)
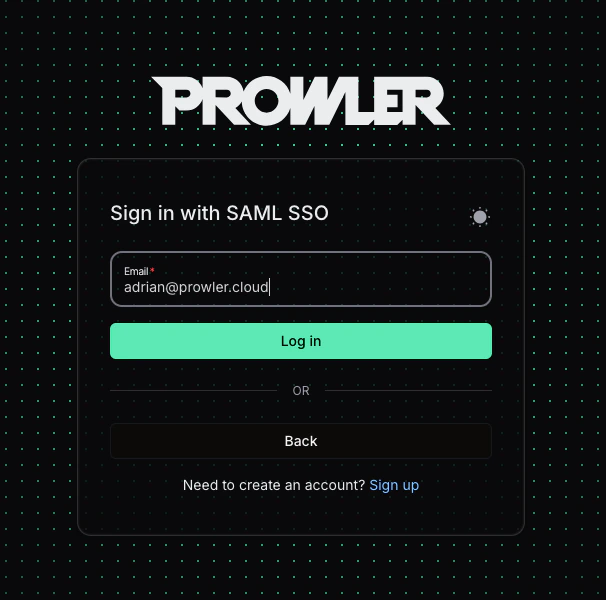
1. Navigate to the Prowler login page.
2. Click "Continue with SAML SSO".
3. Enter an email from the configured domain (e.g., `adrian@prowler.cloud`).
4. Click "Log in". The browser redirects to Google for authentication and returns to Prowler App upon success.
### SP-Initiated SSO (from Prowler)
1. Navigate to the Prowler login page.
2. Click "Continue with SAML SSO".
3. Enter an email from the configured domain (e.g., `adrian@prowler.cloud`).
4. Click "Log in". The browser redirects to Google for authentication and returns to Prowler App upon success.
 ### Verify User Profile and Role Mapping
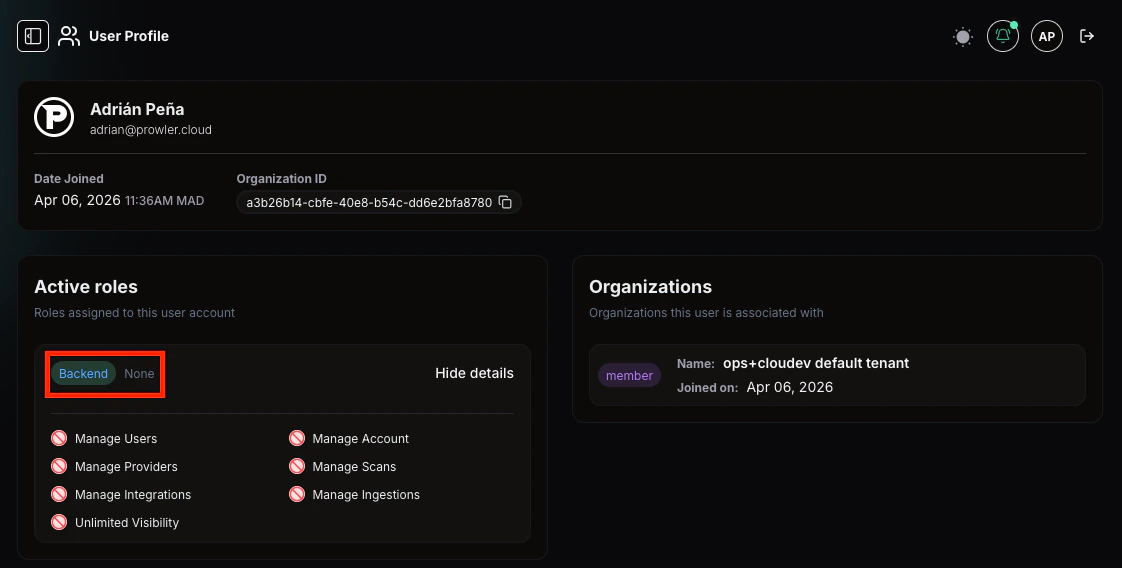
After a successful SSO login, the user profile in Prowler App reflects the attributes sent by Google Workspace:
* **Name**: Populated from the `firstName` and `lastName` attributes.
* **Role**: Created automatically from the `userType` attribute (e.g., `Backend`). If the role did not exist previously, it is created with read-only access by default.
* **Permissions**: If the assigned permissions need to be adjusted, a Prowler administrator can either:
* Edit the permissions of the new role via the [RBAC Management](/user-guide/tutorials/prowler-app-rbac) tab.
* Set the `userType` attribute in the IdP to match an existing Prowler role that already has the desired permissions. The updated role is applied on the next SAML login.
For more details on role assignment behavior and attribute mapping, refer to the [SAML SSO Configuration](/user-guide/tutorials/prowler-app-sso#configure-attribute-mapping-in-the-idp) page.
### Verify User Profile and Role Mapping
After a successful SSO login, the user profile in Prowler App reflects the attributes sent by Google Workspace:
* **Name**: Populated from the `firstName` and `lastName` attributes.
* **Role**: Created automatically from the `userType` attribute (e.g., `Backend`). If the role did not exist previously, it is created with read-only access by default.
* **Permissions**: If the assigned permissions need to be adjusted, a Prowler administrator can either:
* Edit the permissions of the new role via the [RBAC Management](/user-guide/tutorials/prowler-app-rbac) tab.
* Set the `userType` attribute in the IdP to match an existing Prowler role that already has the desired permissions. The updated role is applied on the next SAML login.
For more details on role assignment behavior and attribute mapping, refer to the [SAML SSO Configuration](/user-guide/tutorials/prowler-app-sso#configure-attribute-mapping-in-the-idp) page.
 ### IdP-Initiated SSO (from Google)
1. Sign in to Google Workspace with an account that has access to the Prowler SAML app.
2. Open the Google Workspace app launcher (the grid icon in the top-right corner of any Google page).
3. Click the Prowler app tile.
4. The browser redirects directly to Prowler App, authenticated.
For more information on the SSO login flows, refer to the [SAML SSO Configuration](/user-guide/tutorials/prowler-app-sso#idp-initiated-sso) page.
***
## Troubleshooting
**User Lockout After Misconfiguration**
If SAML is configured with incorrect metadata or an incorrect domain, users who authenticated via SAML cannot fall back to password login. A Prowler administrator must remove the SAML configuration via the API:
```bash theme={null}
curl -X DELETE 'https://api.prowler.com/api/v1/saml-config' \
-H 'Authorization: Bearer ' \
-H 'Accept: application/vnd.api+json'
```
After removal, affected users must reset their password to regain access using standard email and password login. This also applies when SAML is intentionally removed - all SAML-authenticated users need to reset their password. For more details, refer to the [SAML API Reference](/user-guide/tutorials/prowler-app-sso#saml-api-reference). For additional support, contact [Prowler Support](https://docs.prowler.com/user-guide/contact-support).
**Email Domain Uniqueness**
Prowler does not allow two tenants to share the same email domain. If the domain is already associated with another tenant, the configuration will fail. This is by design to prevent authentication ambiguity.
**Just-in-Time Provisioning**
Users who authenticate via SAML for the first time are automatically created in Prowler App. No prior invitation is needed. User attributes (`firstName`, `lastName`, `userType`) are updated on every login from the Google directory.
***
## Quick Summary
1. In **Google Admin Console**, create a custom SAML app using the ACS URL and Entity ID from Prowler App.
2. Configure **attribute mapping**: `firstName`, `lastName`, and optionally `userType` and `organization`.
3. **Download the metadata XML** from Google.
4. **Enable the app** in Google Workspace for the relevant users or groups.
5. In **Prowler App**, enter the email domain, upload the metadata XML, and save.
6. Verify the SAML SSO Integration shows **"Status: Enabled"**.
7. Test login via "Continue with SAML SSO" on the Prowler login page.
### IdP-Initiated SSO (from Google)
1. Sign in to Google Workspace with an account that has access to the Prowler SAML app.
2. Open the Google Workspace app launcher (the grid icon in the top-right corner of any Google page).
3. Click the Prowler app tile.
4. The browser redirects directly to Prowler App, authenticated.
For more information on the SSO login flows, refer to the [SAML SSO Configuration](/user-guide/tutorials/prowler-app-sso#idp-initiated-sso) page.
***
## Troubleshooting
**User Lockout After Misconfiguration**
If SAML is configured with incorrect metadata or an incorrect domain, users who authenticated via SAML cannot fall back to password login. A Prowler administrator must remove the SAML configuration via the API:
```bash theme={null}
curl -X DELETE 'https://api.prowler.com/api/v1/saml-config' \
-H 'Authorization: Bearer ' \
-H 'Accept: application/vnd.api+json'
```
After removal, affected users must reset their password to regain access using standard email and password login. This also applies when SAML is intentionally removed - all SAML-authenticated users need to reset their password. For more details, refer to the [SAML API Reference](/user-guide/tutorials/prowler-app-sso#saml-api-reference). For additional support, contact [Prowler Support](https://docs.prowler.com/user-guide/contact-support).
**Email Domain Uniqueness**
Prowler does not allow two tenants to share the same email domain. If the domain is already associated with another tenant, the configuration will fail. This is by design to prevent authentication ambiguity.
**Just-in-Time Provisioning**
Users who authenticate via SAML for the first time are automatically created in Prowler App. No prior invitation is needed. User attributes (`firstName`, `lastName`, `userType`) are updated on every login from the Google directory.
***
## Quick Summary
1. In **Google Admin Console**, create a custom SAML app using the ACS URL and Entity ID from Prowler App.
2. Configure **attribute mapping**: `firstName`, `lastName`, and optionally `userType` and `organization`.
3. **Download the metadata XML** from Google.
4. **Enable the app** in Google Workspace for the relevant users or groups.
5. In **Prowler App**, enter the email domain, upload the metadata XML, and save.
6. Verify the SAML SSO Integration shows **"Status: Enabled"**.
7. Test login via "Continue with SAML SSO" on the Prowler login page.