

 About Us
Prowler Cloud
The following steps apply to Prowler Cloud and Prowler Local Server.Step 1: Collect OCI Identifiers
- Sign in to the OCI Console and open Tenancy Details to copy the Tenancy OCID.
- Go to Identity & Security → Users, select the principal that owns the API key, and copy the User OCID.
- Generate or locate the API key fingerprint and private key for that user. Follow the Config File Authentication steps to create or rotate the key pair and copy the fingerprint.
- In Tenancy Details, note the Home Region identifier (for example,
me-abudhabi-1). Any other region the tenancy is subscribed to also works.
Step 2: Access Prowler Cloud
- Navigate to Prowler Cloud or launch Prowler Local Server.
- Go to Configuration → Providers and click Add Provider.
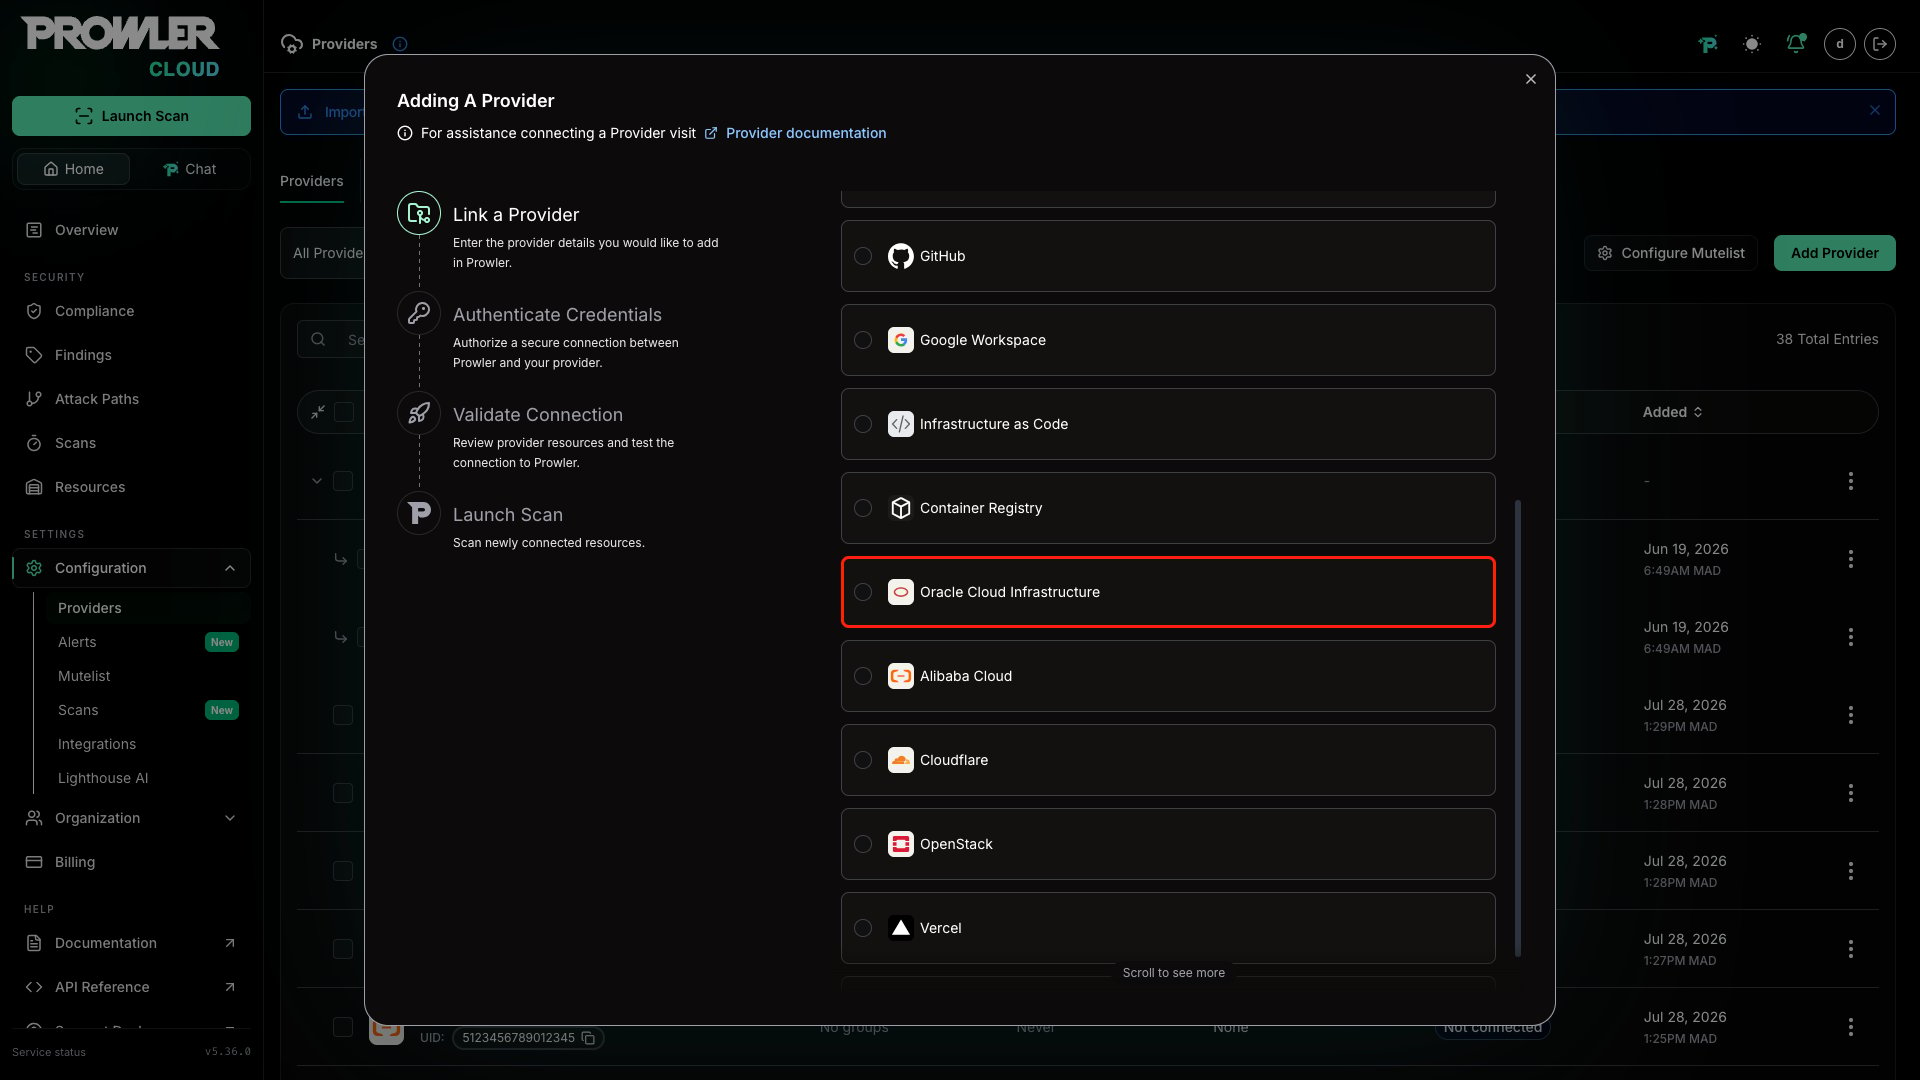
- Select Oracle Cloud and enter the Tenancy OCID and an optional alias, then choose Next.
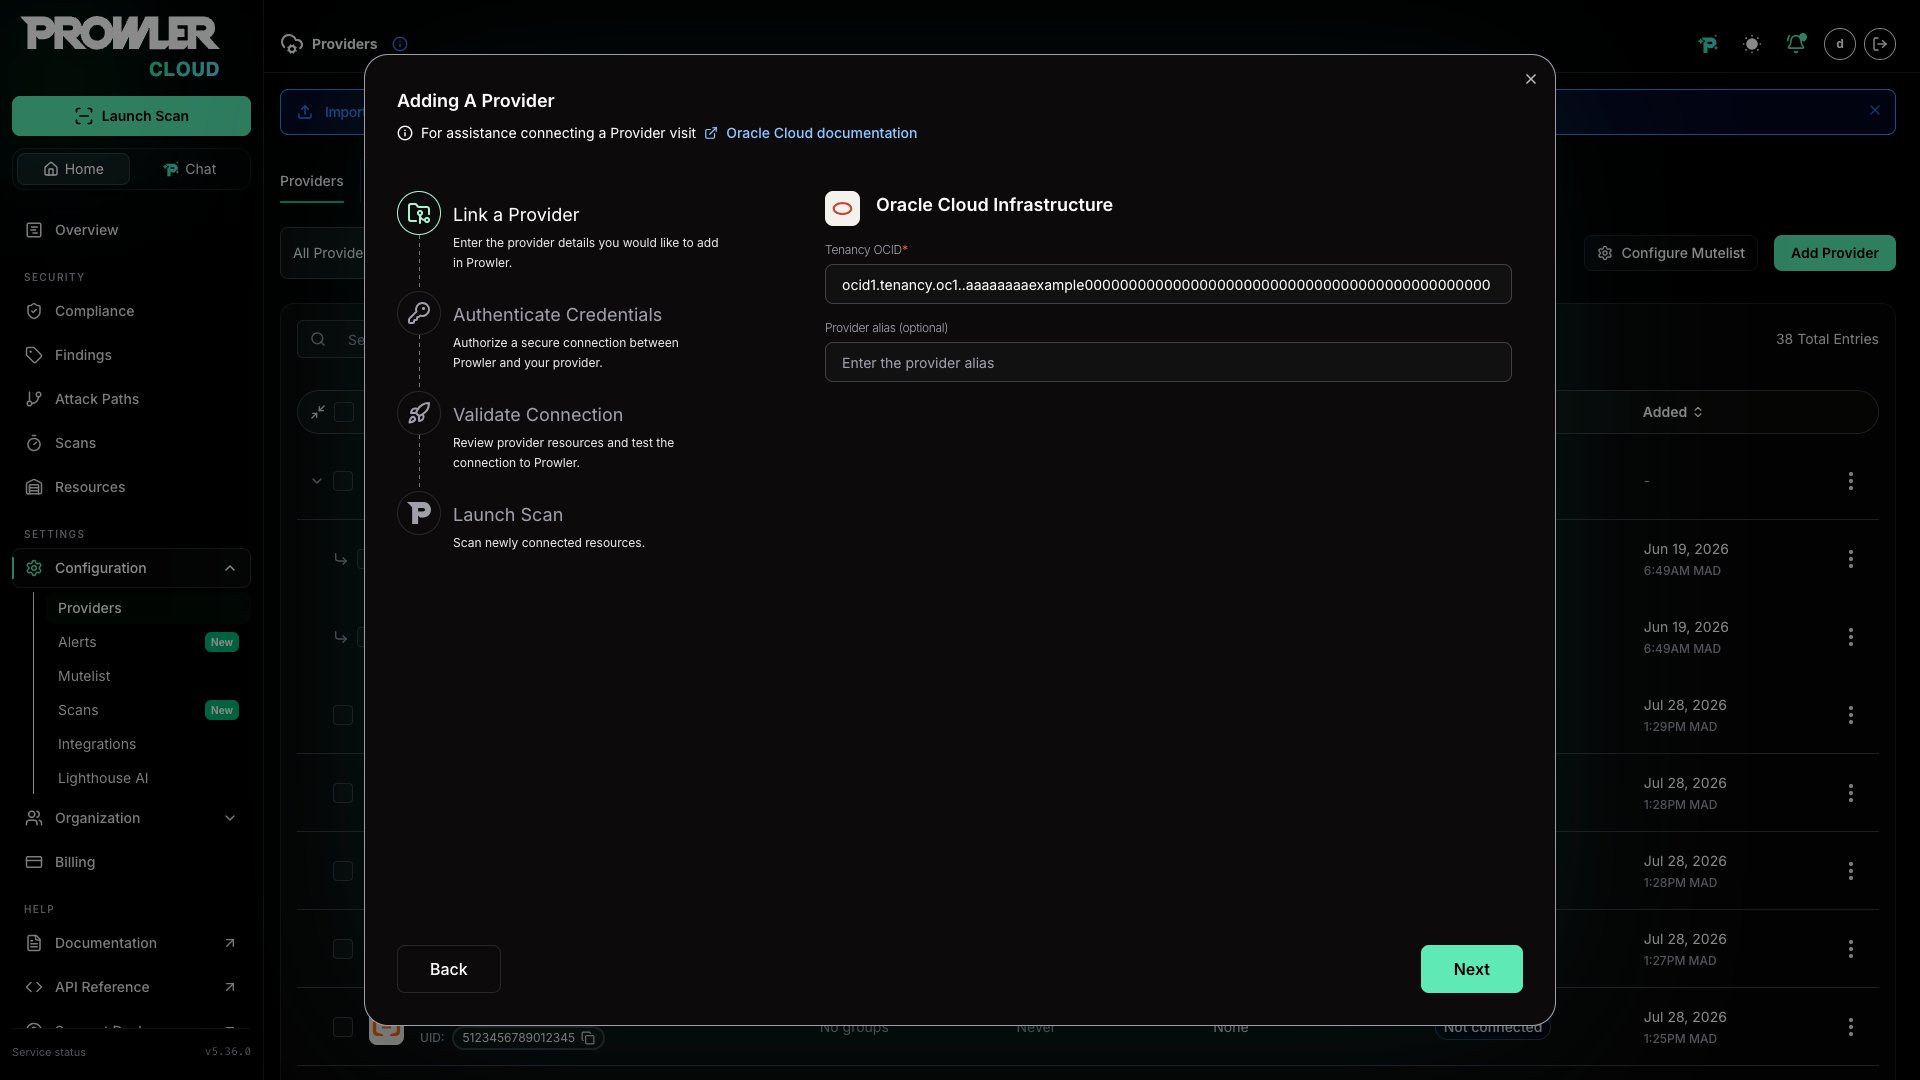
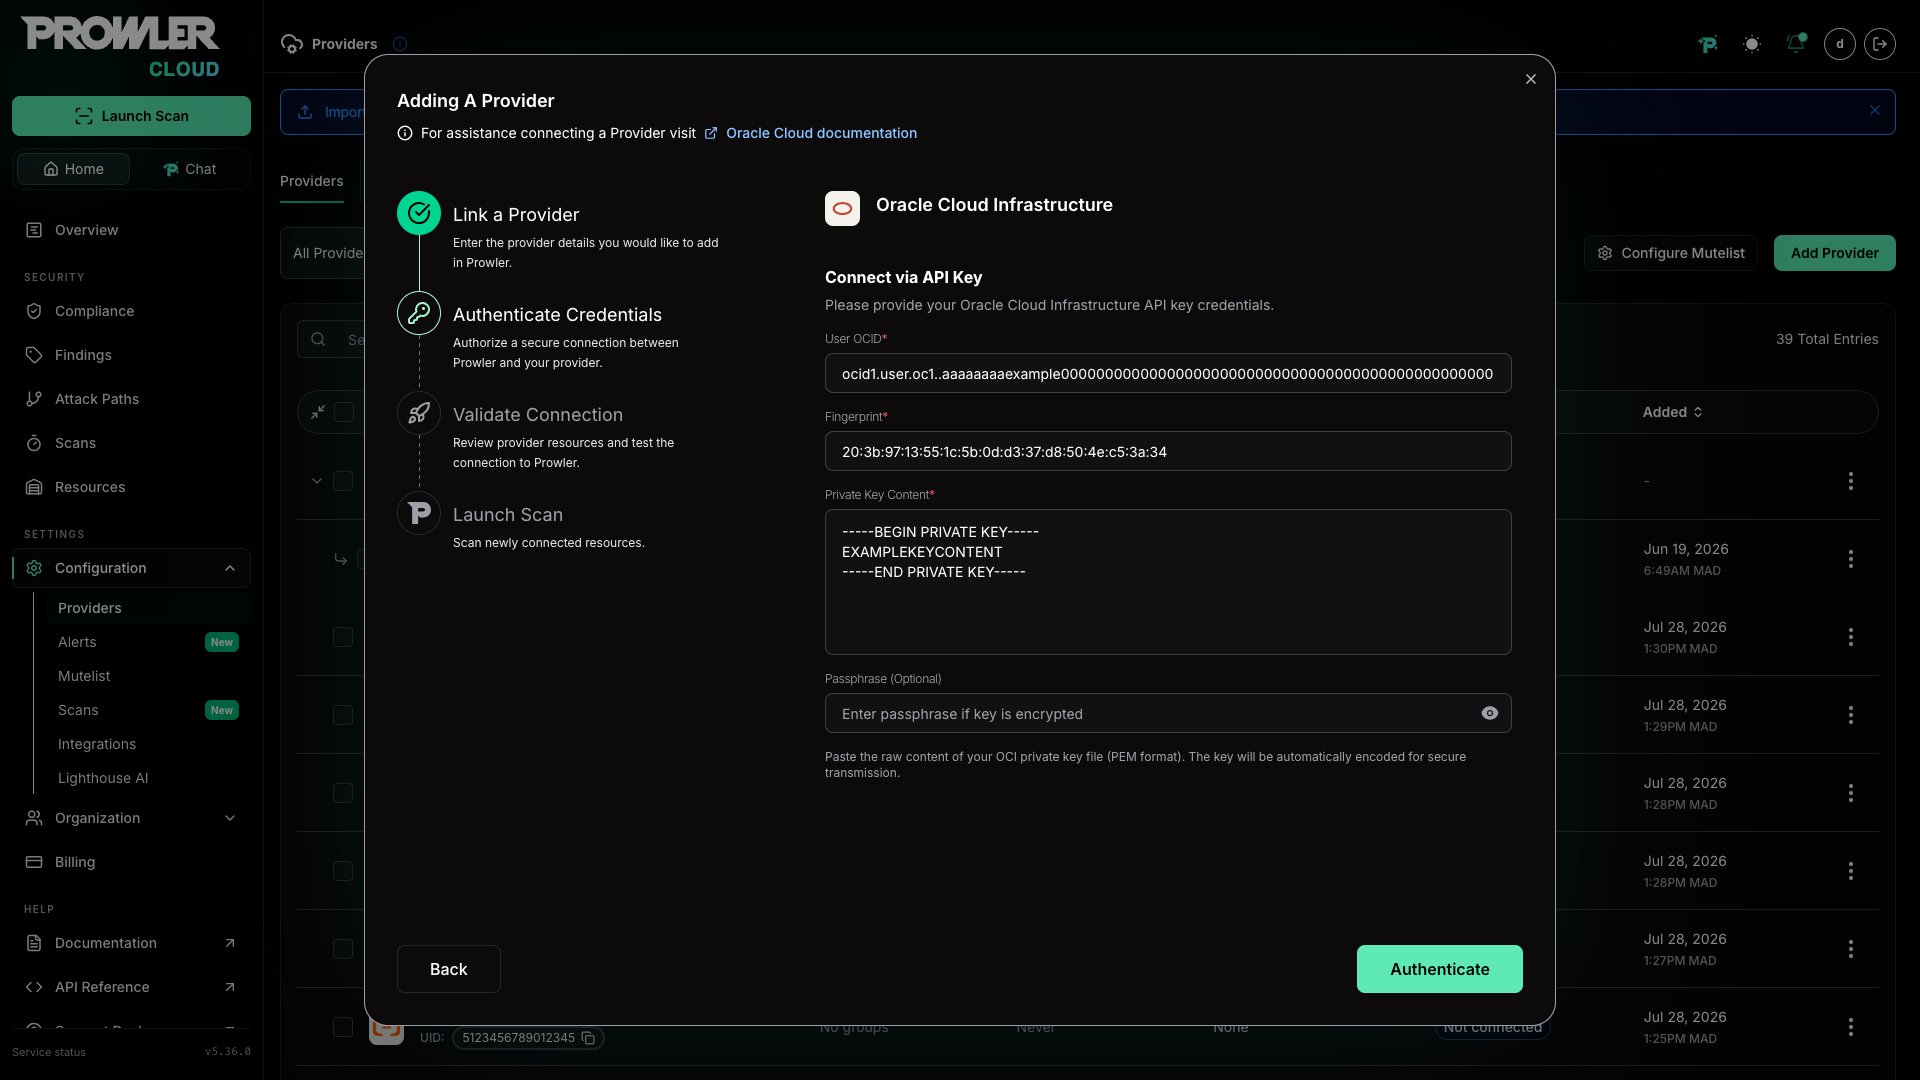
Step 3: Add OCI API Key Credentials
Prowler Cloud connects to OCI with API key credentials. Provide:- User OCID for the API key owner
- Fingerprint of the API key
- Home Region: select it from the list (for example,
me-abudhabi-1) - Private Key Content (paste the full PEM value)
- Passphrase (Optional) if the private key is encrypted
The home region is used only to validate the credentials and discover the regions the tenancy is subscribed to. It does not limit the scan: Prowler audits every subscribed region. OCI Identity and Access Management (IAM) only answers in subscribed regions, so a tenancy that is not subscribed to the selected region cannot be validated.
us-ashburn-1 for validation. If such a provider fails with 401 NotAuthenticated, update its credentials and select the home region.
Prowler CLI
Prerequisites
Before you begin, ensure you have:-
Prowler installed with OCI dependencies:
-
OCI Python SDK (automatically installed with Prowler):
- OCI Account Access with appropriate permissions to read resources in your tenancy.
Authentication
Prowler supports multiple authentication methods for OCI. For detailed authentication setup, see the OCI Authentication Guide. Note: OCI Session Authentication and Config File Authentication both use the same~/.oci/config file. The difference is how the config file is generated - automatically via browser (session auth) or manually with API keys.
Quick Start: OCI Session Authentication (Recommended)
The easiest and most secure method is using OCI session authentication, which automatically generates your config file via browser login. Prerequisites: You need to have the OCI CLI installed. See the OCI CLI Installation Guide for installation instructions.-
Authenticate using the OCI CLI:
This will open your browser for OCI Console login and automatically generate the config file.
-
Add your user OCID to
~/.oci/config: Get your user OCID from the OCI Console: Navigate to: Identity & Security → Users → Click your username → Copy the OCID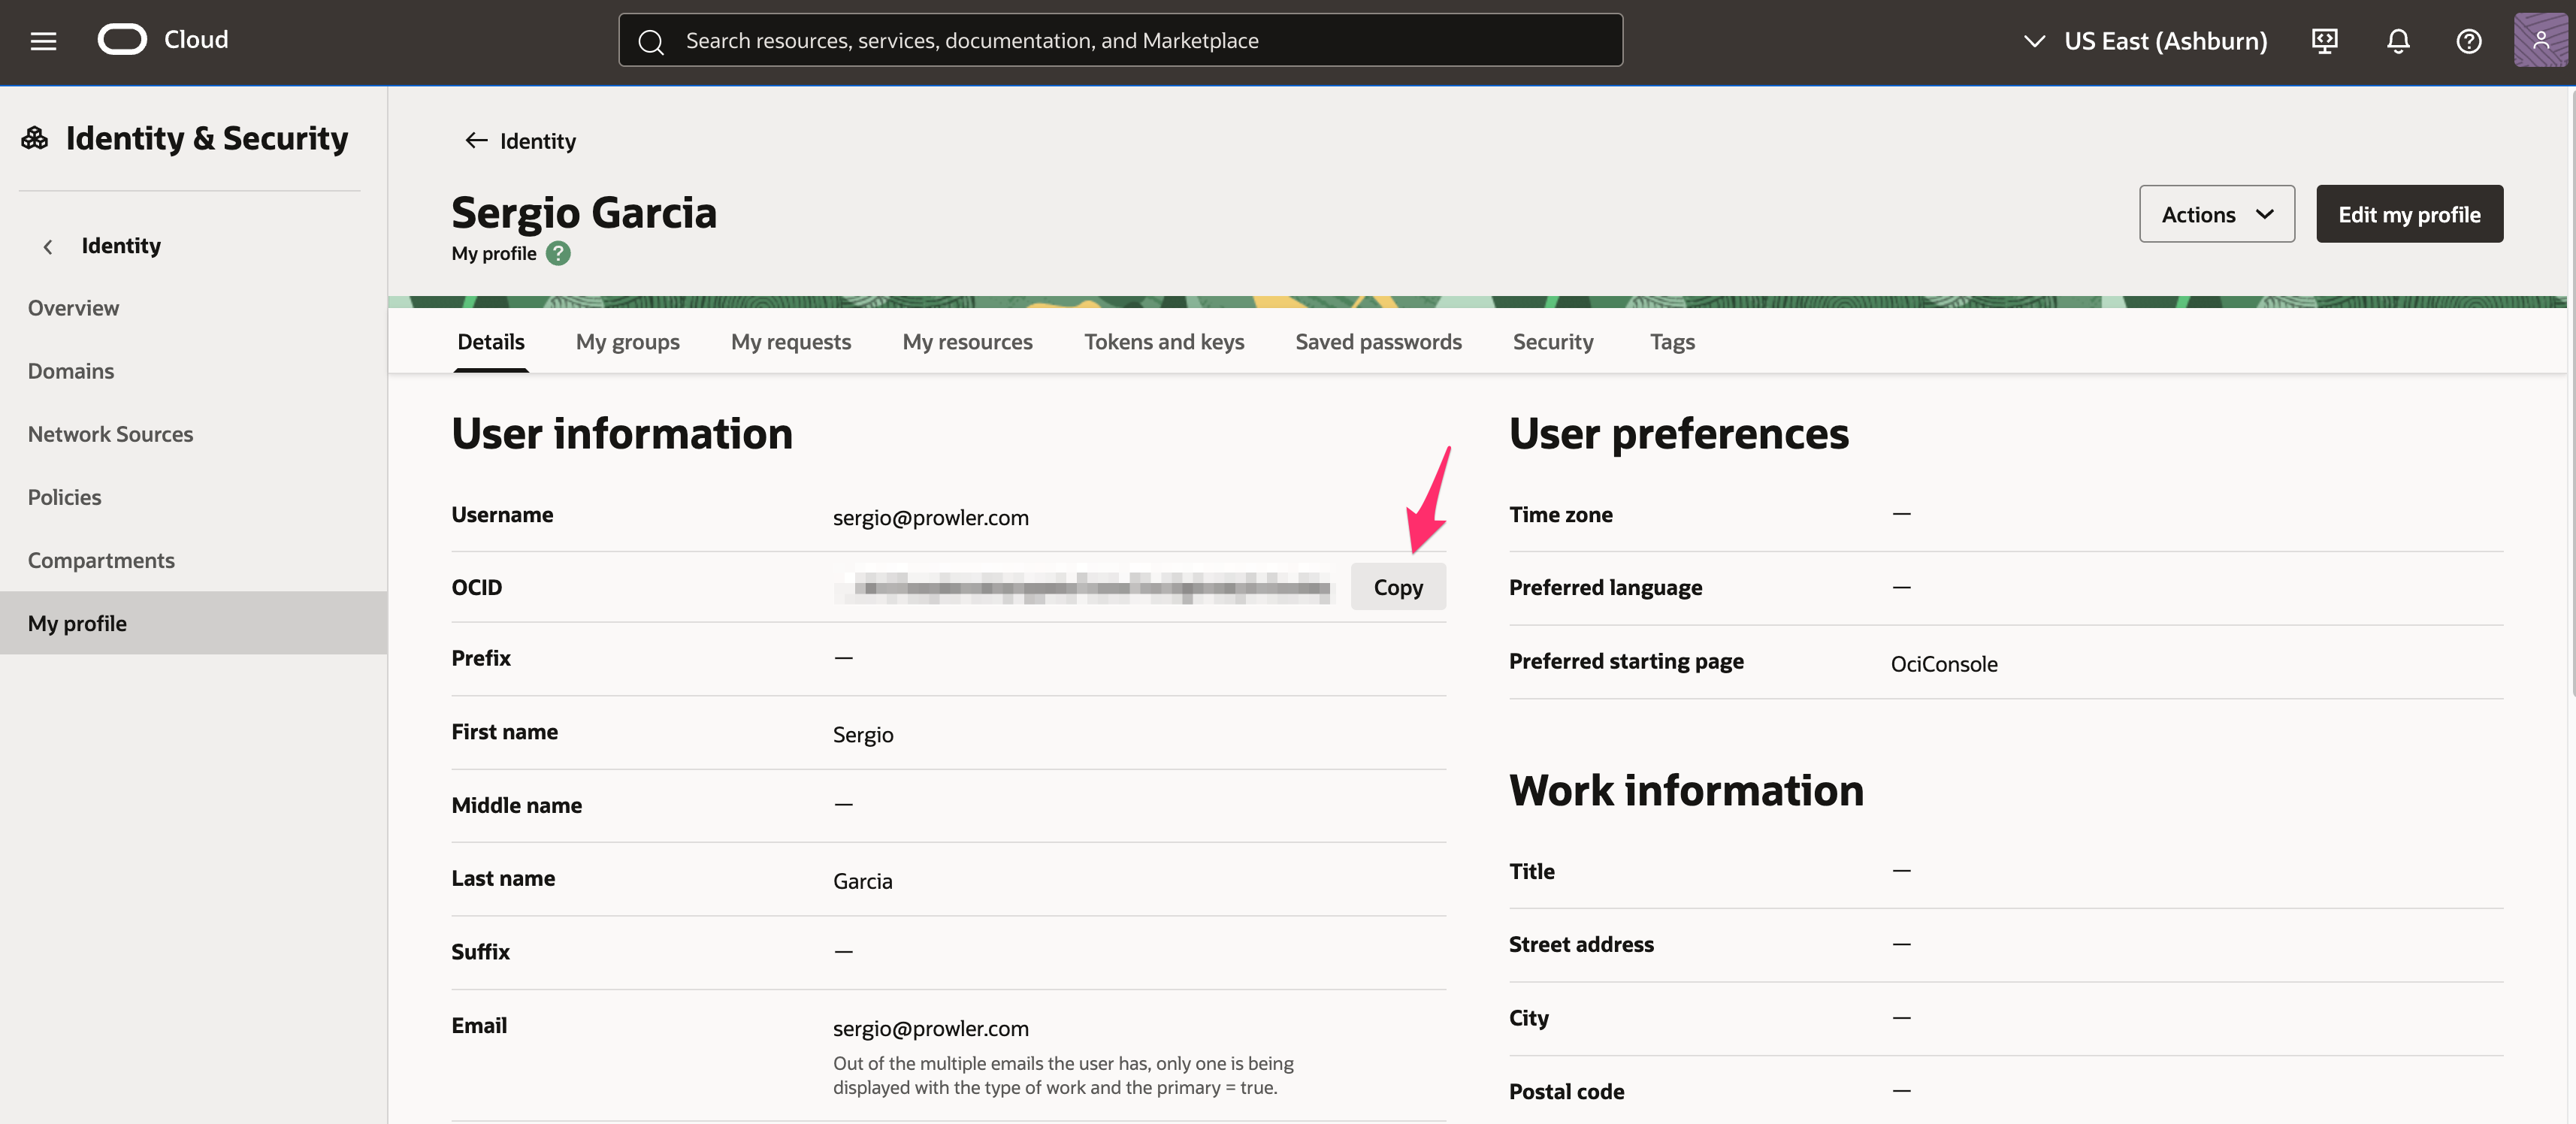 Edit
Edit~/.oci/configand add theuserparameter: -
Run Prowler:
Alternative: Manual API Key Setup
If you prefer to manually generate API keys instead of using browser-based session authentication, see the detailed instructions in the Authentication Guide. Note: Both methods use the same~/.oci/config file - the difference is that manual setup uses static API keys while session authentication uses temporary session tokens.
Using a Specific Profile
If you have multiple profiles in your OCI config:Using a Custom Config File
Instance Principal Authentication
IMPORTANT: This authentication method only works when Prowler is running inside an OCI compute instance. If you’re running Prowler from your local machine, use OCI Session Authentication instead. When running Prowler on an OCI Compute instance, you can use Instance Principal authentication:- Prowler must be running on an OCI compute instance
- The compute instance must have a dynamic group and policy allowing access to OCI resources
- Example policy:
Basic Usage
Scan Entire Tenancy
Scan Specific Region
Scan Specific Compartments
Run Specific Checks
Run Specific Services
Compliance Frameworks
Run CIS OCI Foundations Benchmark v3.0:Required Permissions
Prowler requires read-only permissions to audit your OCI tenancy. Below are the minimum required permissions:Tenancy-Level Policy
Create a groupprowler-users and add your user to it, then create this policy:
Service-Specific Permissions
For more granular control, you can grant specific permissions:Output Formats
Prowler supports multiple output formats for OCI:JSON
CSV
HTML
Multiple Formats
Common Scenarios
Security Assessment
Full security assessment with CIS compliance:Continuous Monitoring
Run specific security-critical checks:Compartment-Specific Audit
Audit a specific project compartment:Troubleshooting
Authentication Issues
Error: “Could not find a valid config file”- Ensure
~/.oci/configexists and is properly formatted - Verify the path to your API key is correct
- Check file permissions:
chmod 600 ~/.oci/config ~/.oci/oci_api_key.pem
- Verify the API key fingerprint matches the one in OCI Console
- Ensure the public key is uploaded to your OCI user account
- Check that the private key file is accessible
Permission Issues
Error: “Authorization failed or requested resource not found”- Verify your user has the required policies (see Required Permissions)
- Check that policies apply to the correct compartments
- Ensure policies are not restricted by conditions that exclude your user
Region Issues
Error: “OCI credential validation failed” with401 NotAuthenticated on get_tenancy
- The tenancy is not subscribed to the region used for validation (by default
us-ashburn-1) - In Prowler Cloud or Prowler Local Server, update the provider credentials and select the tenancy home region
- In Prowler CLI, set
regionin~/.oci/configto the home region. All subscribed regions are still scanned;--regionalso works but limits the scan to that region
- Check available regions:
prowler oci --list-regions - Verify your tenancy is subscribed to the region
- Use the region identifier (e.g.,
us-ashburn-1), not the display name
Advanced Usage
Using Mutelist
Create a mutelist file to suppress specific findings:Custom Checks Metadata
Override check metadata:Filtering by Status
Only show failed checks:Filtering by Severity
Only show critical and high severity findings:Next Steps
- Learn about Compliance Frameworks in Prowler
- Review Prowler Output Formats
- Explore Integrations with SIEM and ticketing systems