

 About Us
- Streamlined management: Convert security Findings directly into actionable Jira work items
- Enhanced team collaboration: Leverage existing project management workflows for security remediation
- Automated ticket creation: Reduce manual effort in tracking and assigning security work items
How It Works
When enabled and configured:- Select one or more complete Finding Groups, or expand a Finding Group and select multiple Findings, from the Findings table.
- Send the selection to Jira in one action.
- Choose how Jira issues are created:
- Grouped issue: Create one Jira issue that contains all selected Findings from the Finding Group.
- Separate issues: Create one Jira issue for each selected Finding. Each Finding represents one affected resource.
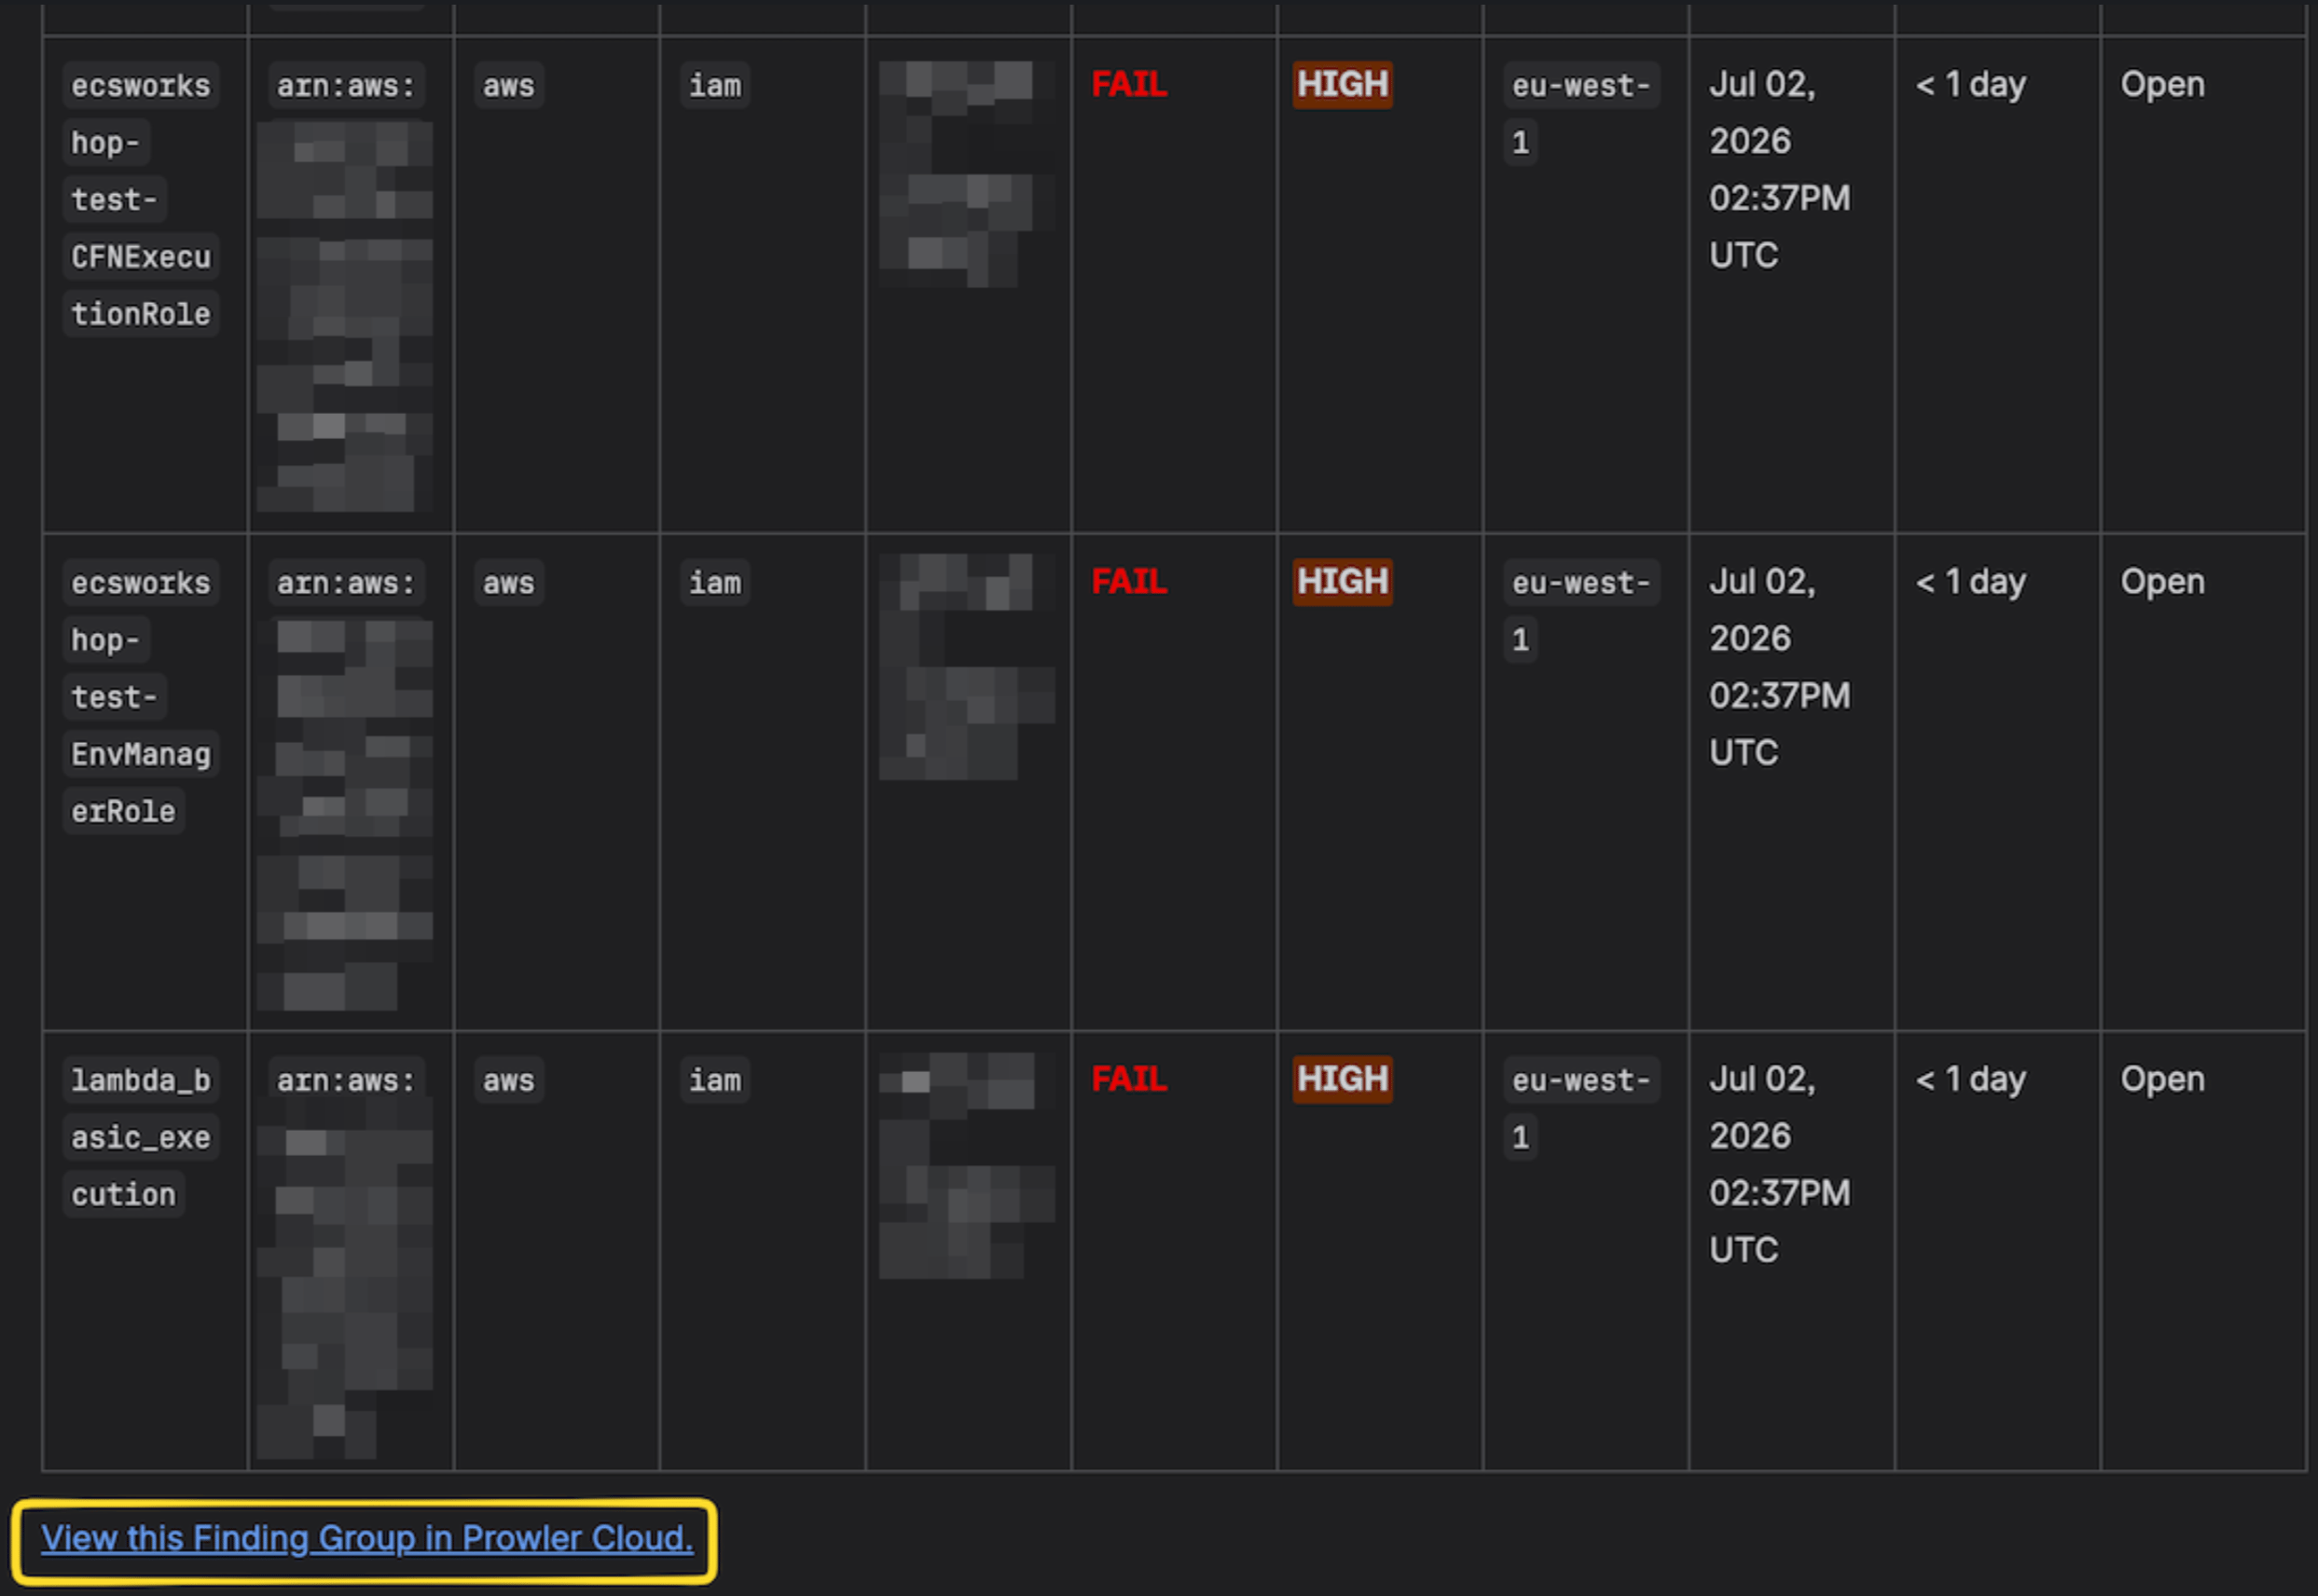
- Review the Finding Group summary and affected-resource details in Jira, then use the link at the bottom of the issue to open the complete Finding Group in Prowler Cloud.
Prerequisites
Configuring and using the Jira integration requires the Manage Integrations permission. The Jira integration is tenant-wide, so it does not require Unlimited Visibility or any specific Provider Group. Findings sent to Jira are still limited to the providers the role can access.Configuration
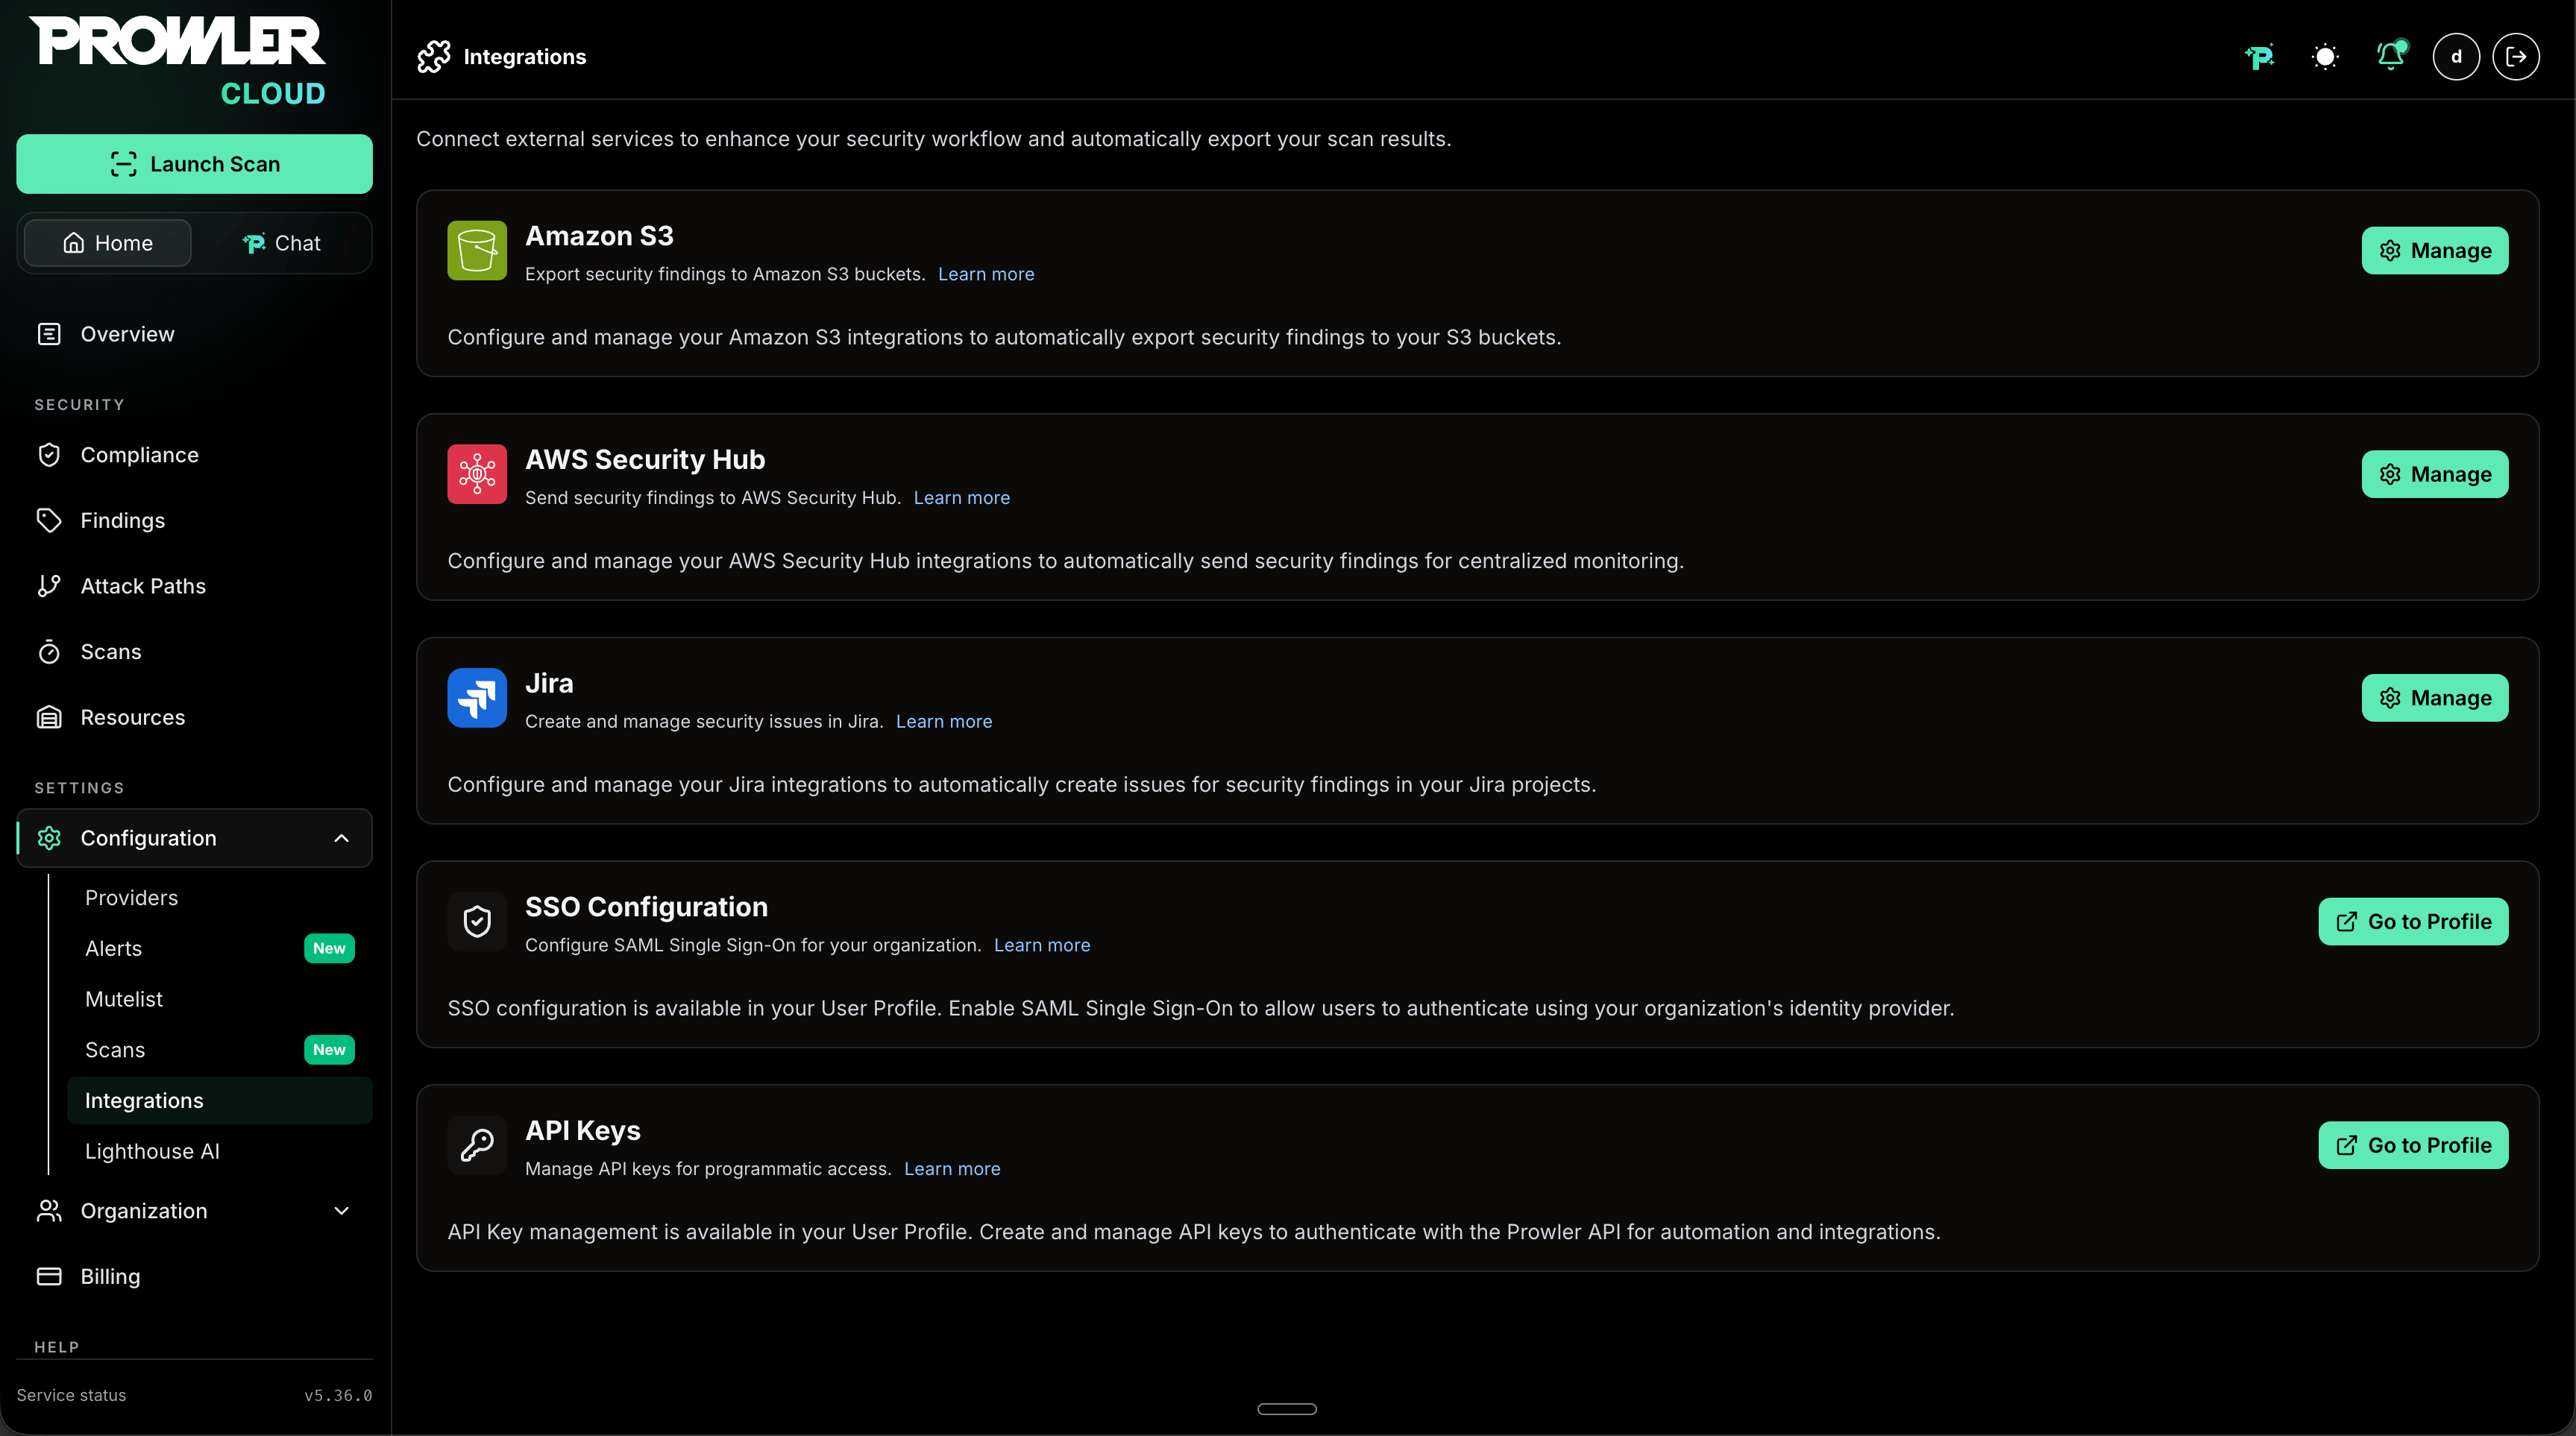
To configure Jira integration in Prowler Cloud:- Navigate to Integrations in Prowler Cloud
-
Locate the Jira card and click Manage, then select Add integration
-
Complete the integration settings:
- Jira domain: Enter the Jira domain (e.g., from
https://your-domain.atlassian.net->your-domain) - Email: Your Jira account email
- API Token: API token with the following scopes:
read:jira-user,read:jira-work,write:jira-work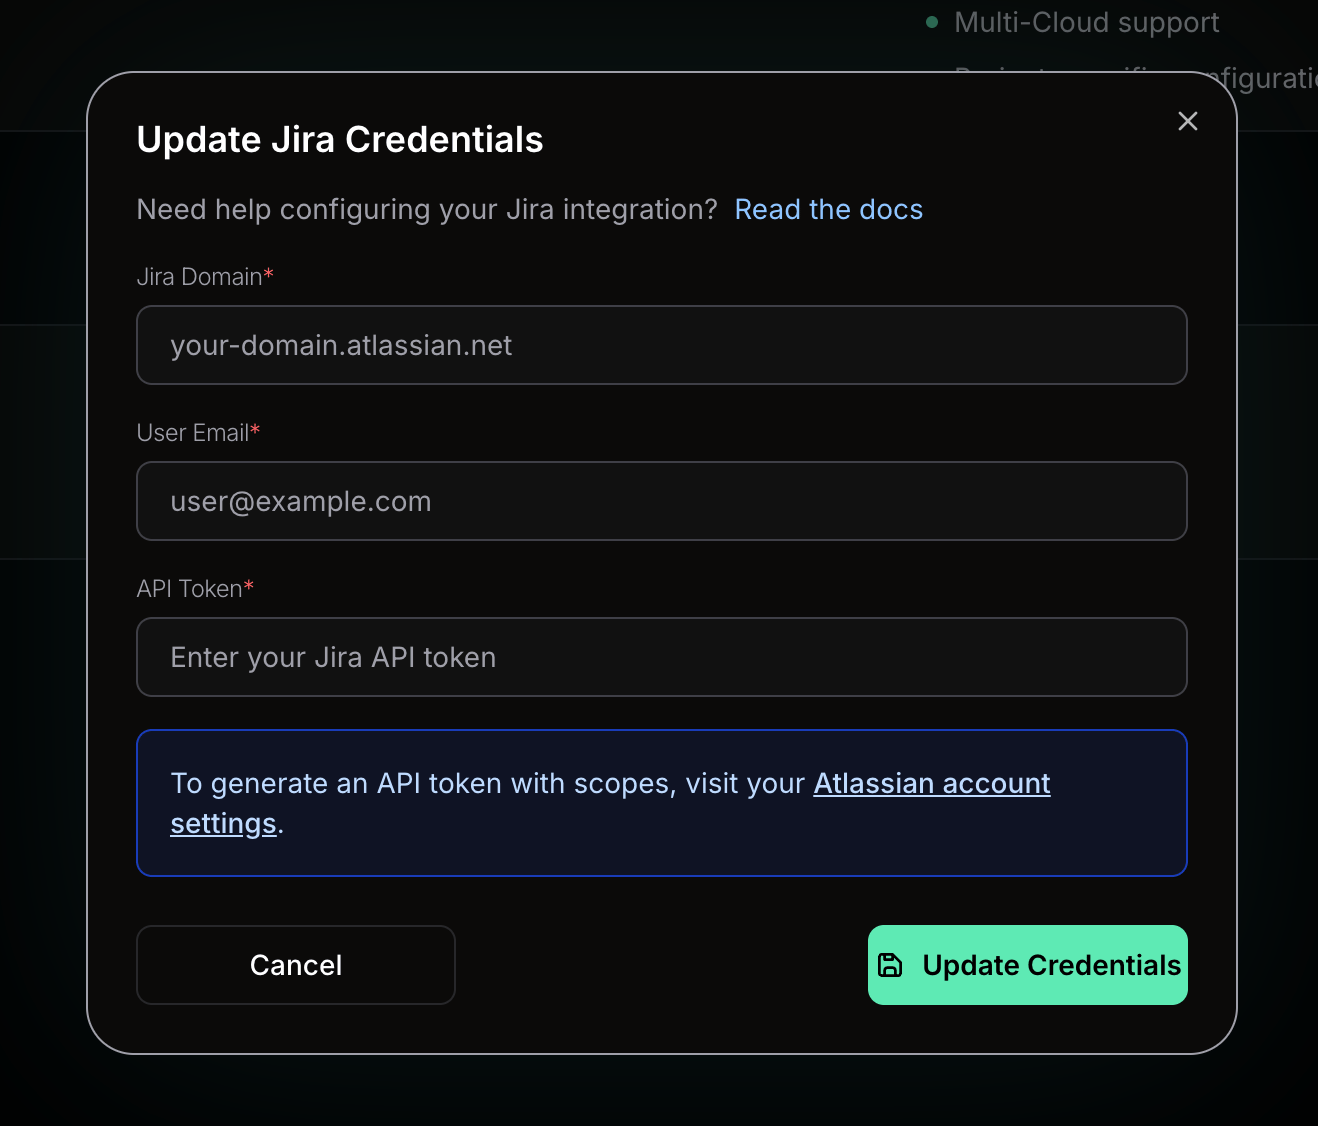
- Jira domain: Enter the Jira domain (e.g., from
Generate Jira API TokenTo generate a Jira API token, visit: https://id.atlassian.com/manage-profile/security/api-tokens
Sending Findings to Jira
Prowler Cloud can send a complete Finding Group or a selection of Findings within a group to Jira in one action.Sending a Complete Finding Group
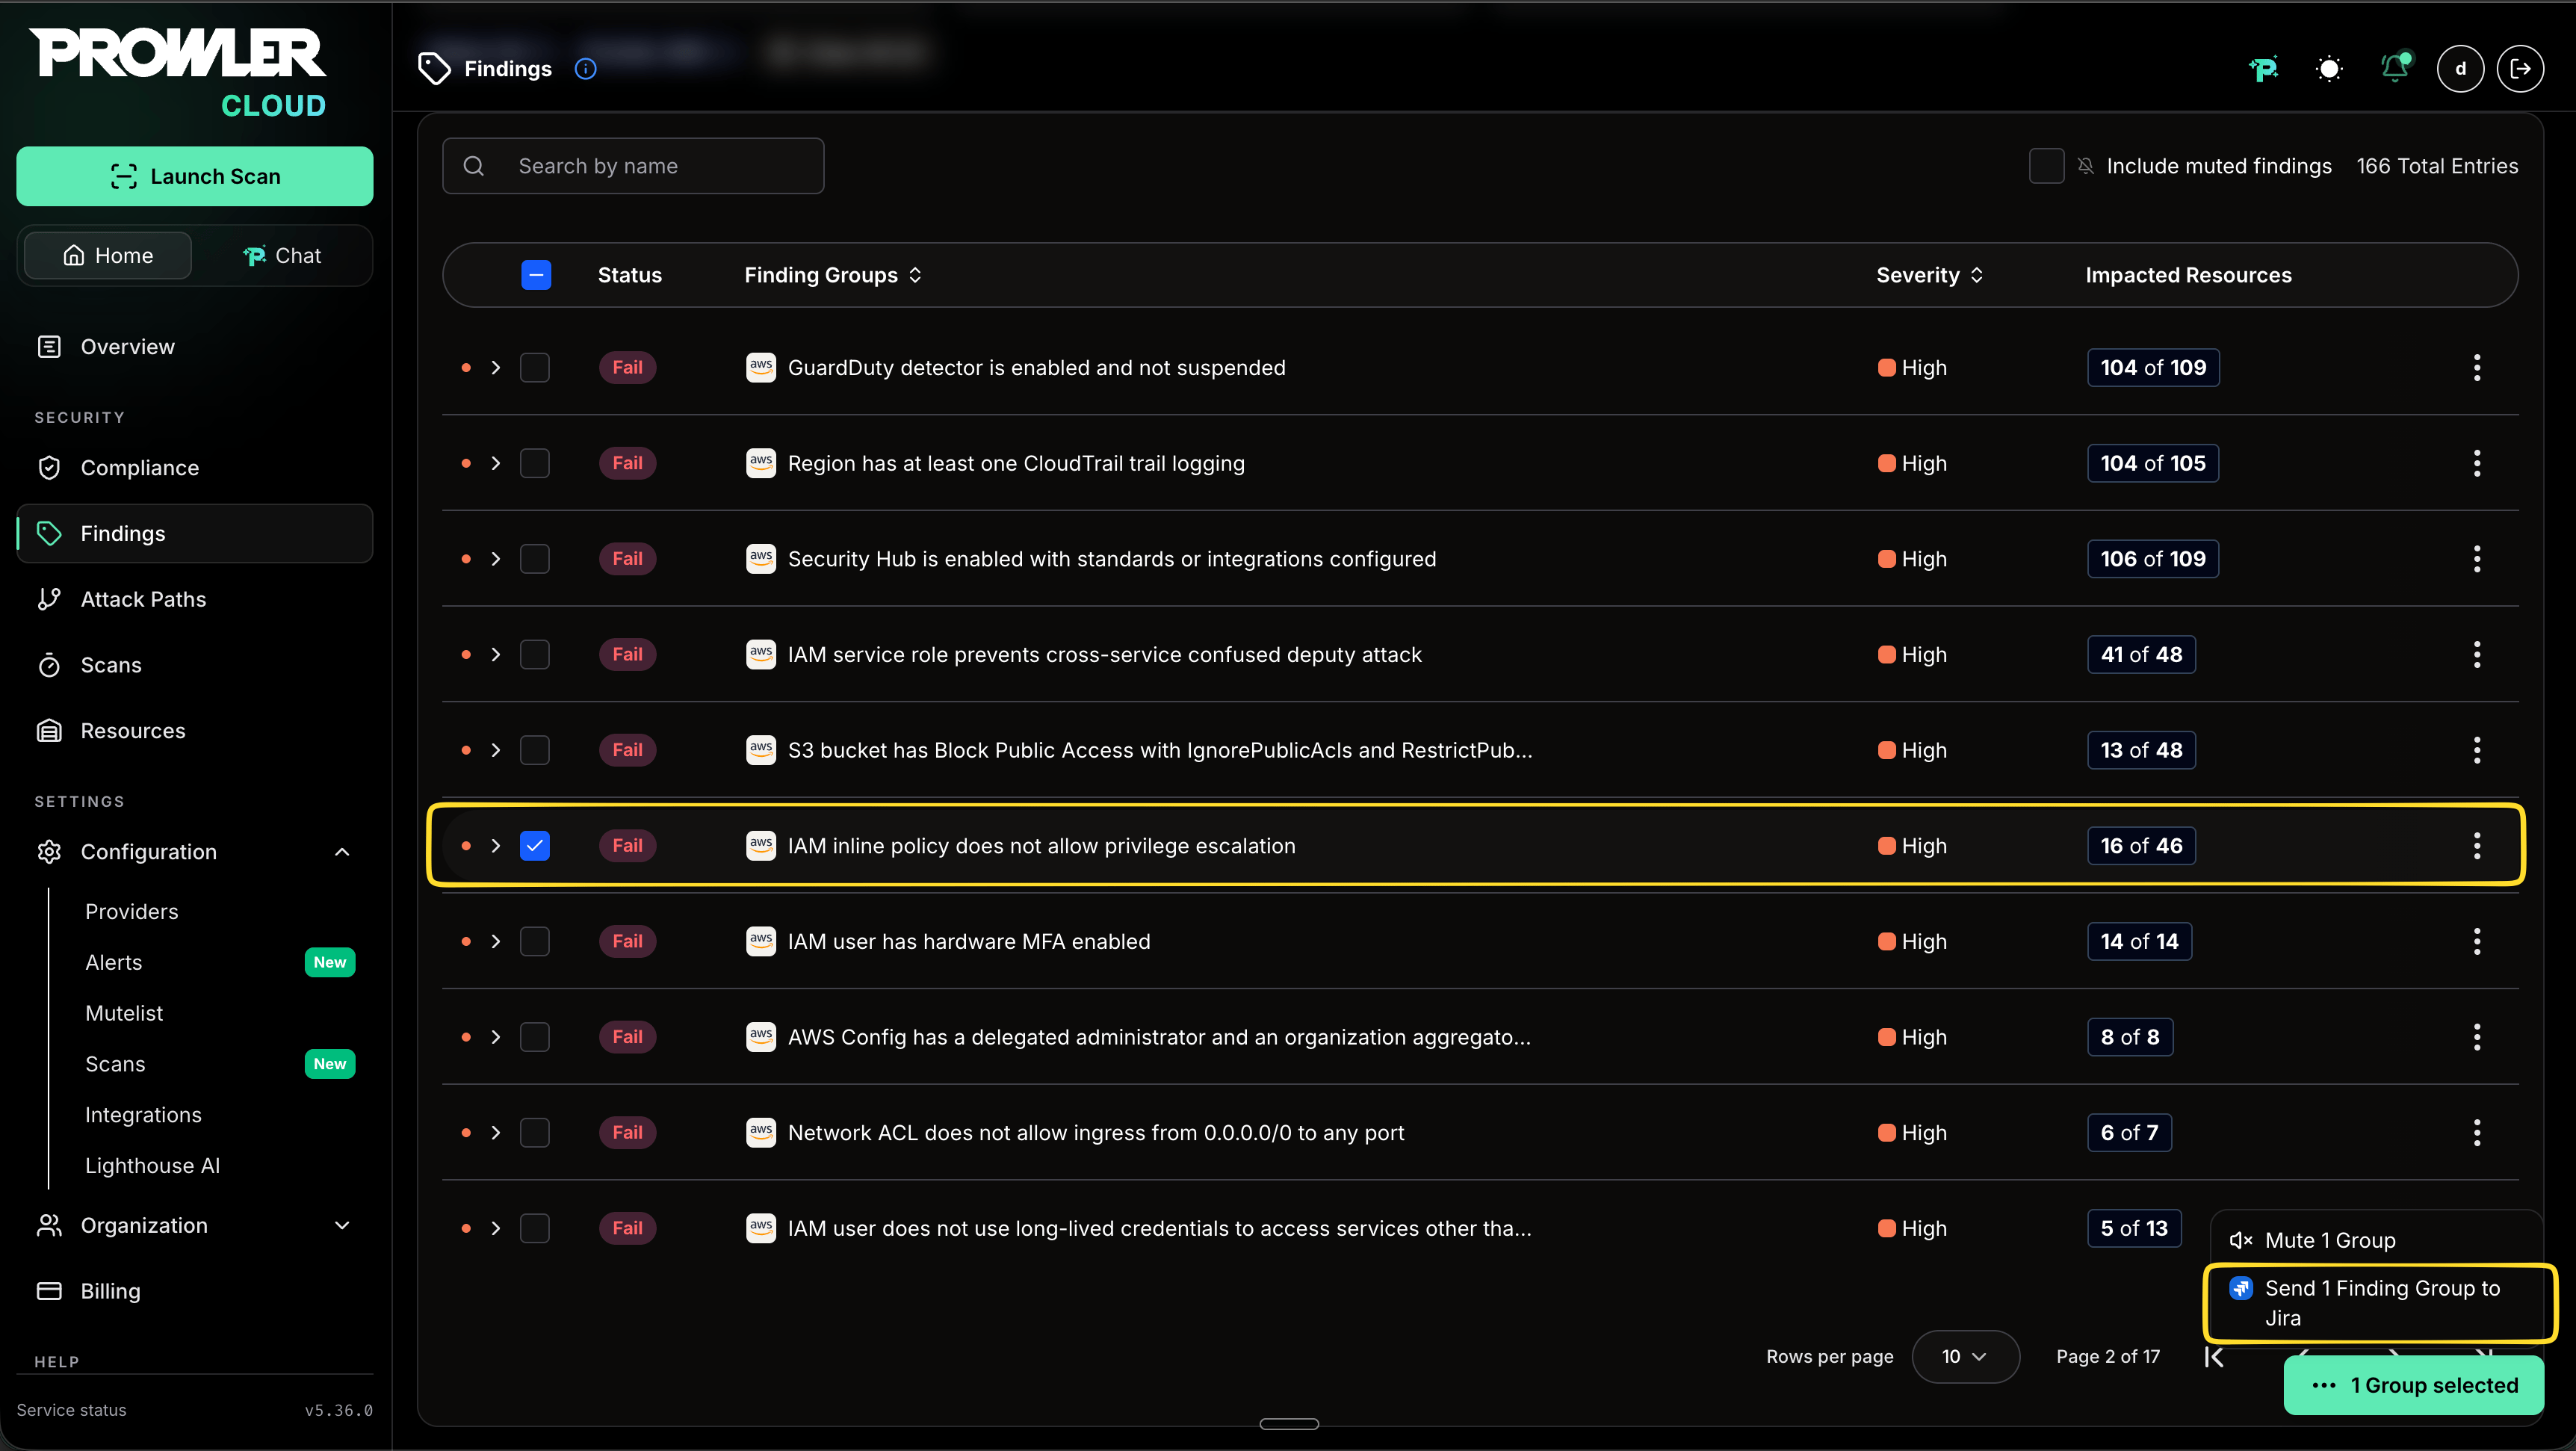
To send every Finding in a Finding Group:- Navigate to Findings in Prowler Cloud.
- Select one or more Finding Groups.
-
Open the bulk actions menu and click Send Finding Group to Jira.
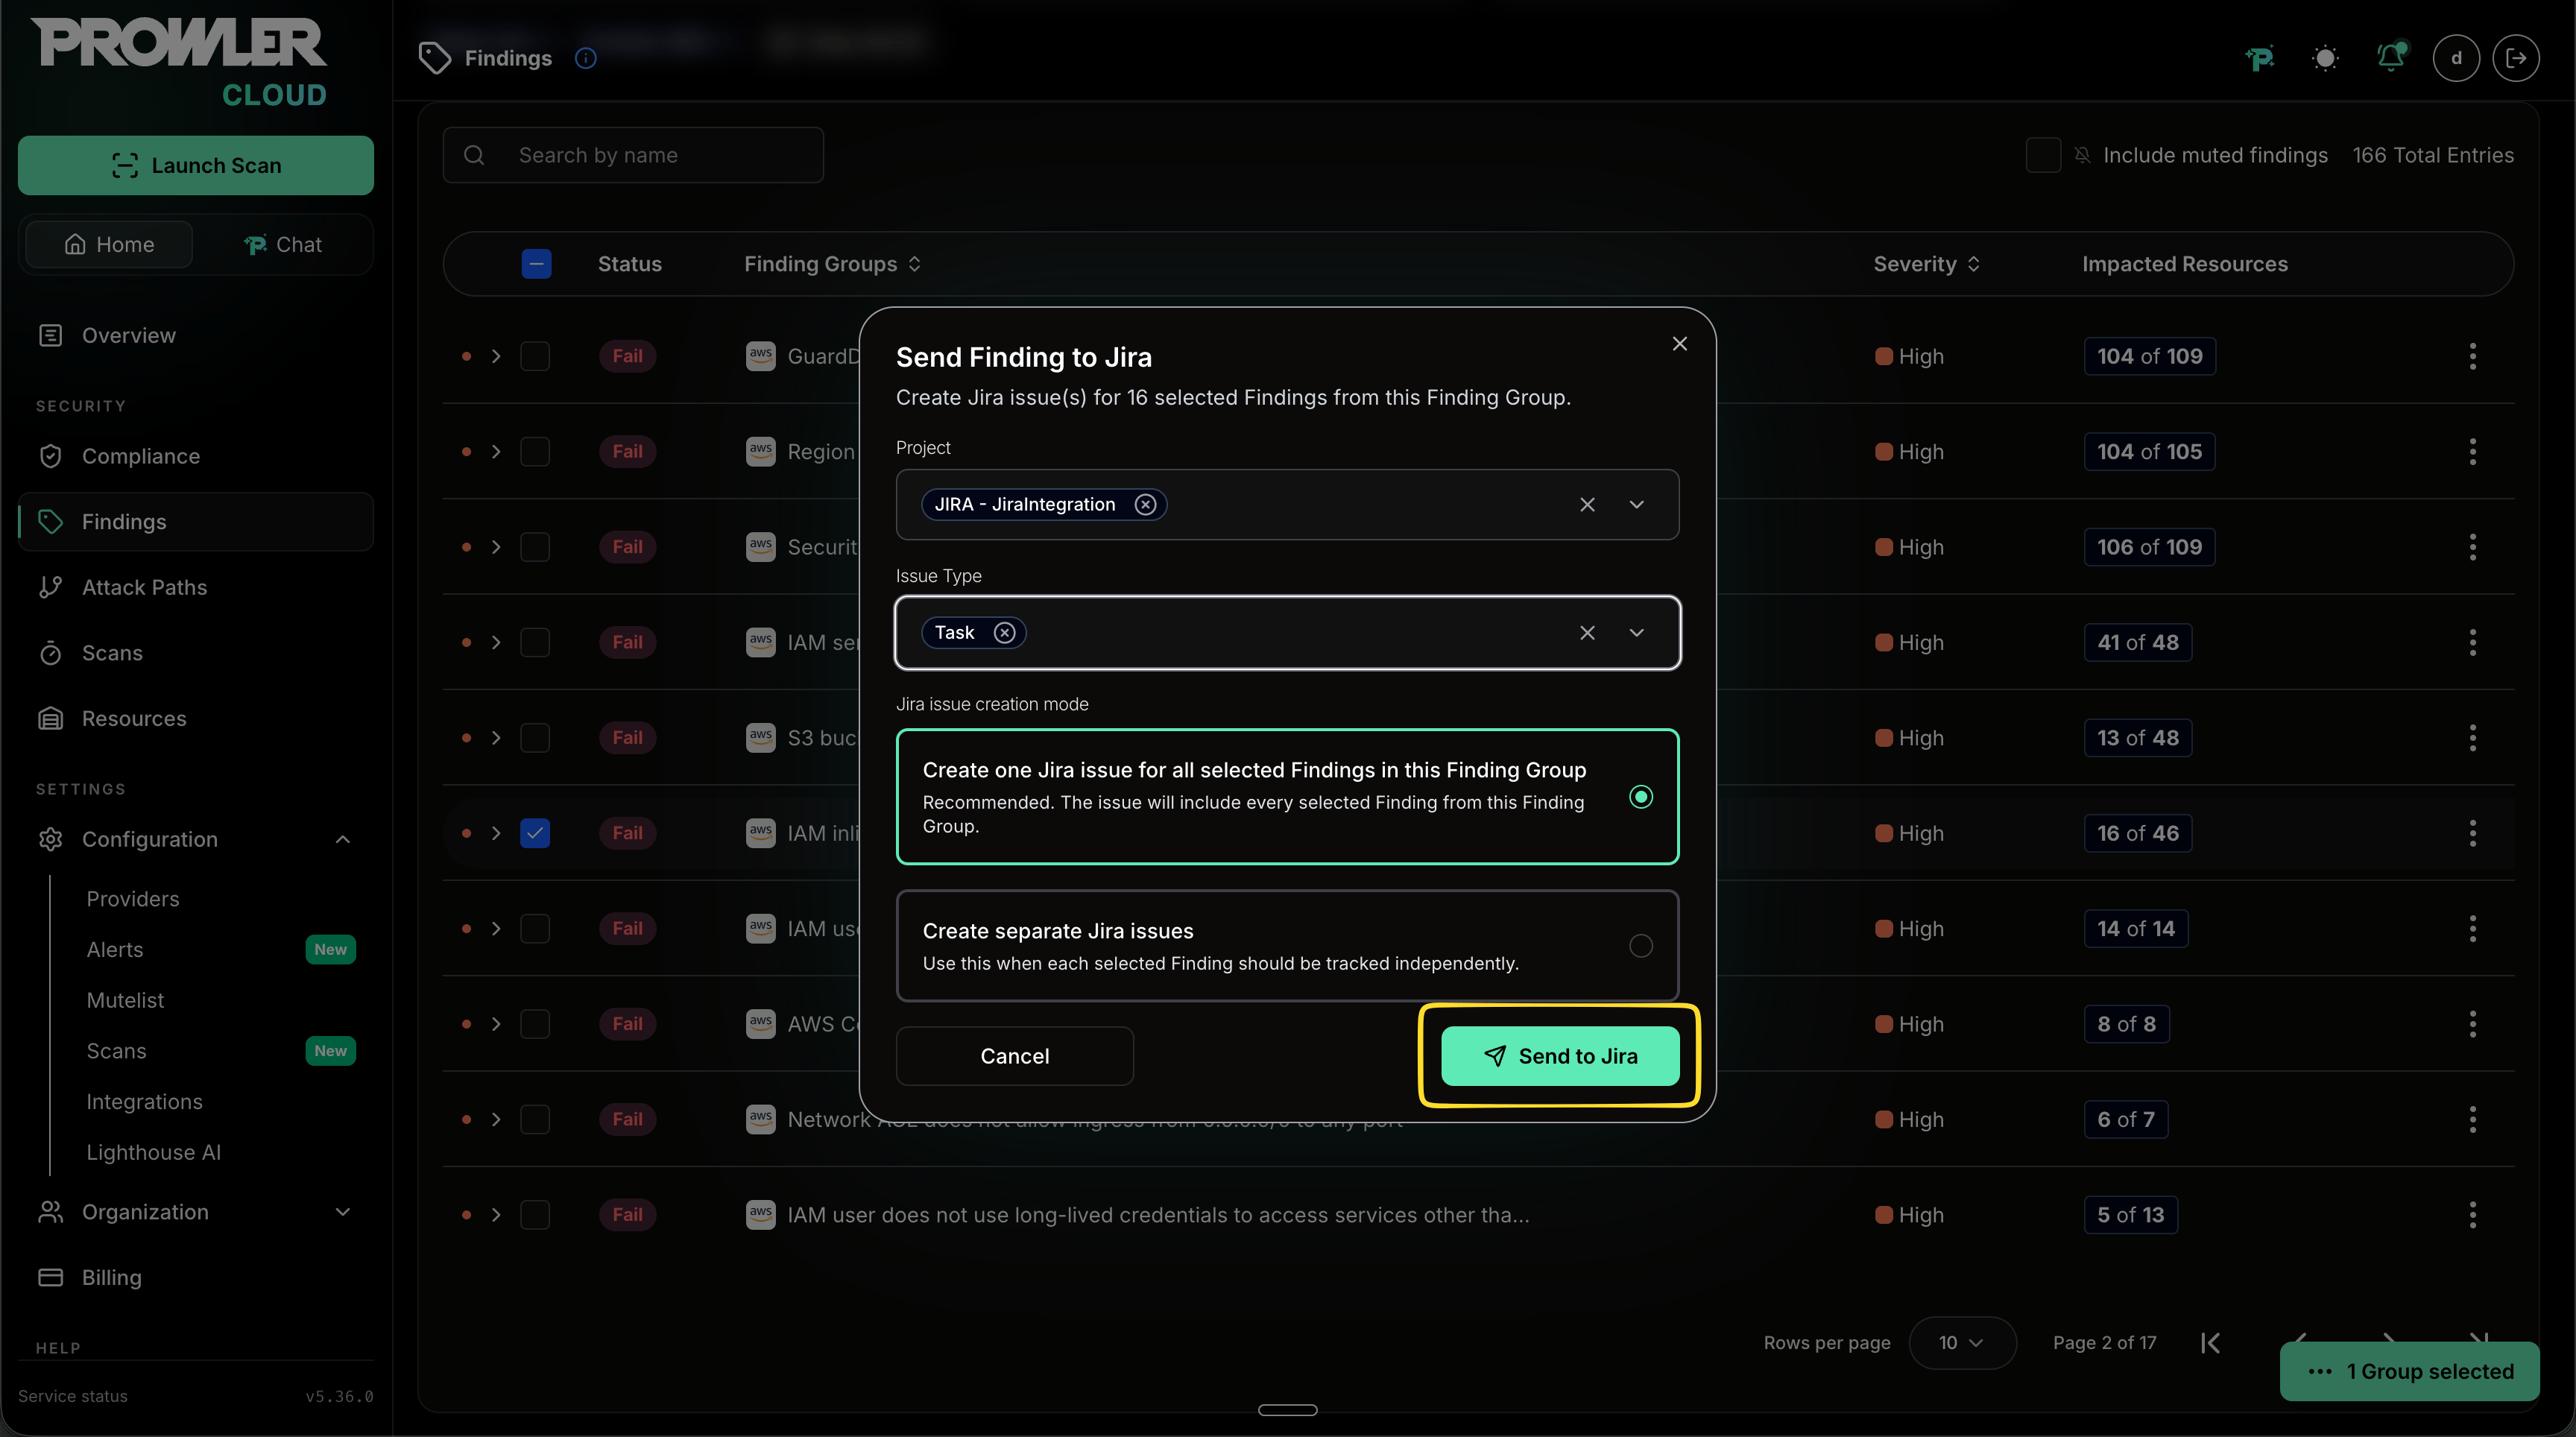
- Select the Jira project and issue type.
-
Choose an issue creation mode:
- Create one Jira issue for all selected Findings in this Finding Group: Keeps the complete Finding Group in one Jira issue.
- Create separate Jira issues: Creates one Jira issue per selected Finding so that each affected resource can be tracked independently.
-
Click Send to Jira.
Sending Multiple Findings from a Group
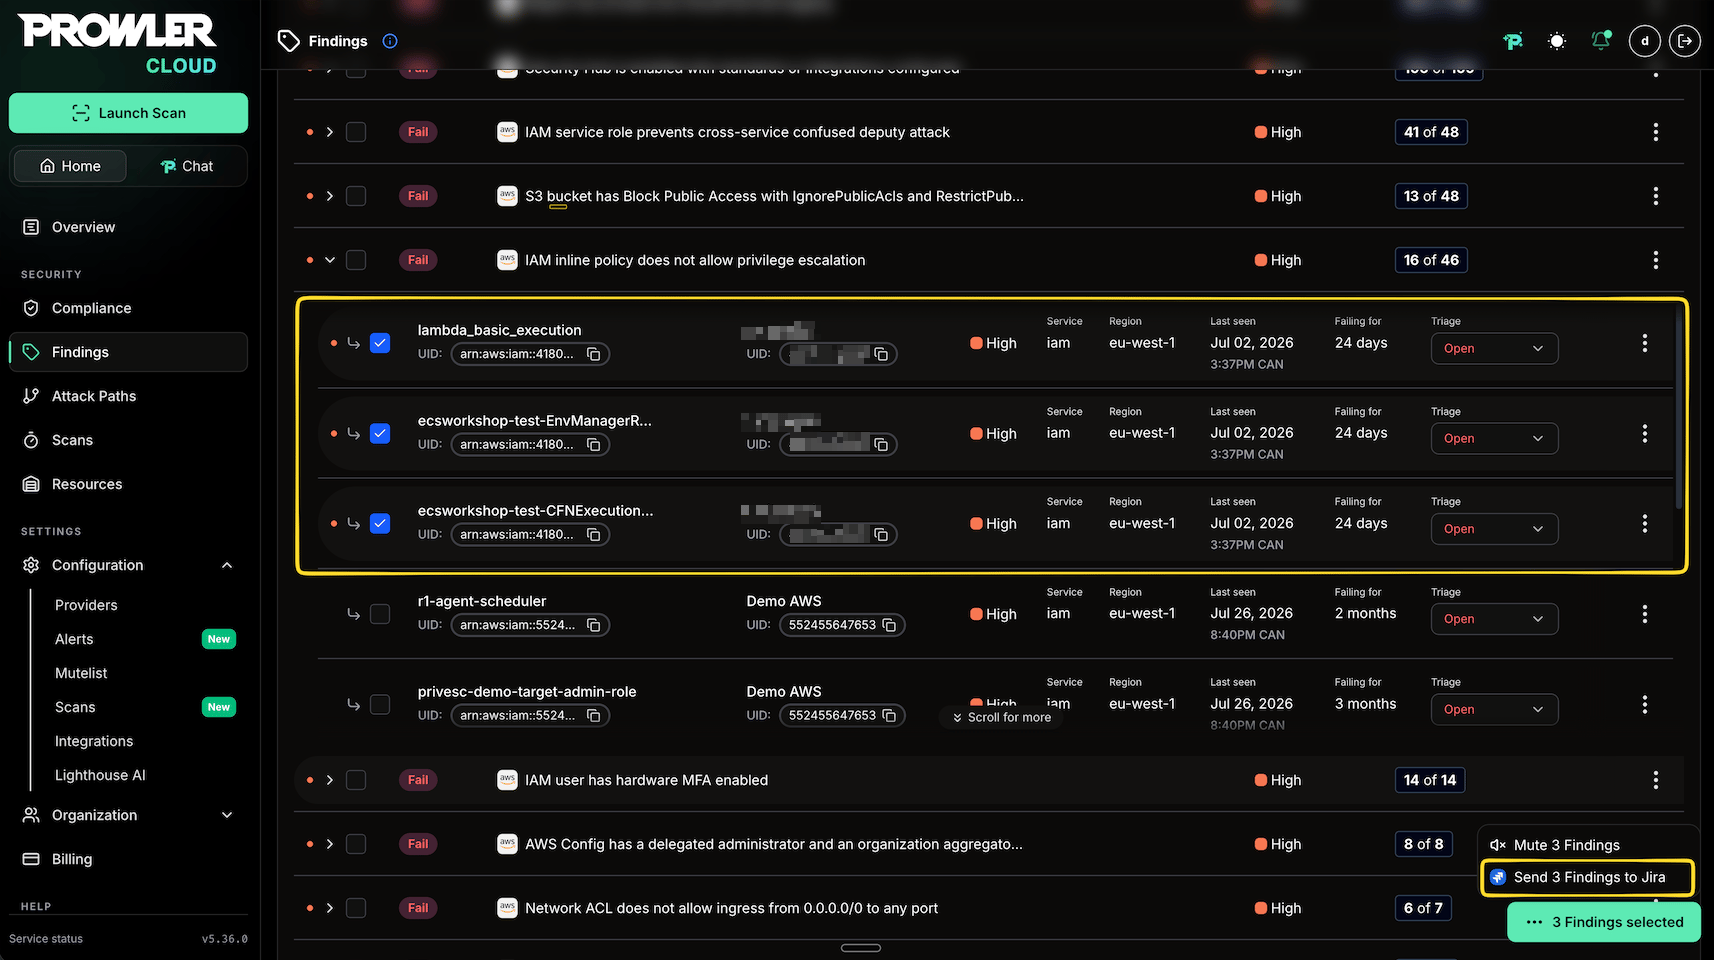
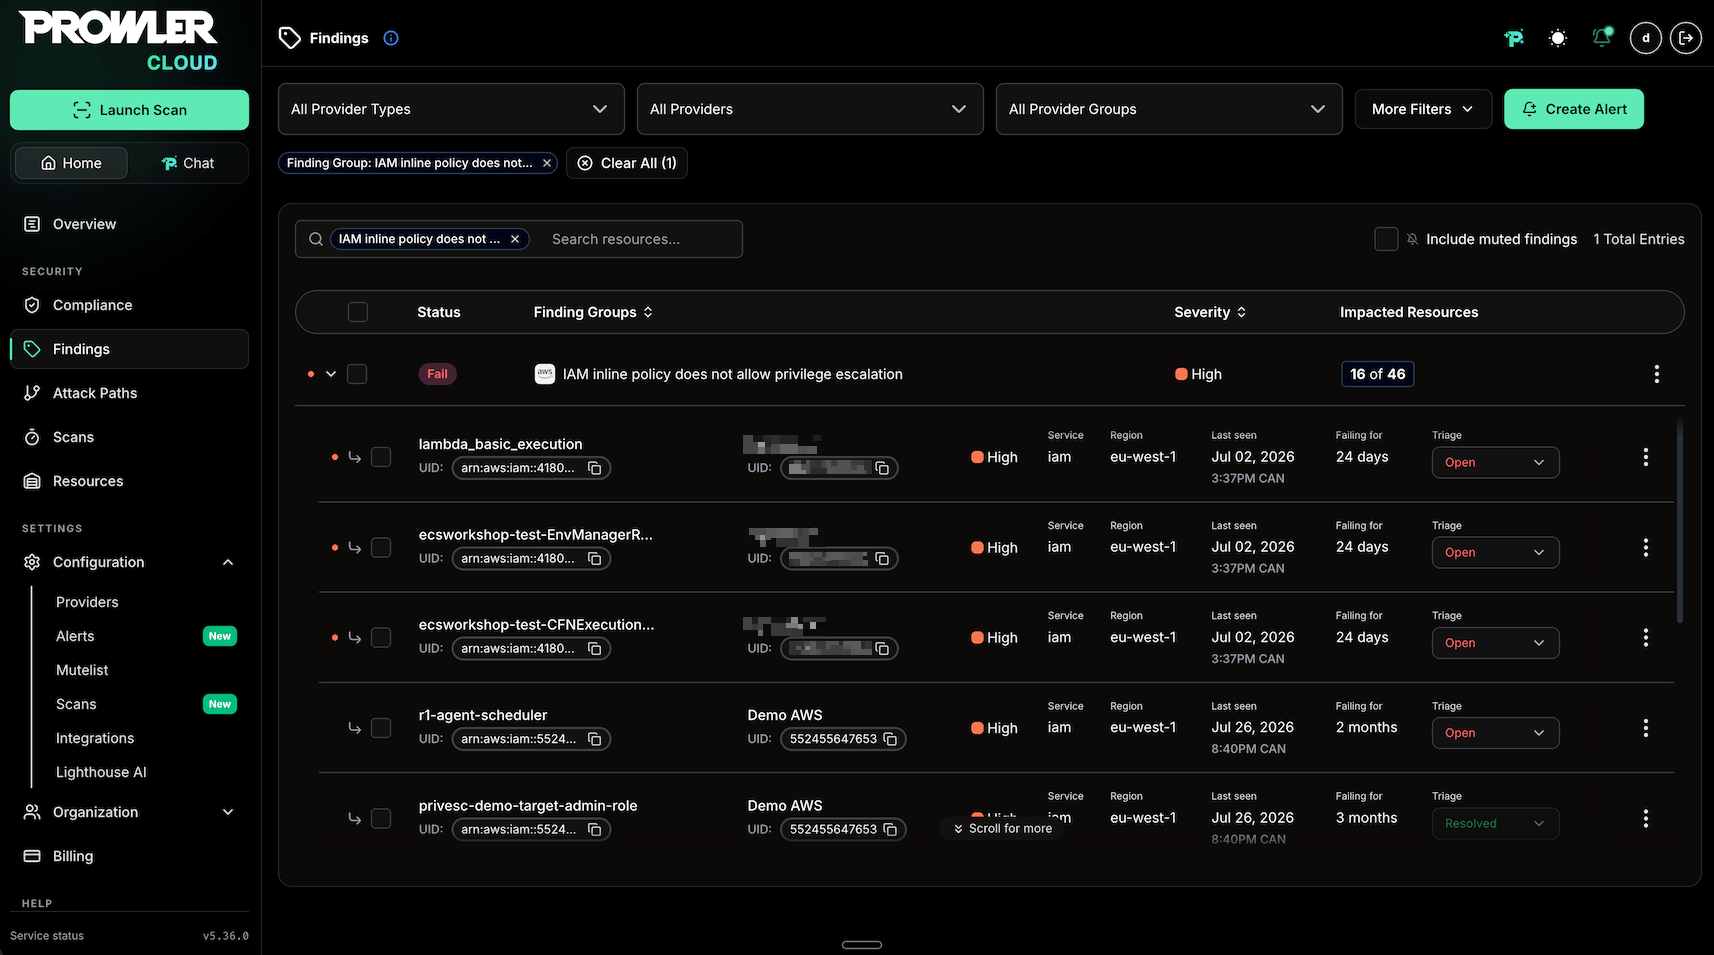
To send only specific affected resources:- Expand a Finding Group.
- Select the Findings to send. Each Finding represents one affected resource.
- Open the bulk actions menu and click Send Findings to Jira.
- Select the Jira project, issue type, and grouped or separate issue creation mode.
-
Click Send to Jira.
Reviewing the Jira Issue
A grouped Jira issue starts with Finding Group summary information. This section identifies the check and provides context such as the check title and ID, severity, status, provider, service, number of affected failing resources, last-seen time, failure duration, and risk.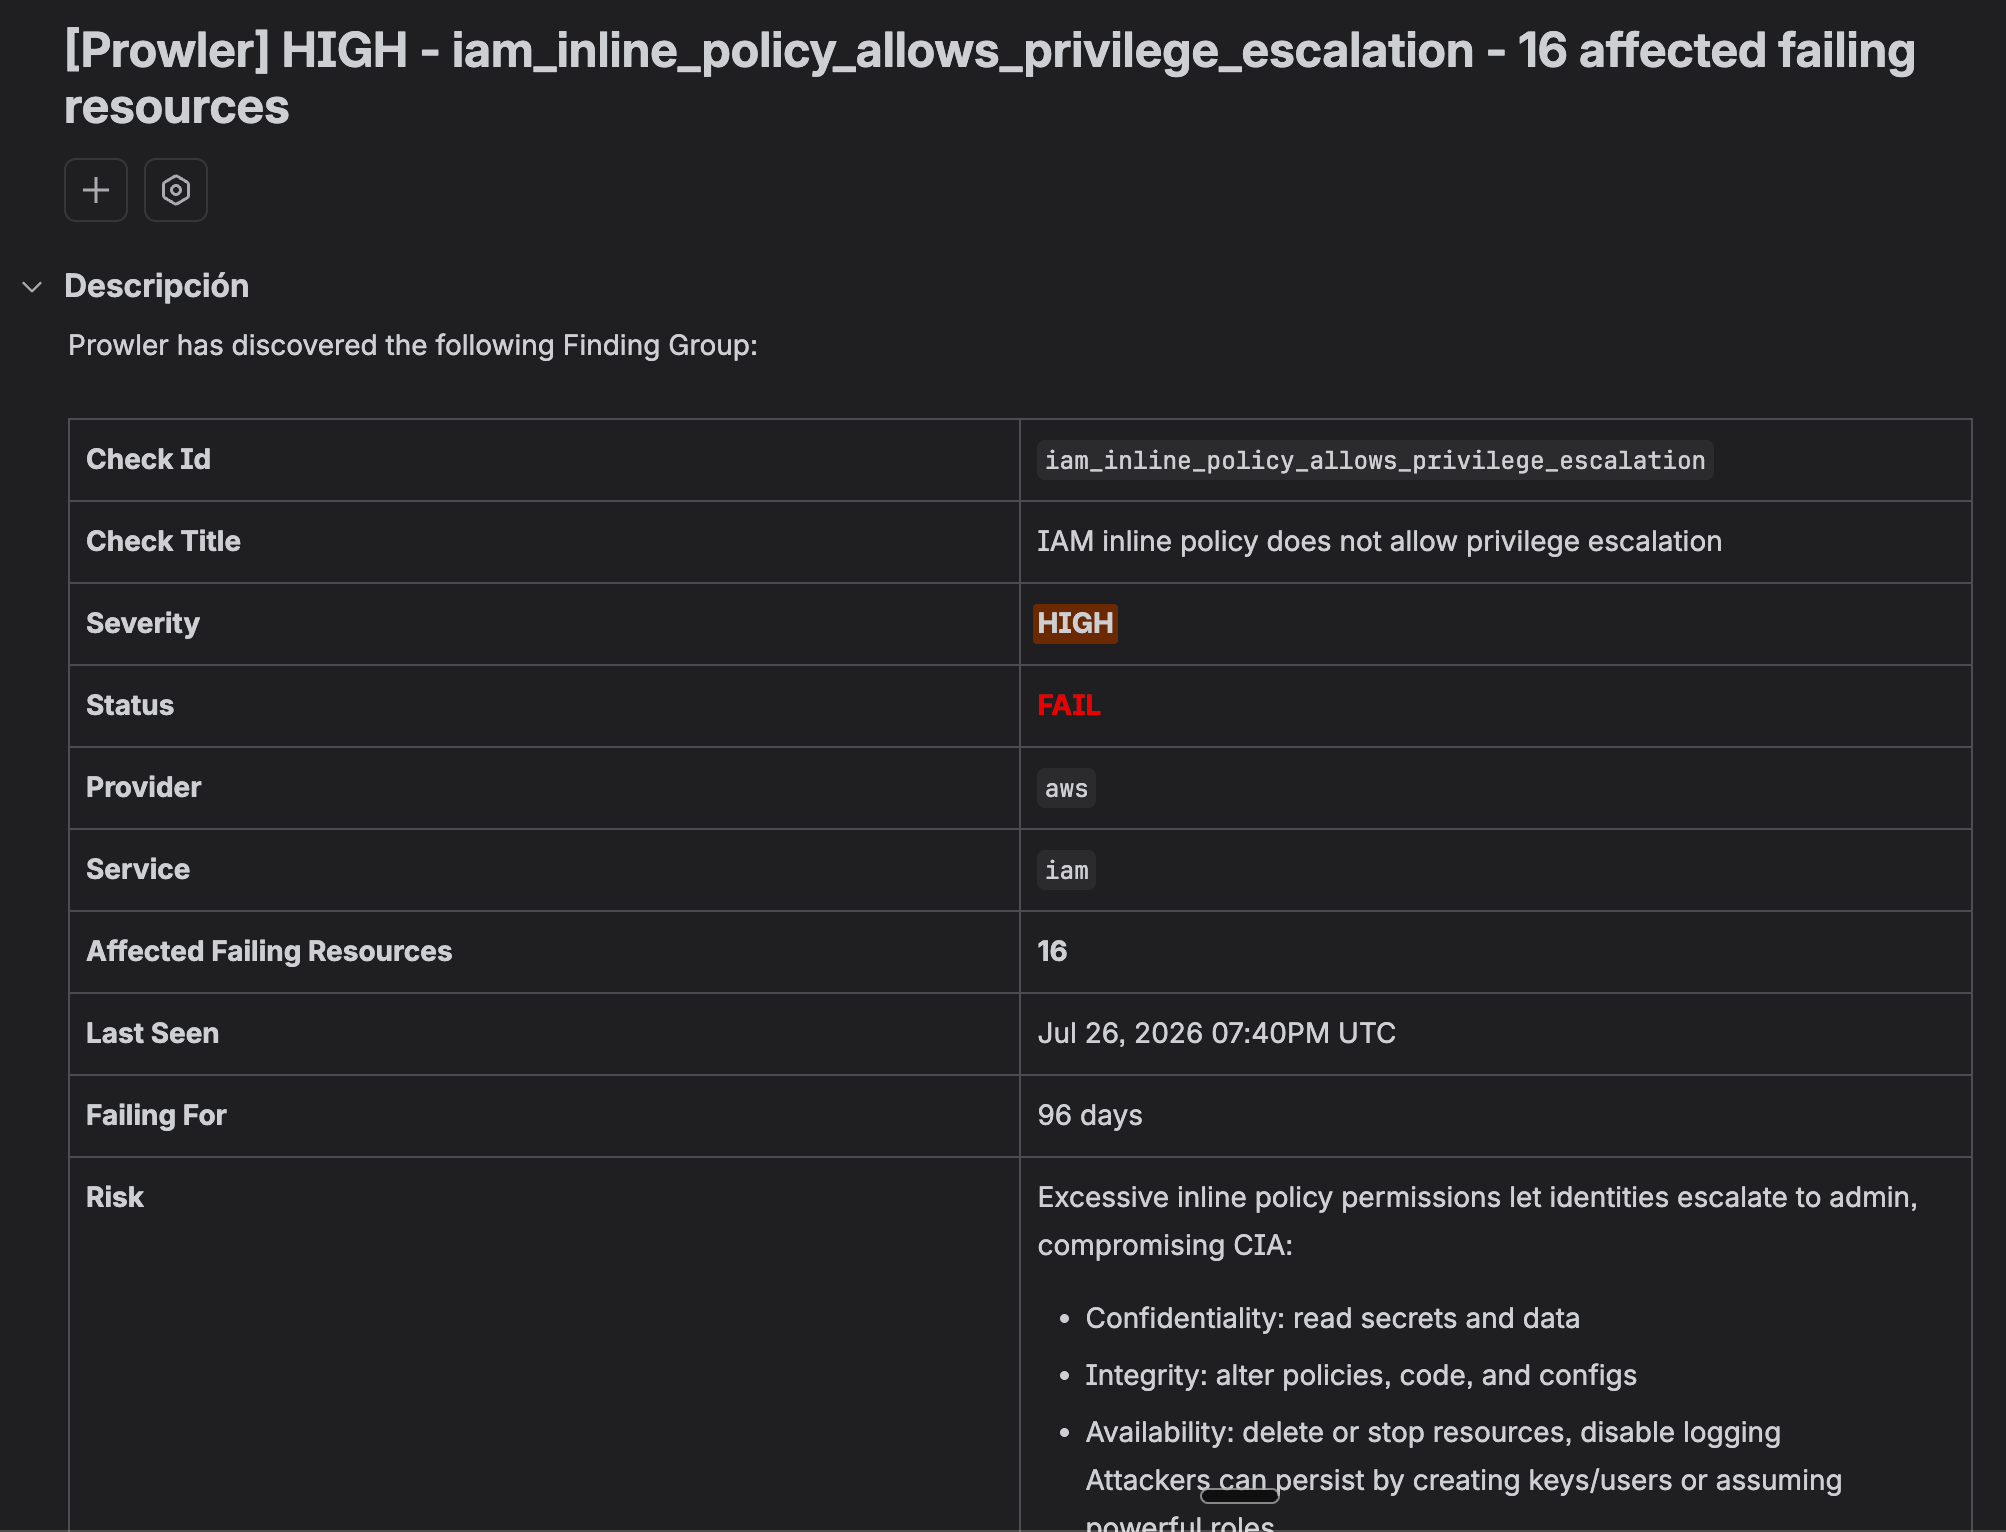
Sending One Finding
To manually send individual Findings to Jira:- Navigate to the Findings section in Prowler Cloud
- Select one Finding you want to export
- Click the action button on the table row and select Send to Jira
- Select the Jira integration and project
-
Click Send to Jira
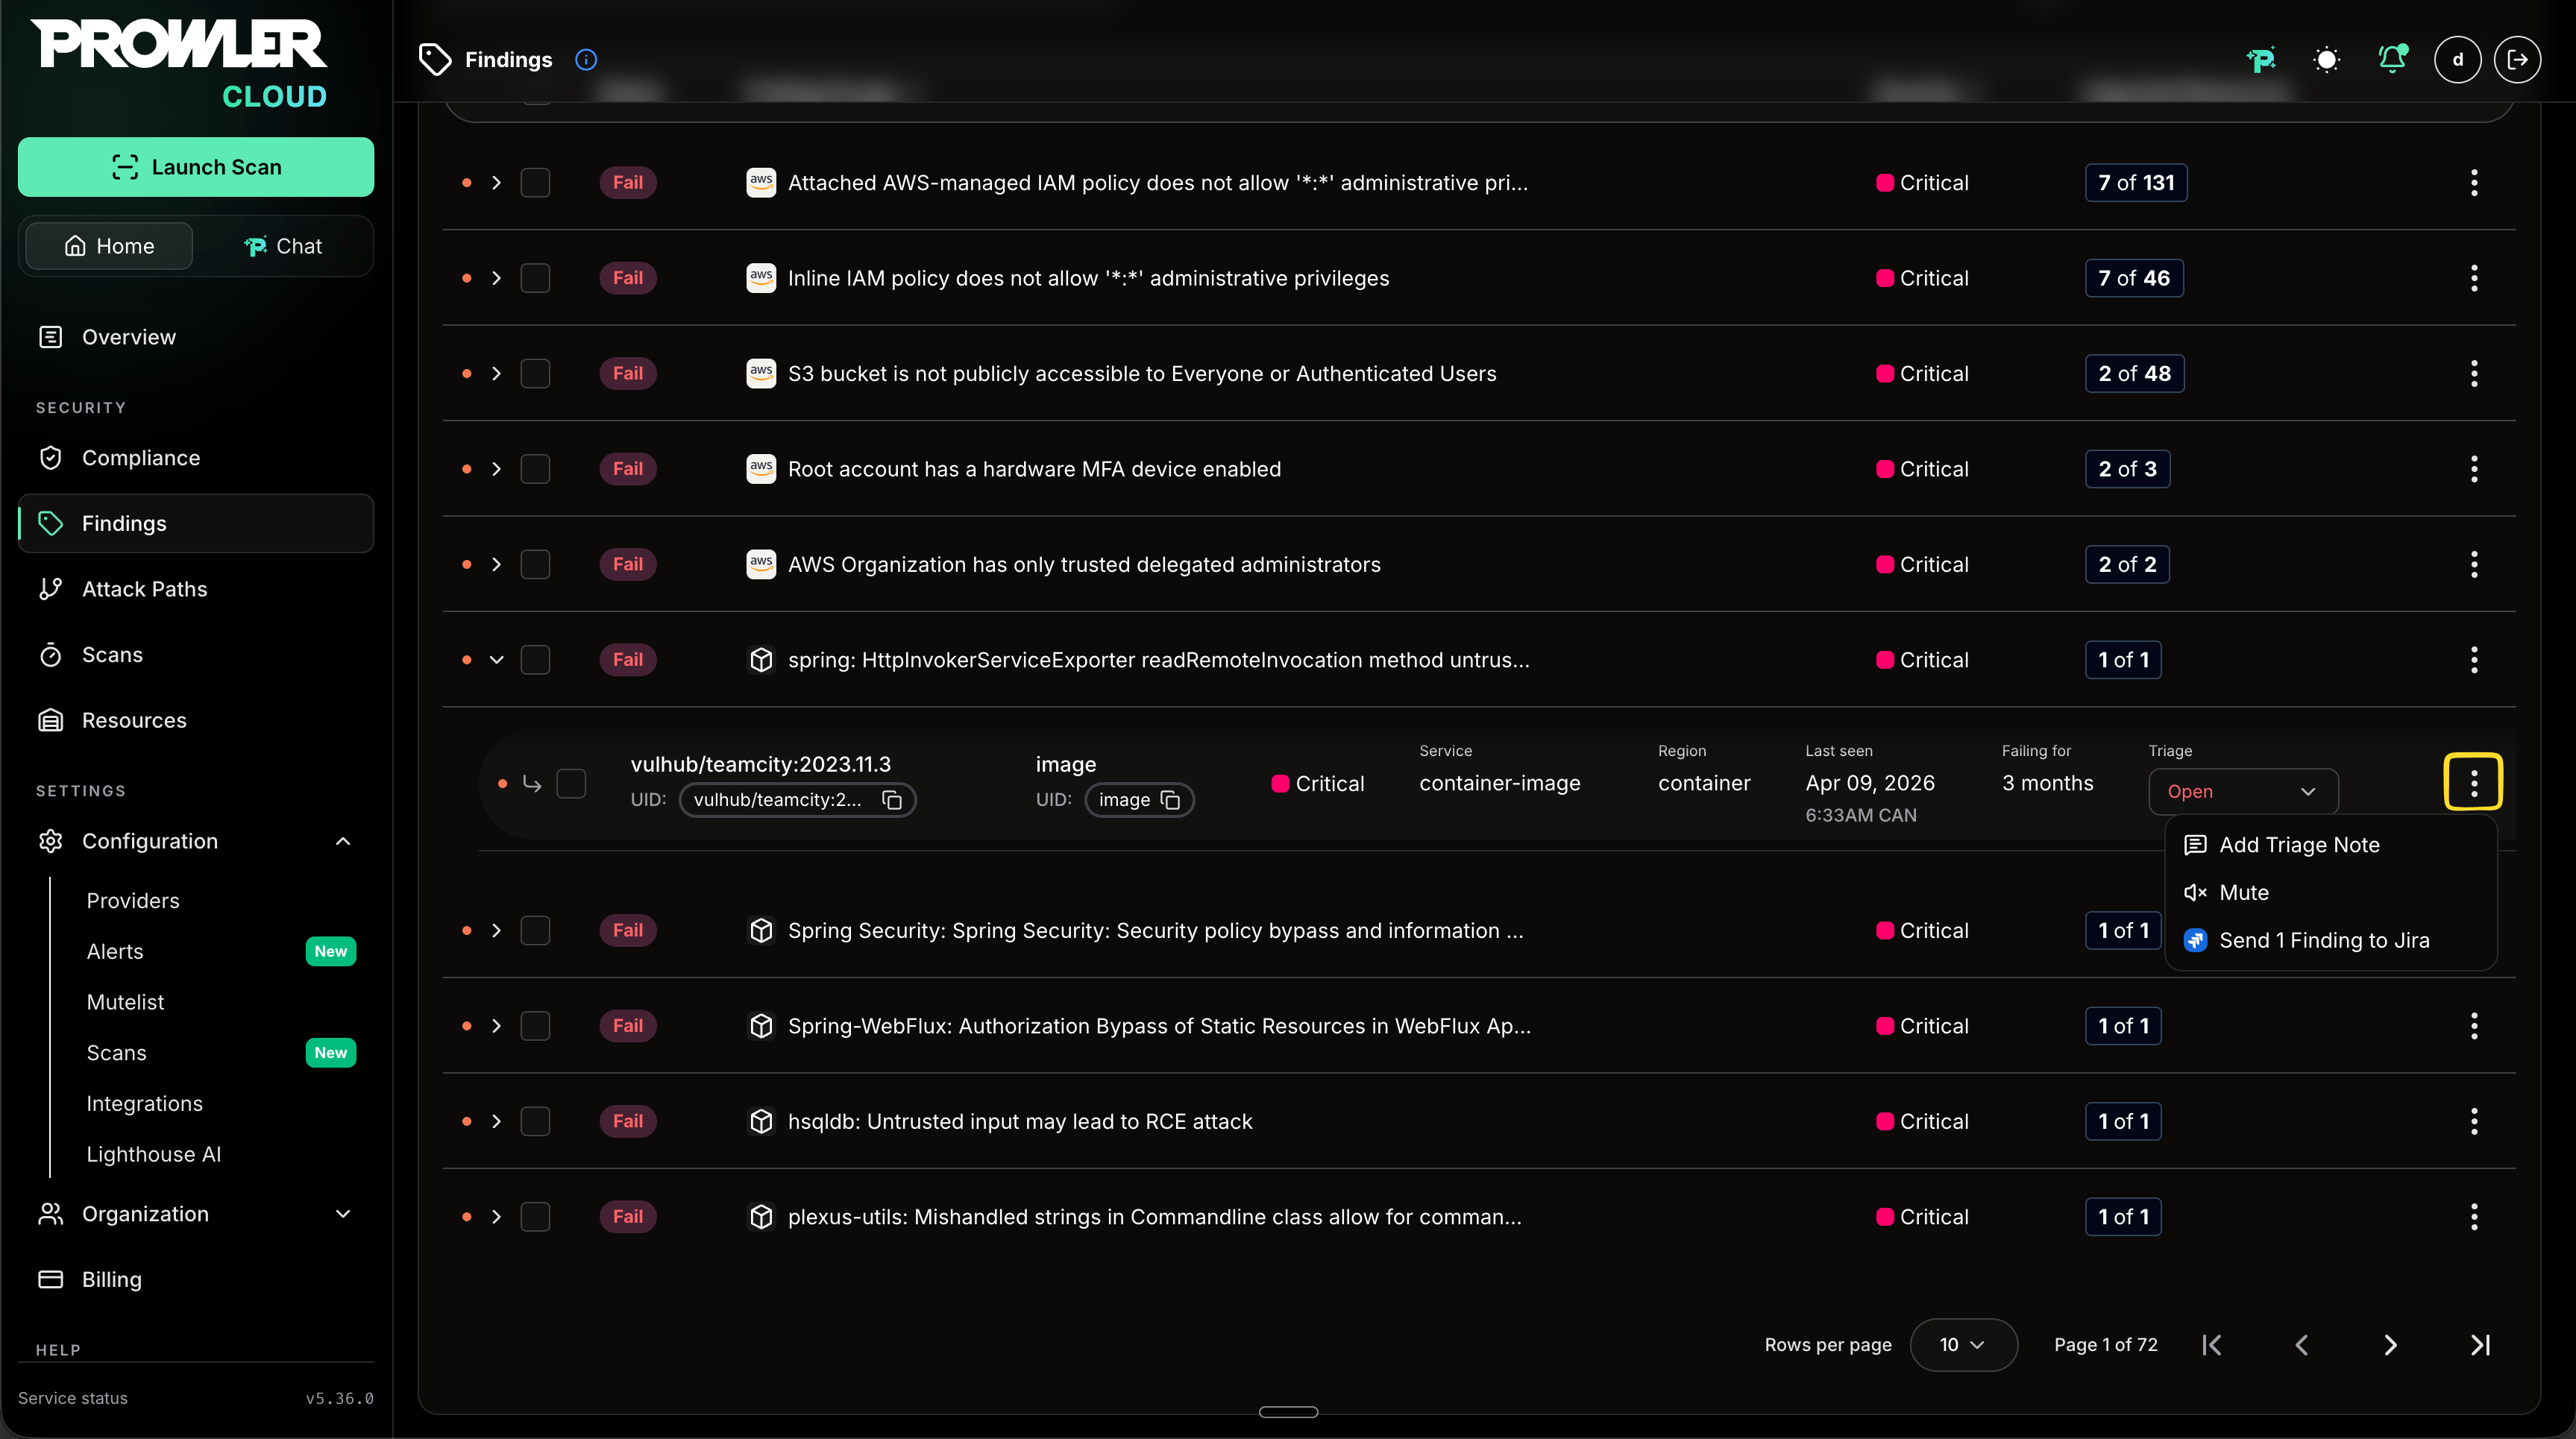
Finding Reference in the Jira Issue
Every Jira issue created from a single Finding carries a stable reference back to that Finding, so issues can be filtered, searched with Jira Query Language (JQL), or matched by automation:- Labels:
prowler,prowler-<provider>,prowler-<severity>,prowler-<check-id>andprowler-finding-<finding-uid>. Labels are sanitized deterministically: whitespace becomes_, control characters are removed, and values are truncated to Jira’s 255-character label limit. - Finding URL: a link that opens the Finding in Prowler, filtered by its unique identifier (UID) so it keeps working after later scans.
- Tenant Info: the name of the Prowler organization that sent the Finding.
DJANGO_UI_BASE_URL in the API environment (for example, https://prowler.example.com) to enable it. When the variable is empty, the issue is created without the link.
Integration Status
Monitor and manage your Jira integrations through the management interface:- Review configured integrations in the integrations dashboard
-
Each integration displays:
- Connection Status: Connected or Disconnected indicator
- Instance Information: Jira domain and last checked timestamp
Actions
Each Jira integration provides management actions through dedicated buttons:Known Limitations
Issue Types with Required Custom Fields
Certain Jira issue types (such as Epic) may require mandatory custom fields that Prowler does not currently populate when creating work items. If a selected issue type enforces required fields beyond the standard set (e.g., “Team”, “Epic Name”), the work item creation will fail. To avoid this, select an issue type that does not require additional custom fields — Task, Bug, or Story typically work without restrictions. If unsure which issue types are available for a project, Prowler automatically fetches and displays them in the “Issue Type” selector when sending a Finding.Support for custom field mapping is planned for a future release.
Troubleshooting
Connection Test Fails
- Verify Jira instance domain is correct and accessible
- Confirm API token or credentials are valid
- Ensure API access is enabled in Jira settings and the needed scopes are granted
Check Task Status (API)
If the Jira issue does not appear in your Jira project, follow these steps to verify the export task status via the API.Replace
http://localhost:8080 with the base URL where your Prowler API is accessible (for example, https://api.yourdomain.com).- Get an access token (replace email and password):
- List tasks filtered by the Jira task (
integration-jira) using the access token:
If you don’t have
jq installed, run the command without | jq.- Share the output so we can help. A typical result will look like:
- “created_count”: number of Jira issues successfully created.
- “failed_count”: number of Jira issues that could not be created. If
failed_count > 0or the issue does not appear in Jira, please contact us so we can assist while detailed logs are not available through the UI.