 About Us
Overview
Individual Accounts vs Organizations
How It Works
Onboarding deploys the ProwlerScan Identity and Access Management (IAM) role in your management account and in every member account. A single CloudFormation stack — launched from the wizard’s Create Stack in Management Account button (Step 2) — creates the management account role and a service-managed StackSet that rolls the role out to your member accounts in one operation. Prefer to deploy the roles yourself? See Deploy the Roles Manually.
Step 1: Start the Organization Wizard
The Prowler wizard walks you through the entire flow: deploying both roles from a single CloudFormation stack, discovering your accounts, testing connectivity, and launching scans.Open the Wizard
- Navigate to Providers and click Add Provider.
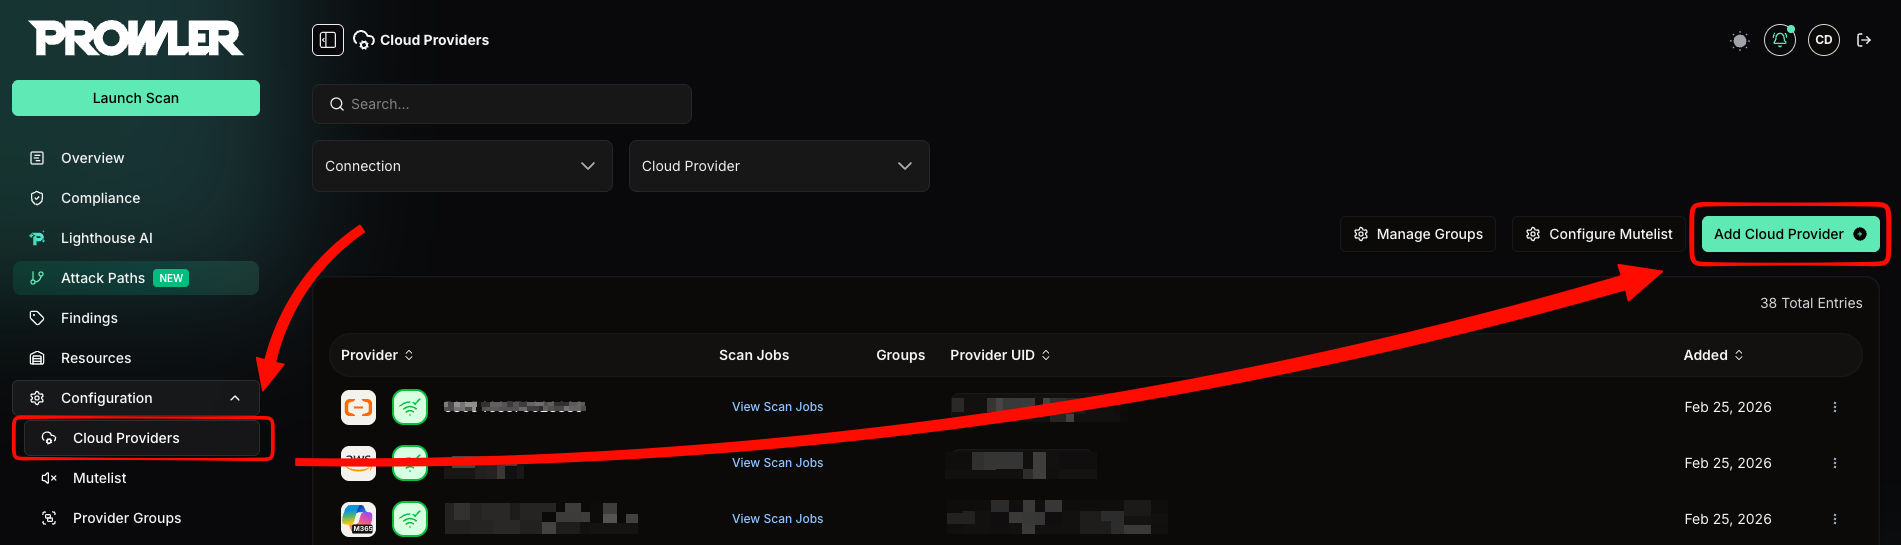
- Select Amazon Web Services as the provider.
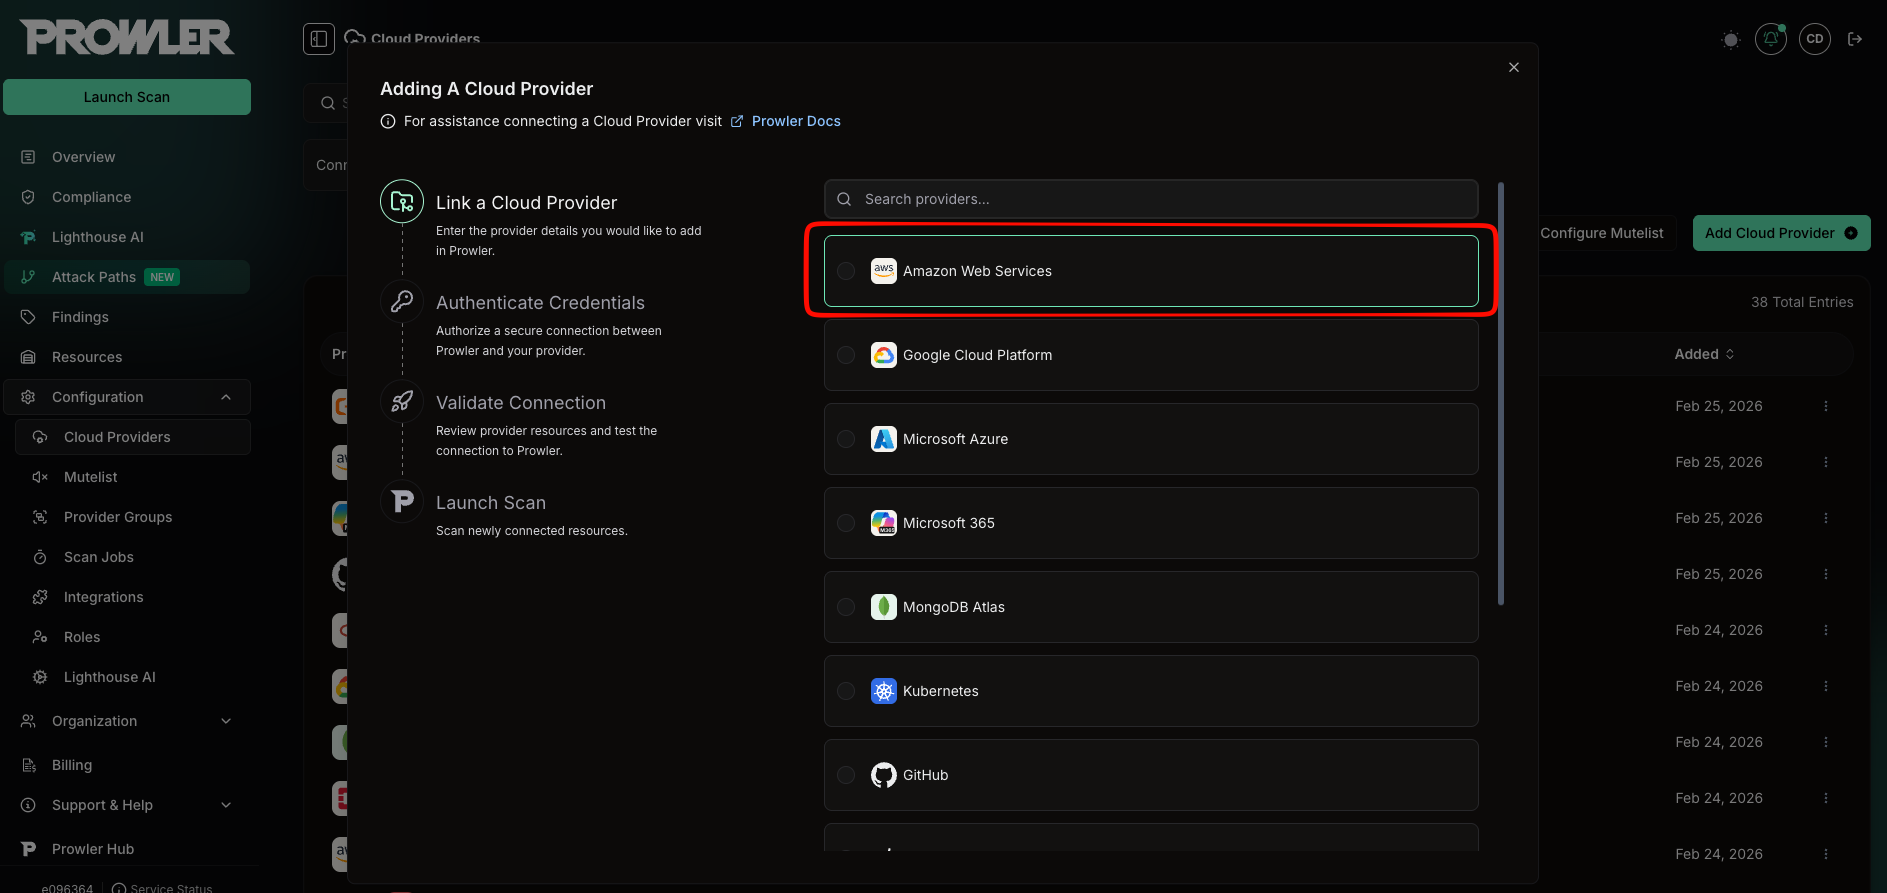
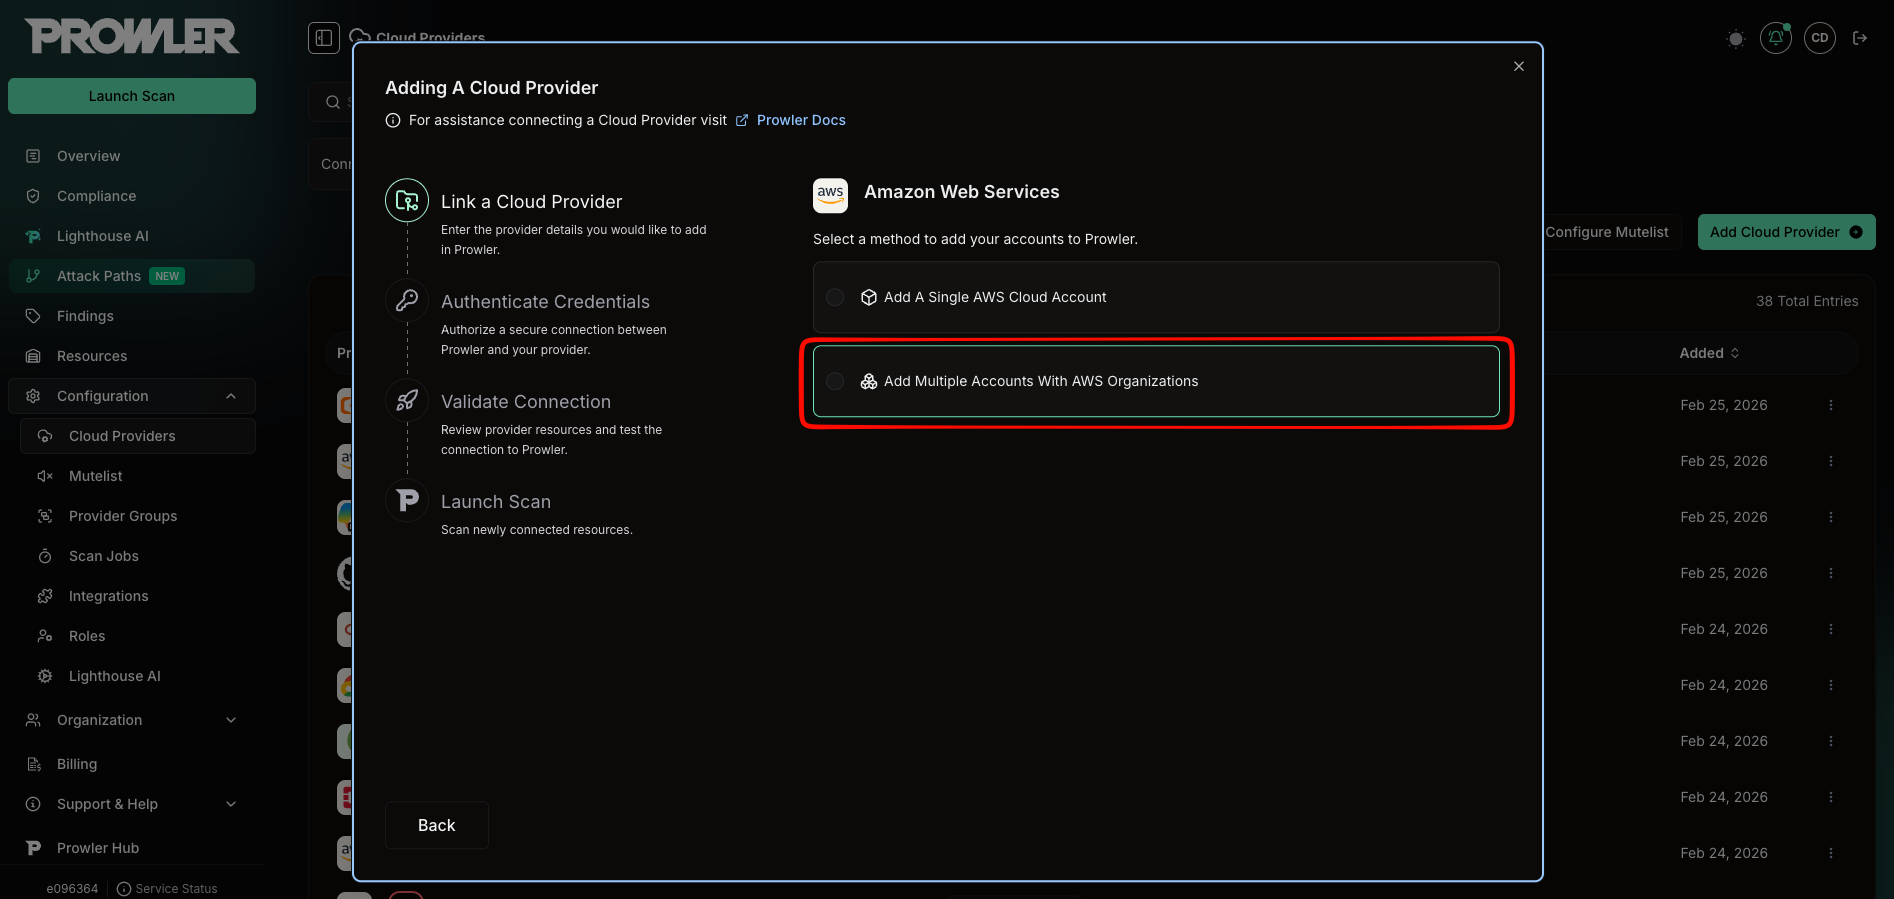
- Choose Add Multiple Accounts With AWS Organizations.
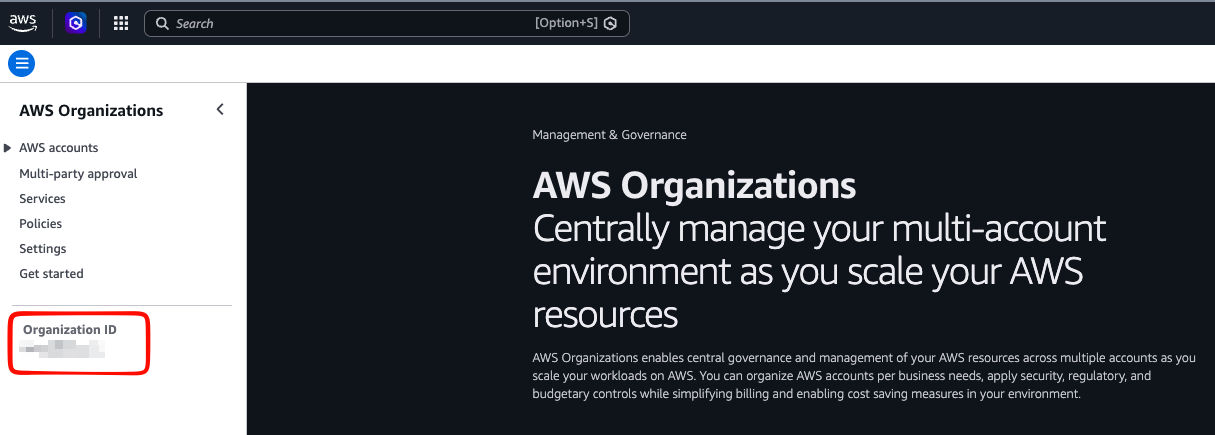
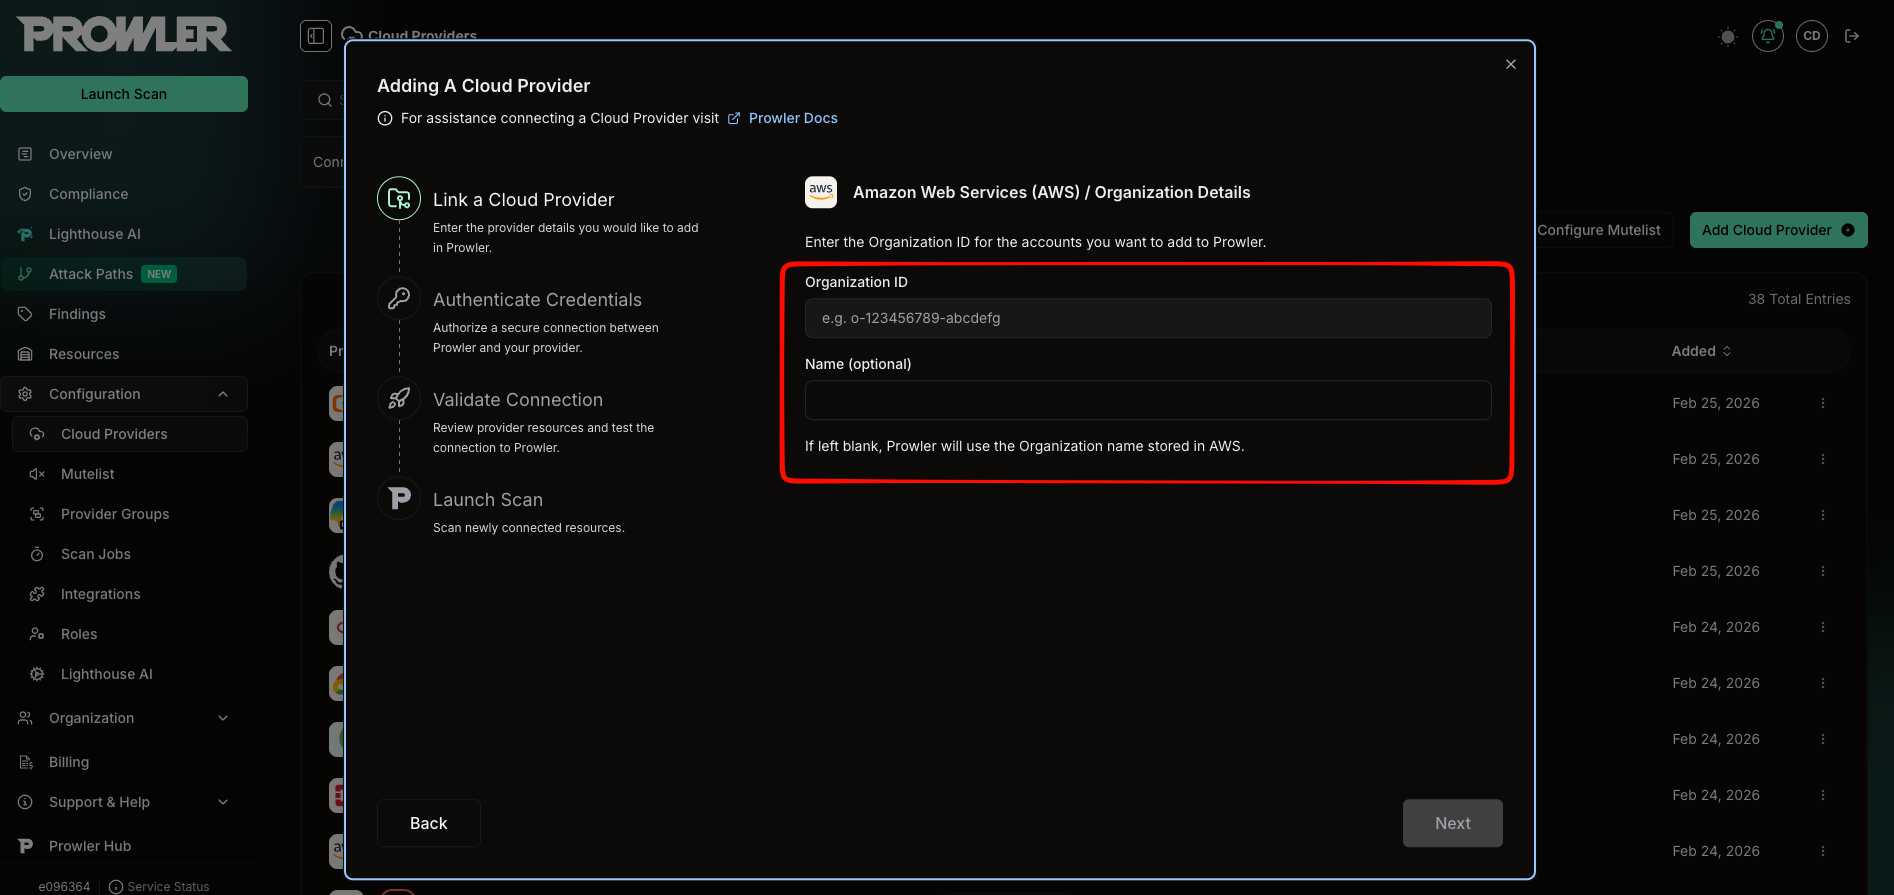
Enter Organization Details
- Organization ID: Your AWS Organization identifier, found in the AWS Organizations Console. It follows the format
o-followed by 10–32 lowercase alphanumeric characters (e.g.,o-abc123def4). You can find it in the left sidebar of the AWS Organizations console:
- Name (optional): A display name for the organization. If left blank, Prowler uses the name stored in AWS.
Step 2: Authenticate with Your Management Account
The Authentication Details page guides you through three actions: deploying the roles in AWS, entering the deployment account Role ARN, and confirming the deployment. The deployment account is either the management account or, when delegated administrator mode is selected, the delegated administrator account.External ID
The wizard displays a Prowler External ID at the top — auto-generated and unique to your tenant. Click the copy icon to copy it. The External ID is pre-filled into the deployment link, and the single stack applies it to both the management account role and the member-account StackSet. Learn more in What Is an External ID?.Deploy the Roles
The wizard deploys the deployment account role and the member-account StackSet in a single CloudFormation Stack:Prefer to use your own role? You do not have to use the Quick Create template. Create the ProwlerScan role yourself — through the IAM Console, Terraform, or your own CloudFormation (Following this guide) — and paste its ARN into the Role ARN field below. The role must use the external ID from the earlier step and include the trust policy and permissions described in Deploy the Roles Manually.
-
Organizational Unit or Root ID — enter the AWS OU (
ou-xxxx-yyyyyyyy) or organization root (r-xxxx) you want to onboard. Prowler rolls the ProwlerScan role out to every member account under this target. Find it in the AWS Organizations Console; use the root ID (r-) to cover the entire organization or an OU ID (ou-) to target a specific unit. - (Optional) Check “I’m deploying from a delegated administrator account” if you launch the stack from a delegated administrator account instead of the management account.
-
Create Stack in Management Account — or Create Stack in Delegated Administrator Account when delegated administrator mode is selected — opens a Quick Create link that deploys, in a single stack: the ProwlerScan role in the account where you launch the stack (
DeployLocalRole, withEnableOrganizations=true) and a service-managed StackSet (DeployStackSet) that rolls the role out to your member accounts. The External ID, OU/Root ID, and deployment options are pre-filled.
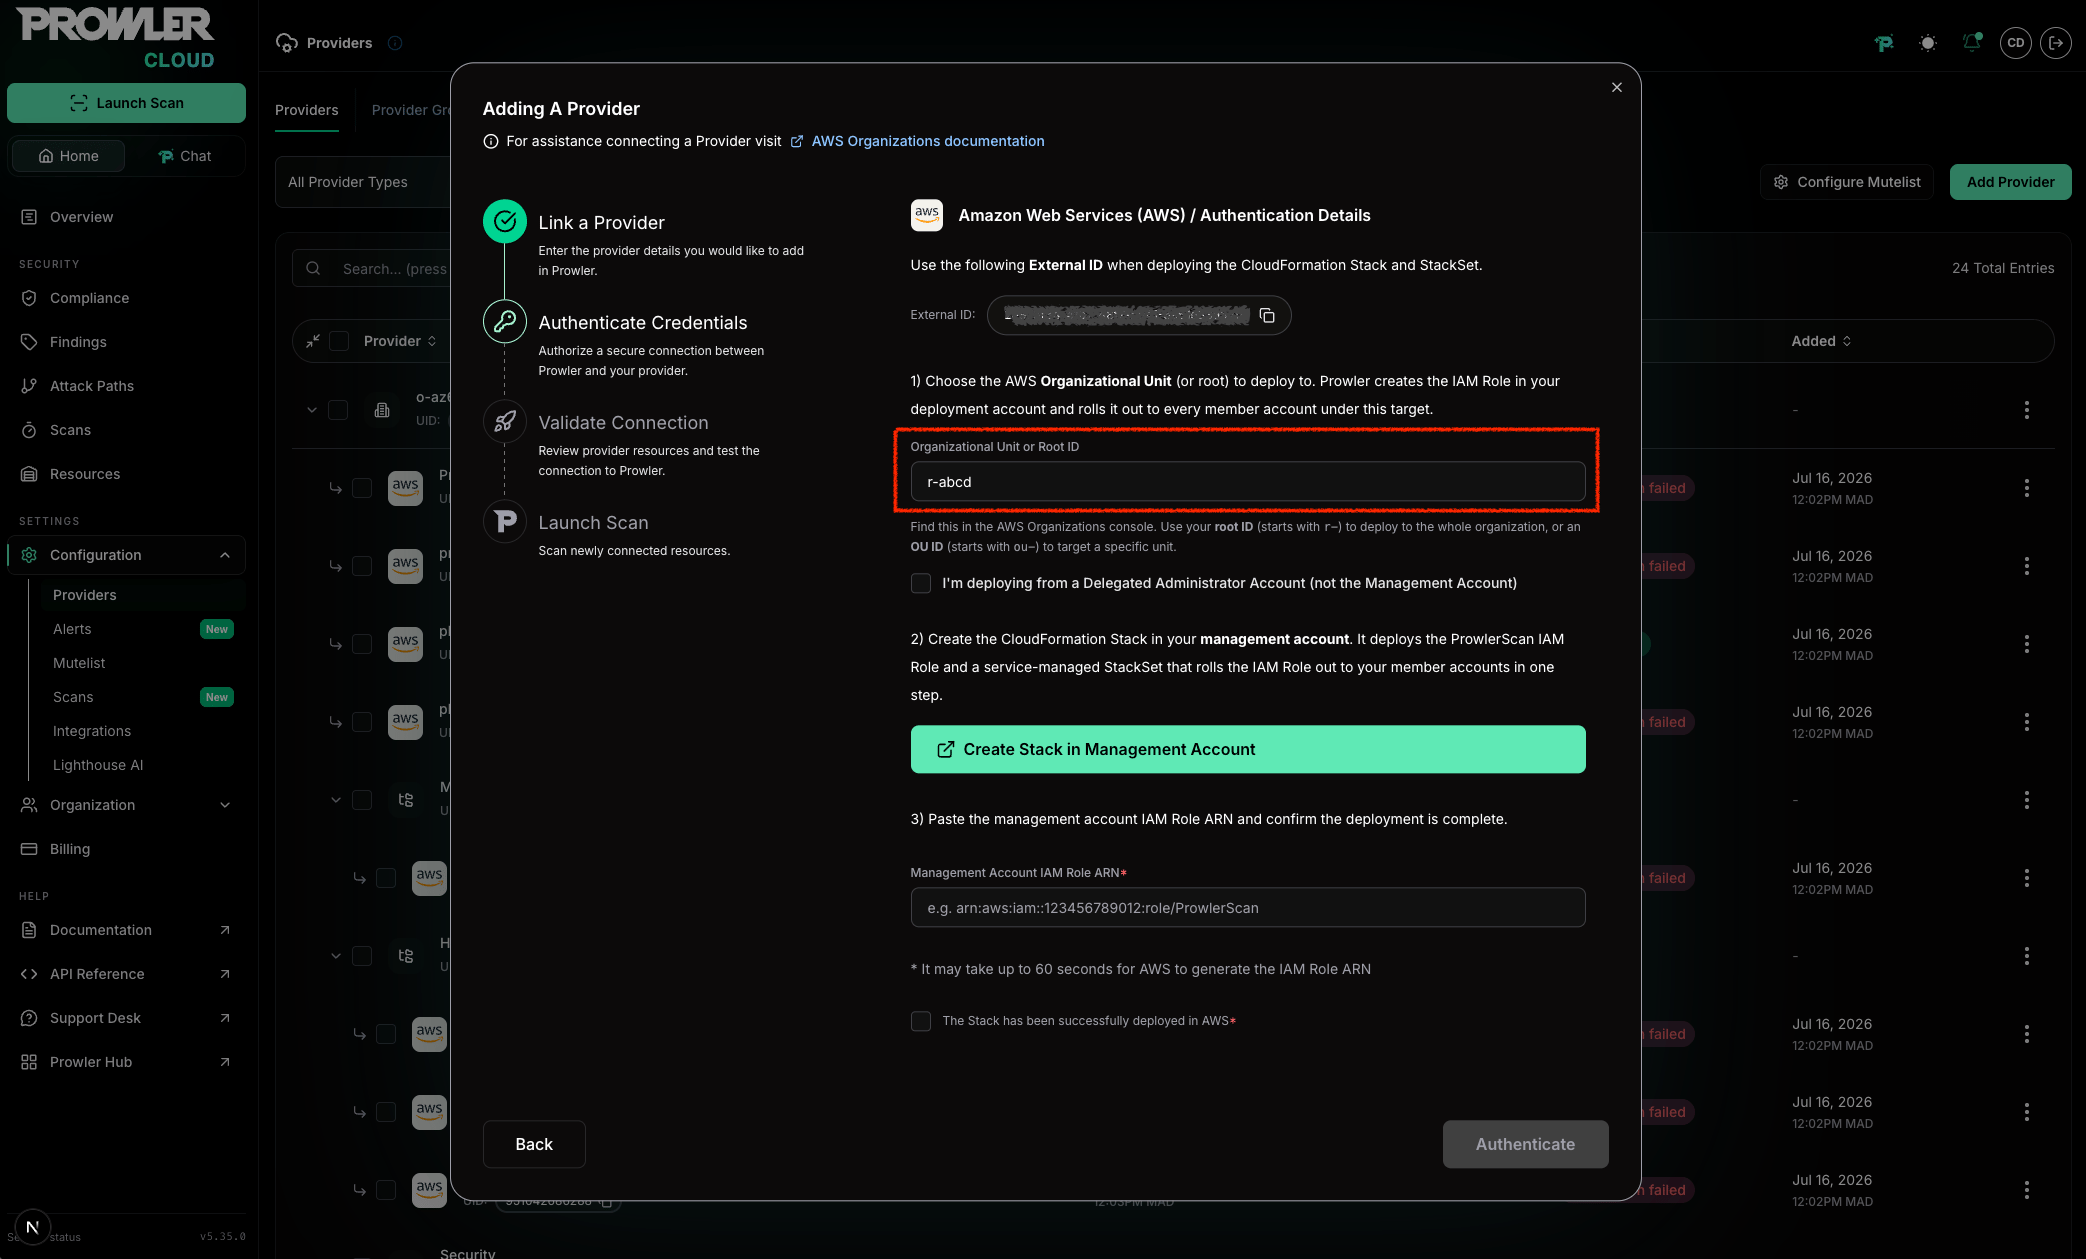
Enter the Deployment Account Role ARN
Paste the Role ARN created by the stack above into the Management Account Role ARN field or, when delegated administrator mode is selected, the Delegated Administrator Account Role ARN field. The ARN follows this format:arn:aws:iam::123456789012:role/ProwlerScan
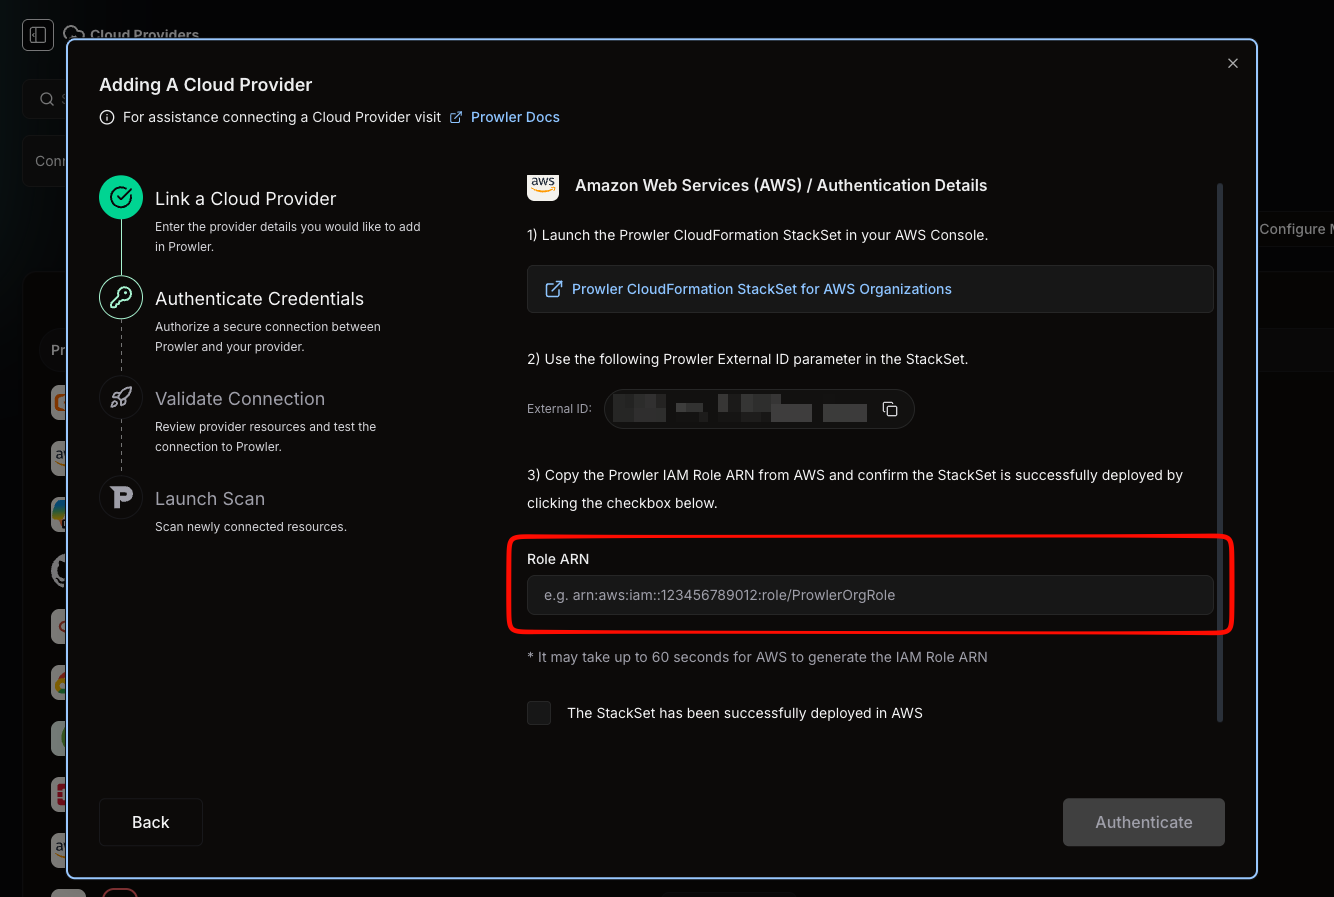
It may take up to 60 seconds for AWS to generate the IAM Role ARN after the stack completes. If the wizard reports an error, wait a moment and try again.
Confirm and Discover
- Check the box: “The Stack has been successfully deployed in AWS”.
- Click Authenticate.
- Prowler creates the organization resource and stores your credentials securely.
- An asynchronous discovery is triggered to query your AWS Organization structure.
- You will see a “Gathering AWS Accounts…” spinner — this typically takes 30 seconds to 2 minutes depending on your organization size.
Step 3: Select Accounts to Scan
Understanding the Tree View
Once discovery completes, the wizard displays a hierarchical tree view of your Organization: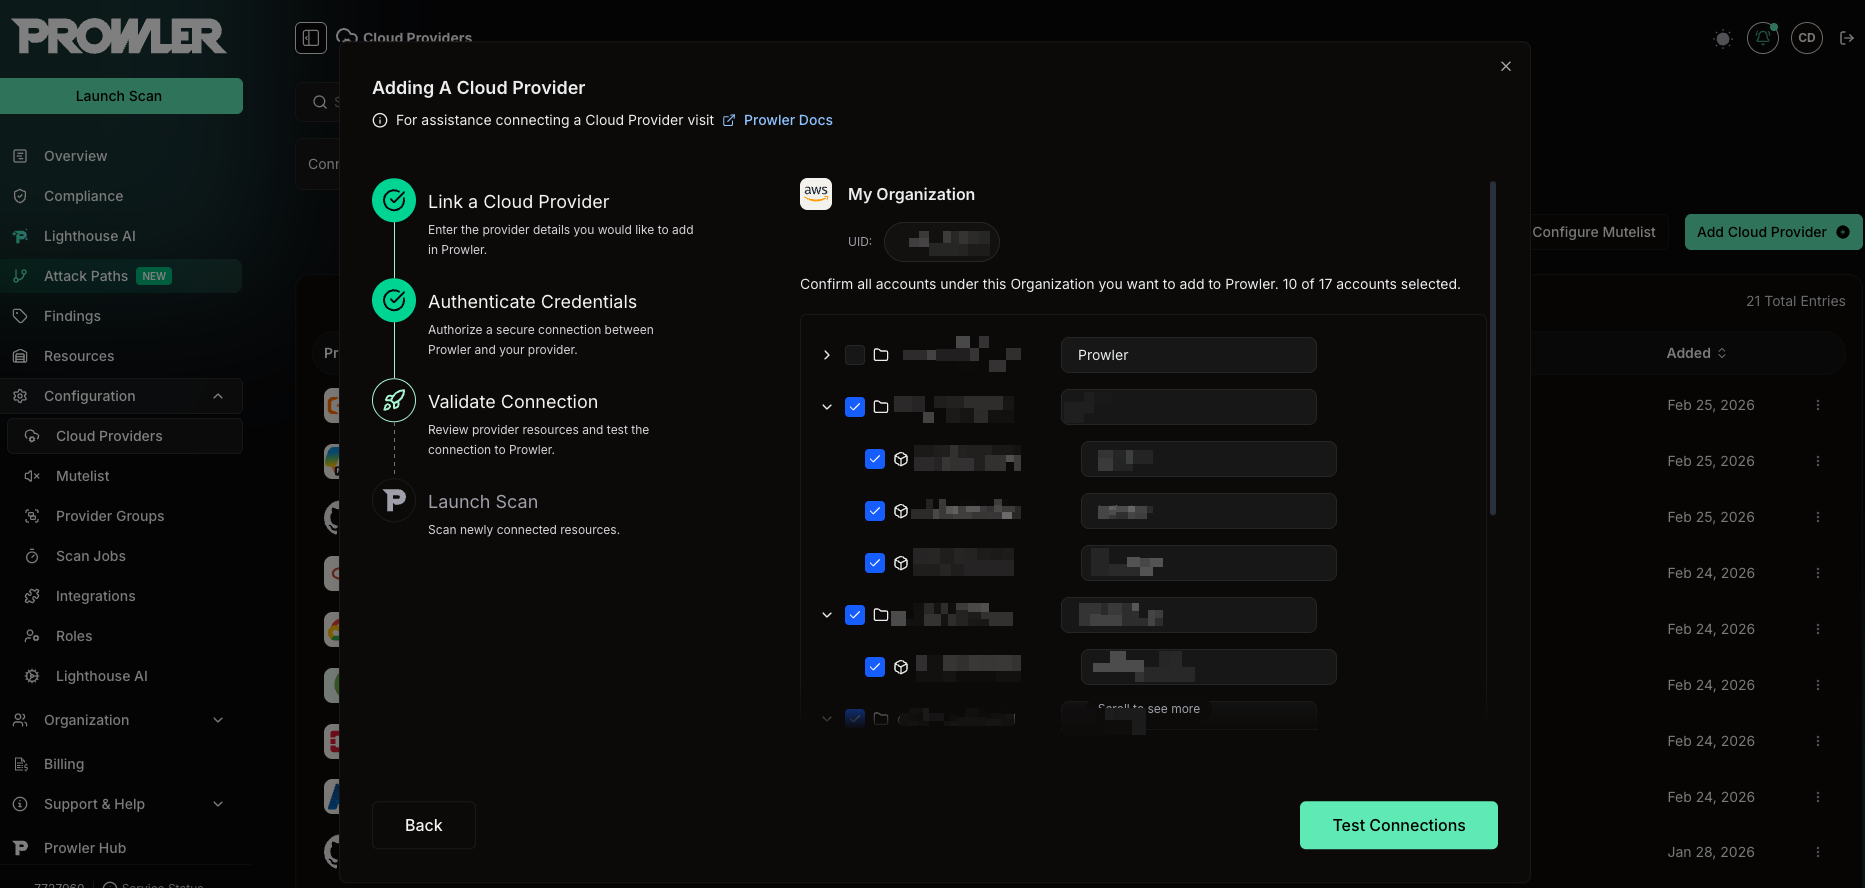
- The tree supports up to 5 levels of nesting (Root > OUs > Sub-OUs > Accounts).
- If you deployed the stack for just one OU, that OU will be preselected in the tree.
- Selecting an OU automatically selects all accounts within it.
- Individual overrides: deselect specific accounts even if the parent OU is selected.
- The header shows “X of Y accounts selected” to track your selection.
Account Statuses
Only ACTIVE accounts can be selected for scanning:Your existing data is safe. If an AWS account is already connected to Prowler as an individual provider, it appears in the tree with a checkmark indicator.When you proceed:
- The existing provider is linked to the organization — it is not duplicated.
- All your historical scan data and findings are preserved — nothing is overwritten.
- There is no additional billing — the existing provider is reused.
Custom Aliases
You can edit the display name for each account before connecting. This alias is only used in Prowler — it does not affect your AWS account name.Blocked Accounts
Some accounts may appear as blocked (grayed out, not selectable) when the account is already linked to a different organization in Prowler (linked_to_other_organization). Hover over the blocked account to see the specific reason.
Step 4: Test Connections
Click Test Connections to verify that Prowler can assume the ProwlerScan role in each selected member account.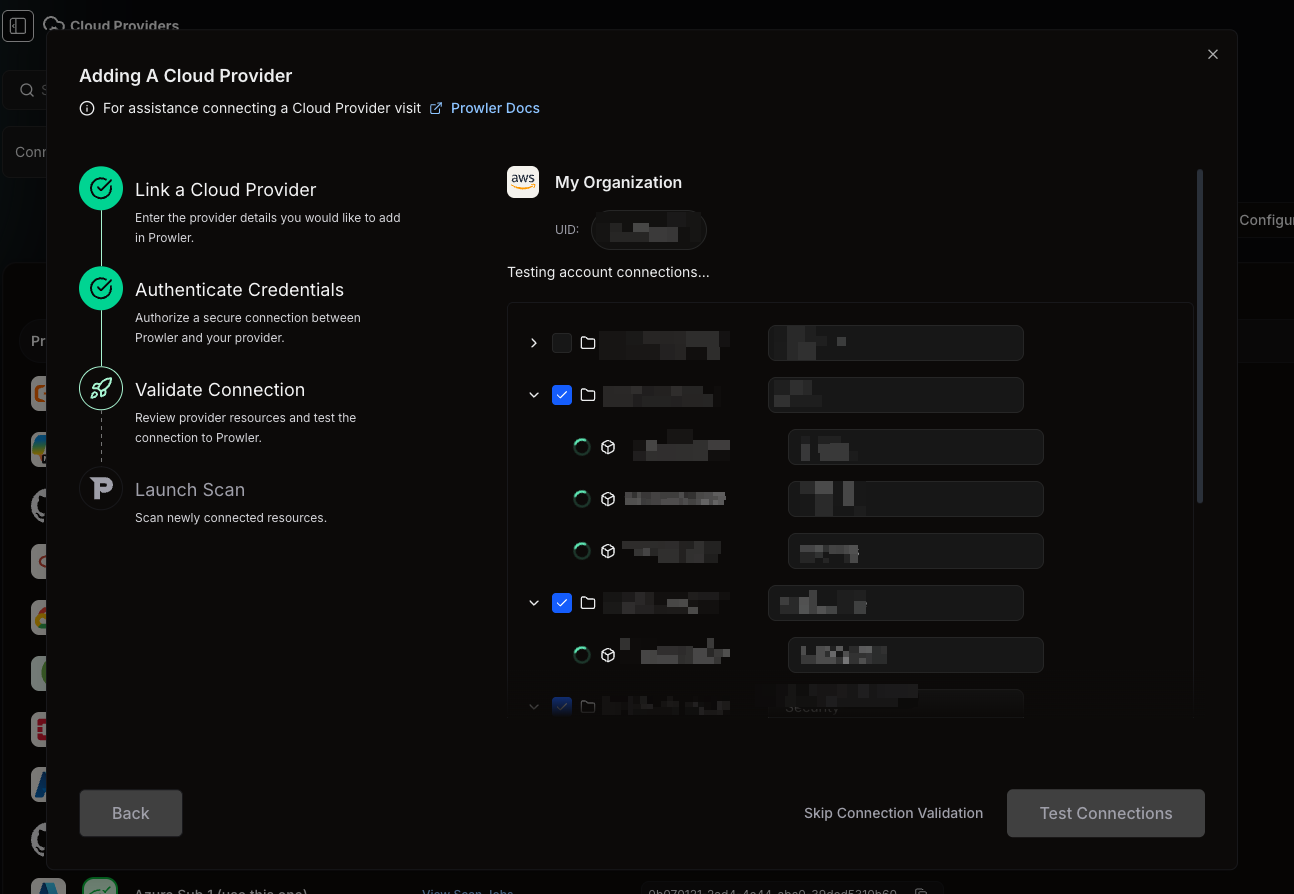
- Spinner — test in progress
- Green checkmark (✓) — connection successful
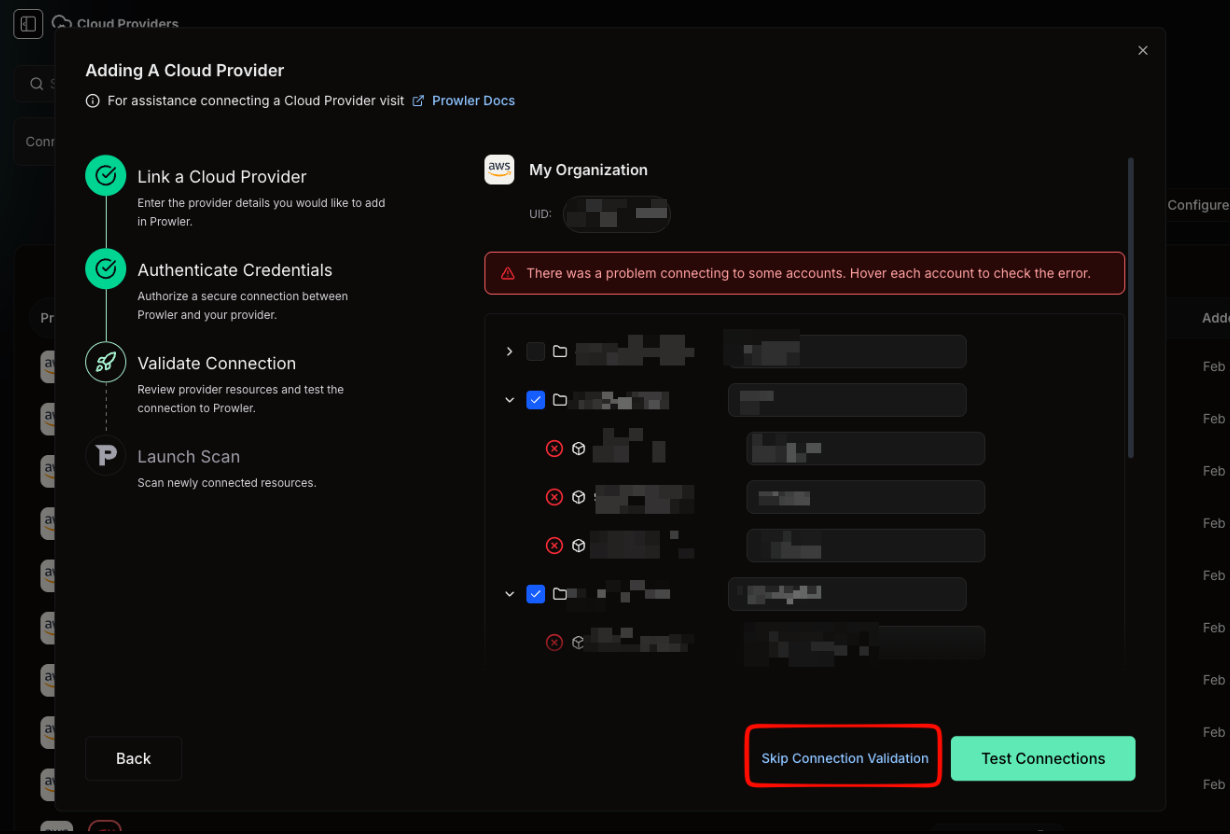
- Red icon (✗) — connection failed (hover to see the error)
When Some Tests Fail
An error banner appears: “There was a problem connecting to some accounts.” You have two options: a) Fix and retry:- Go to the AWS Console and verify the StackSet deployed to the failing accounts.
- Check that the External ID in the StackSet matches the one shown in Prowler.
- Return to Prowler and click Test Connections — only the failed accounts are re-tested (smart retry). Accounts that already passed are not tested again.
Step 5: Launch Scans
The Organizations wizard uses the same schedule controls described in Scan Scheduling. Click Save, Save and launch scan, or Launch scan, depending on the selected schedule option. A toast notification confirms whether the schedule was saved, scans were launched, or both, and includes a link to the Scans page. Prowler then redirects to the Providers page. Scans launch only for accounts that passed connection testing and were selected.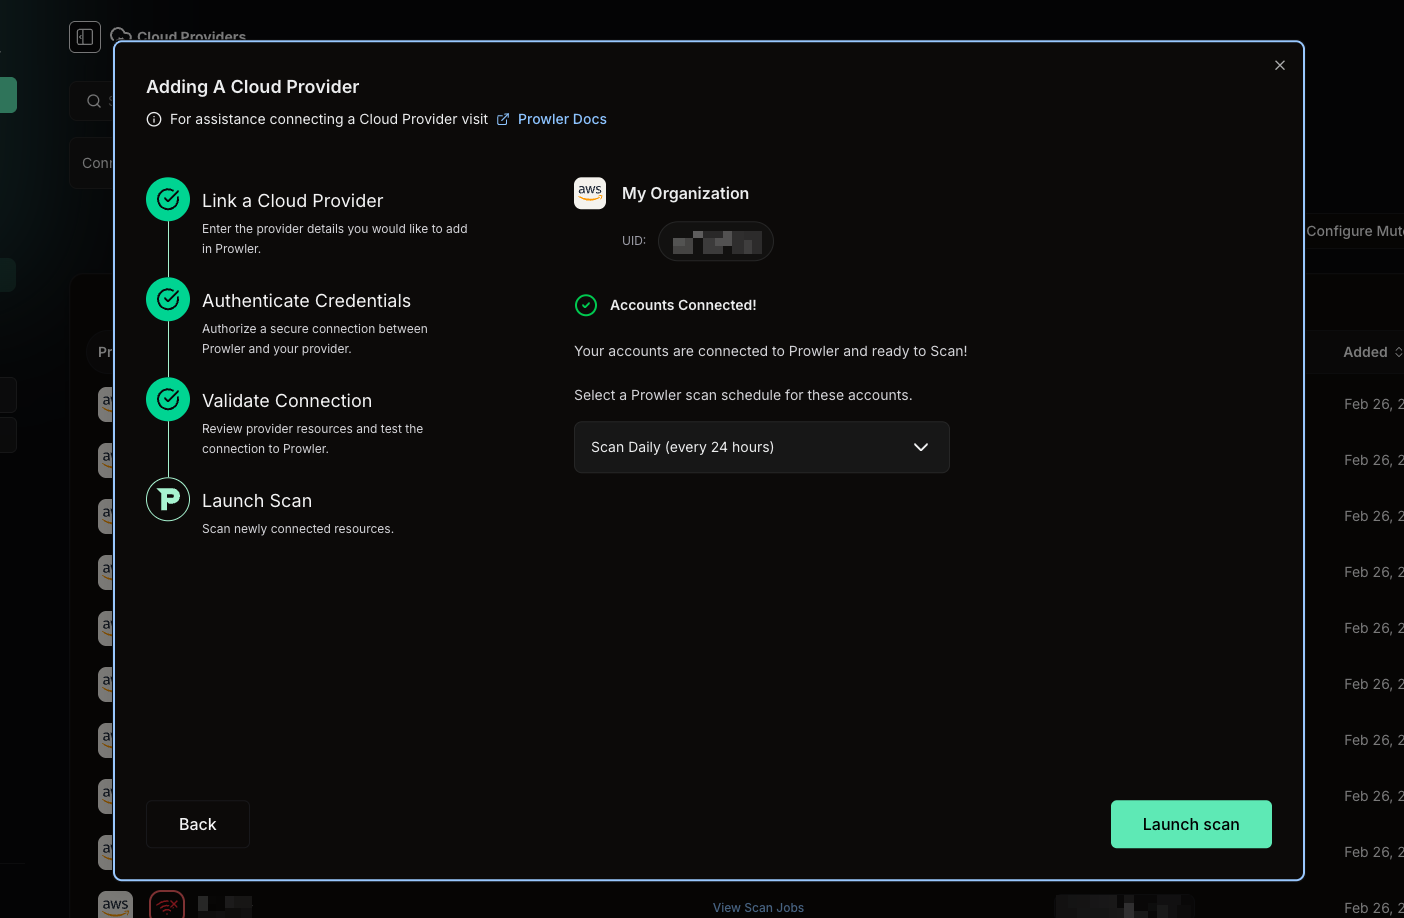
- Scans appear in the Scans page as they start and complete.
- Results populate the Overview and Findings pages.
- Prowler runs an automatic sync every 6 hours to detect accounts added to or removed from your Organization. New accounts under the targeted OU or root are onboarded automatically.
Billing Impact
Each AWS account you connect through the Organizations wizard counts as one provider in your Prowler Cloud subscription.- Already-connected accounts: if an account was already linked as a provider, adding it to the organization does not incur additional billing. The existing provider is reused.
- Large organizations: connecting a 500-account organization results in up to 500 providers on your subscription. Review your plan limits before proceeding.
- Deleted providers: if you later remove an account, the deleted provider no longer counts toward your subscription.
Troubleshooting
Only Some Accounts Connect
Discovery succeeds and the tree view appears, but only one account — or a handful — passes the connection test. This almost always means the ProwlerScan role reached the deployment account but not every member account.- Confirm the StackSet deployed. Open the CloudFormation Console in the deployment account, select your Prowler StackSet, open the Stack instances tab, and confirm every instance shows Status: CURRENT and Stack status: CREATE_COMPLETE. Instances still in progress or in a failed state explain the missing accounts.
- Check the targeted OU or root. The single stack only rolls the role out to accounts under the Organizational Unit or Root ID you entered in Step 2. Accounts in other OUs are not covered — redeploy targeting the organization root (
r-) or add the missing OUs. - Verify the deployment account. The role is created only in the account where you launched the stack. If you deployed from a delegated administrator account, confirm that account is a registered delegated administrator for CloudFormation StackSets (registered through AWS Organizations), not just a regular member account. A regular member account cannot create a service-managed StackSet, so only its own role is created — leaving every other account without the role.
- Suspended accounts cannot be scanned. Deselect them and proceed.
No Accounts Connect
No account passes the connection test.- External ID mismatch. Compare the ExternalId parameter in your StackSet with the External ID shown in the Prowler wizard. They must match exactly.
- StackSet not deployed. Confirm the StackSet exists and its instances reached CREATE_COMPLETE. If you deployed the roles manually, verify trusted access for CloudFormation StackSets is enabled.
- IP-based policies. If your accounts restrict access by IP, allow the Prowler Cloud egress IPs.
Authentication Fails or Times Out
“Authentication failed. Please verify the StackSet deployment and Role ARN” or “Authentication timed out”- Verify the deployment account role exists and is named exactly
ProwlerScan. - Confirm the trust policy includes the correct External ID from the wizard.
- Check the role has the Organizations discovery permissions listed in Deploy the Roles Manually.
- Double-check the Role ARN format and account ID for typos.
- Retry — the role can take up to 60 seconds to propagate, and a second attempt often succeeds. For very large organizations (500+ accounts), allow extra time for discovery.
Invalid Organization ID or Role ARN
“Must be a valid AWS Organization ID” or “Must be a valid IAM Role ARN”- Organization ID format:
o-followed by 10–32 lowercase alphanumeric characters (e.g.,o-abc123def4). - Role ARN format:
arn:aws:iam::<12-digit-account-id>:role/ProwlerScan. - Copy both directly from the AWS Console to avoid typos.
Failed to Apply Discovery
“Failed to apply discovery”- Check the
blocked_reasonsfield for any blocked accounts and retry the operation. - If the error persists, contact Prowler Support.
Deploy the Roles Manually
The wizard’s Create Stack button is the fastest path, but you can create both roles yourself — for example with Terraform or your own CloudFormation — and paste the management account Role ARN into Step 2. Both roles must be namedProwlerScan, since Prowler expects a consistent role name across all accounts.
Prefer Terraform? You can deploy the ProwlerScan role across the organization with Terraform instead of CloudFormation. See the StackSets deployment guide for the module.
Management Account Role
The management account role lets Prowler discover your Organization structure — listing accounts, OUs, and hierarchy — and scan the management account itself. StackSets with service-managed permissions do not deploy to the management account, so this role is always created separately from the member-account StackSet.- Sign in to the AWS IAM Console in your management account (or delegated administrator account).
- Go to Roles > Create role and select Custom trust policy.
- Paste the following trust policy, replacing
<YOUR_EXTERNAL_ID>with the External ID shown in the Prowler wizard:
- Attach the AWS managed policies SecurityAudit and ViewOnlyAccess so Prowler can scan the management account for security findings.
- Add an inline policy with the Organizations discovery permissions:
- Name the role
ProwlerScanand click Create role. The ARN follows the formatarn:aws:iam::<account-id>:role/ProwlerScan— paste it into the wizard.
Member Account Role (StackSet)
Deploy the ProwlerScan role to every member account with a CloudFormation StackSet, so you don’t create the role manually in each account.Trusted access required. CloudFormation StackSets must have trusted access enabled in your management account. Verify this under AWS Organizations > Settings > Trusted access for AWS CloudFormation StackSets.
- In your management account, navigate to CloudFormation > StackSets > Create StackSet (open directly).
- Choose Service-managed permissions so AWS Organizations deploys the role automatically across current and future member accounts.
- Select Amazon S3 URL as the template source and paste:
- Set the ExternalId parameter to the External ID shown in the Prowler wizard.
- Choose your deployment targets (entire organization or specific OUs) and regions, then click Create StackSet.
- Open the Stack instances tab and confirm every instance shows Status: CURRENT and Stack status: CREATE_COMPLETE. Deployment typically takes 2–5 minutes; large organizations (500+ accounts) may take longer.
SecurityAudit, ViewOnlyAccess, plus a small set of additional read-only permissions). Prowler makes no changes to your accounts. See the CloudFormation template for the full list. When you add new accounts under the targeted OU or root, the StackSet deploys the role automatically, and Prowler’s 6-hour sync onboards them end-to-end.
Key Concepts
What Is an External ID?
An External ID is a security token that Prowler generates unique to your tenant. When Prowler assumes the IAM role in your AWS account, it presents this External ID to prove its identity. This prevents the confused deputy problem — a scenario where an unauthorized party could trick AWS into granting access to your account. By requiring the External ID, only your specific Prowler tenant can assume the role. Prowler generates it automatically and displays it in the wizard for you to copy.Two Roles Architecture
Prowler uses two IAM roles, both namedProwlerScan but deployed in different places:
Both roles share the name
ProwlerScan because Prowler expects a consistent role name across all accounts. The single CloudFormation stack in Step 2 deploys both at once.

Both roles share the same name ProwlerScan. The management account role includes additional Organization discovery permissions.
What Is a CloudFormation StackSet?
A CloudFormation StackSet deploys the same CloudFormation template across multiple AWS accounts in a single operation. Prowler uses a service-managed StackSet to deploy the ProwlerScan IAM role into every member account of your organization, so you don’t create the role manually in each account. StackSets do not deploy to the management account, which is why that role is created separately.What’s Next
Prowler Cloud
Full guide to using Prowler Cloud features.
AWS Organizations (CLI)
CLI-based Organizations scanning and StackSet deployment with Terraform.
Bulk Provider Provisioning
Script-based bulk provisioning for advanced automation.